
Sharing a local development server, running a quick demo for a teammate, or testing a webhook integration usually means wrestling with tunneling tools, firewall changes, or deploying to a staging environment just so someone else can reach your endpoint.
NetBird v0.66 introduces the command, letting any connected peer expose a local HTTP or HTTPS service to the public internet through the NetBird reverse proxy with a single command. The service is ephemeral, it lives only while the command runs and cleans up automatically when you stop it. No dashboard clicks, no YAML files, no infrastructure changes.
How It Works
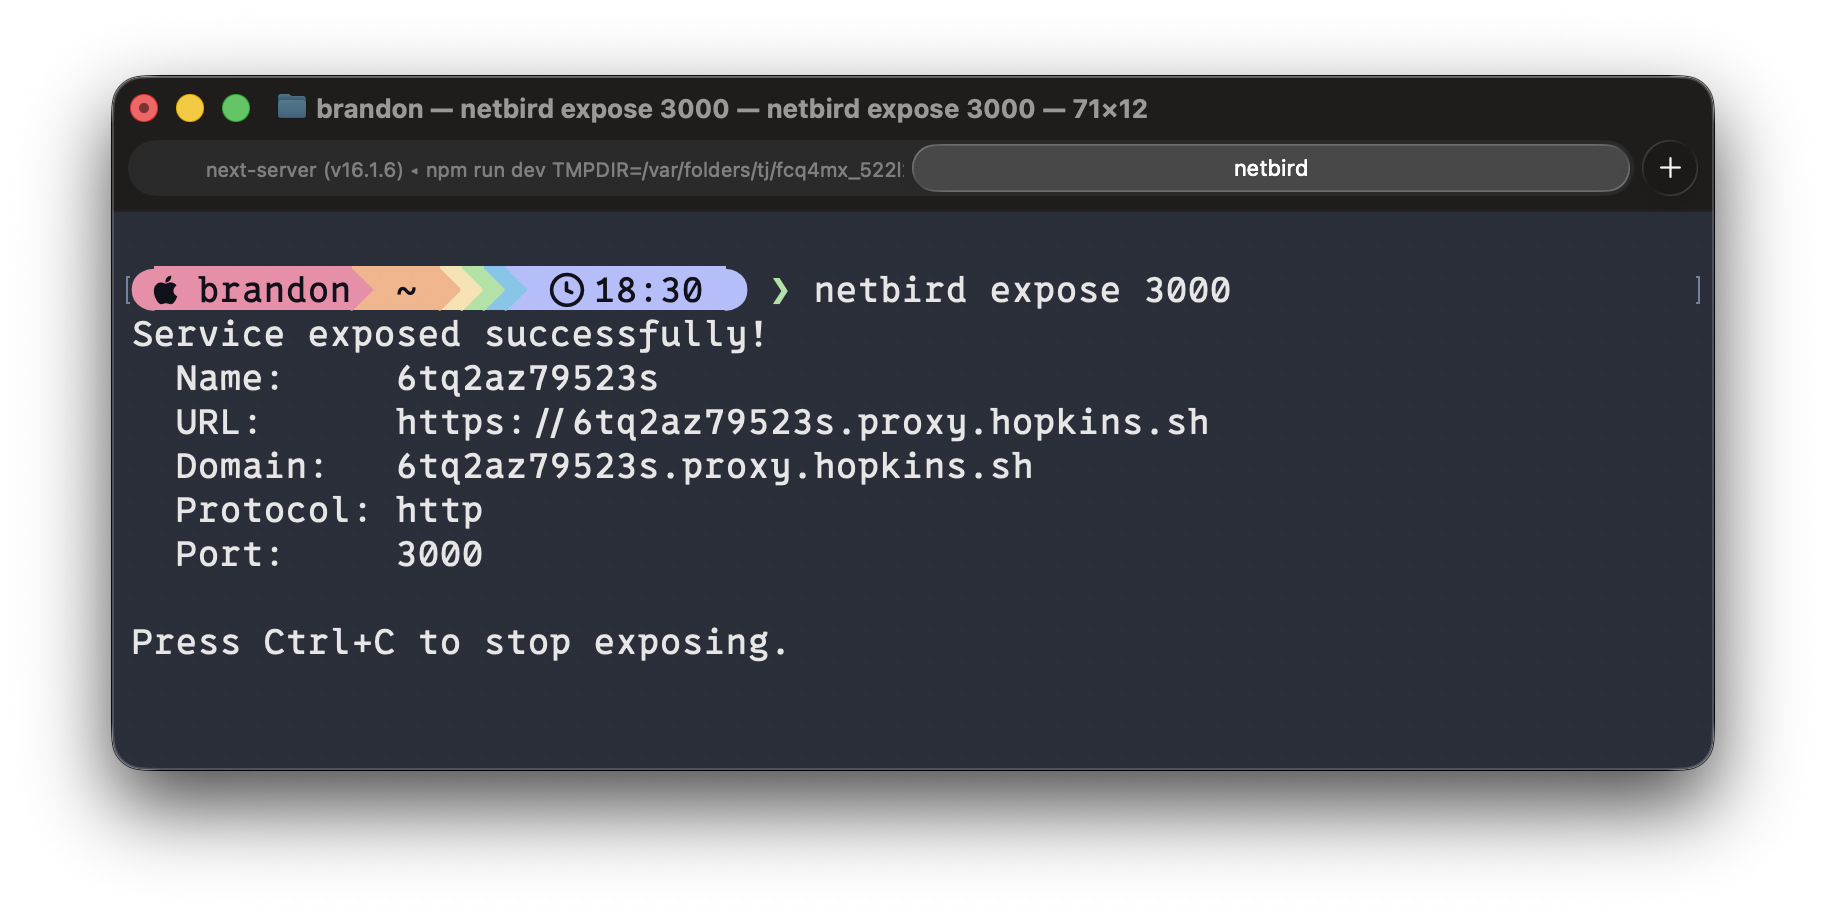
If you already have NetBird running, exposing a service is one command:
That's it. NetBird handles the rest: provisions a TLS certificate, assigns a public domain, and routes traffic through your NetBird reverse proxy to your local port. You get output like:
The service stays alive as long as the command runs. Press and it's gone, no orphaned configurations, no cleanup required.
Built-In Authentication
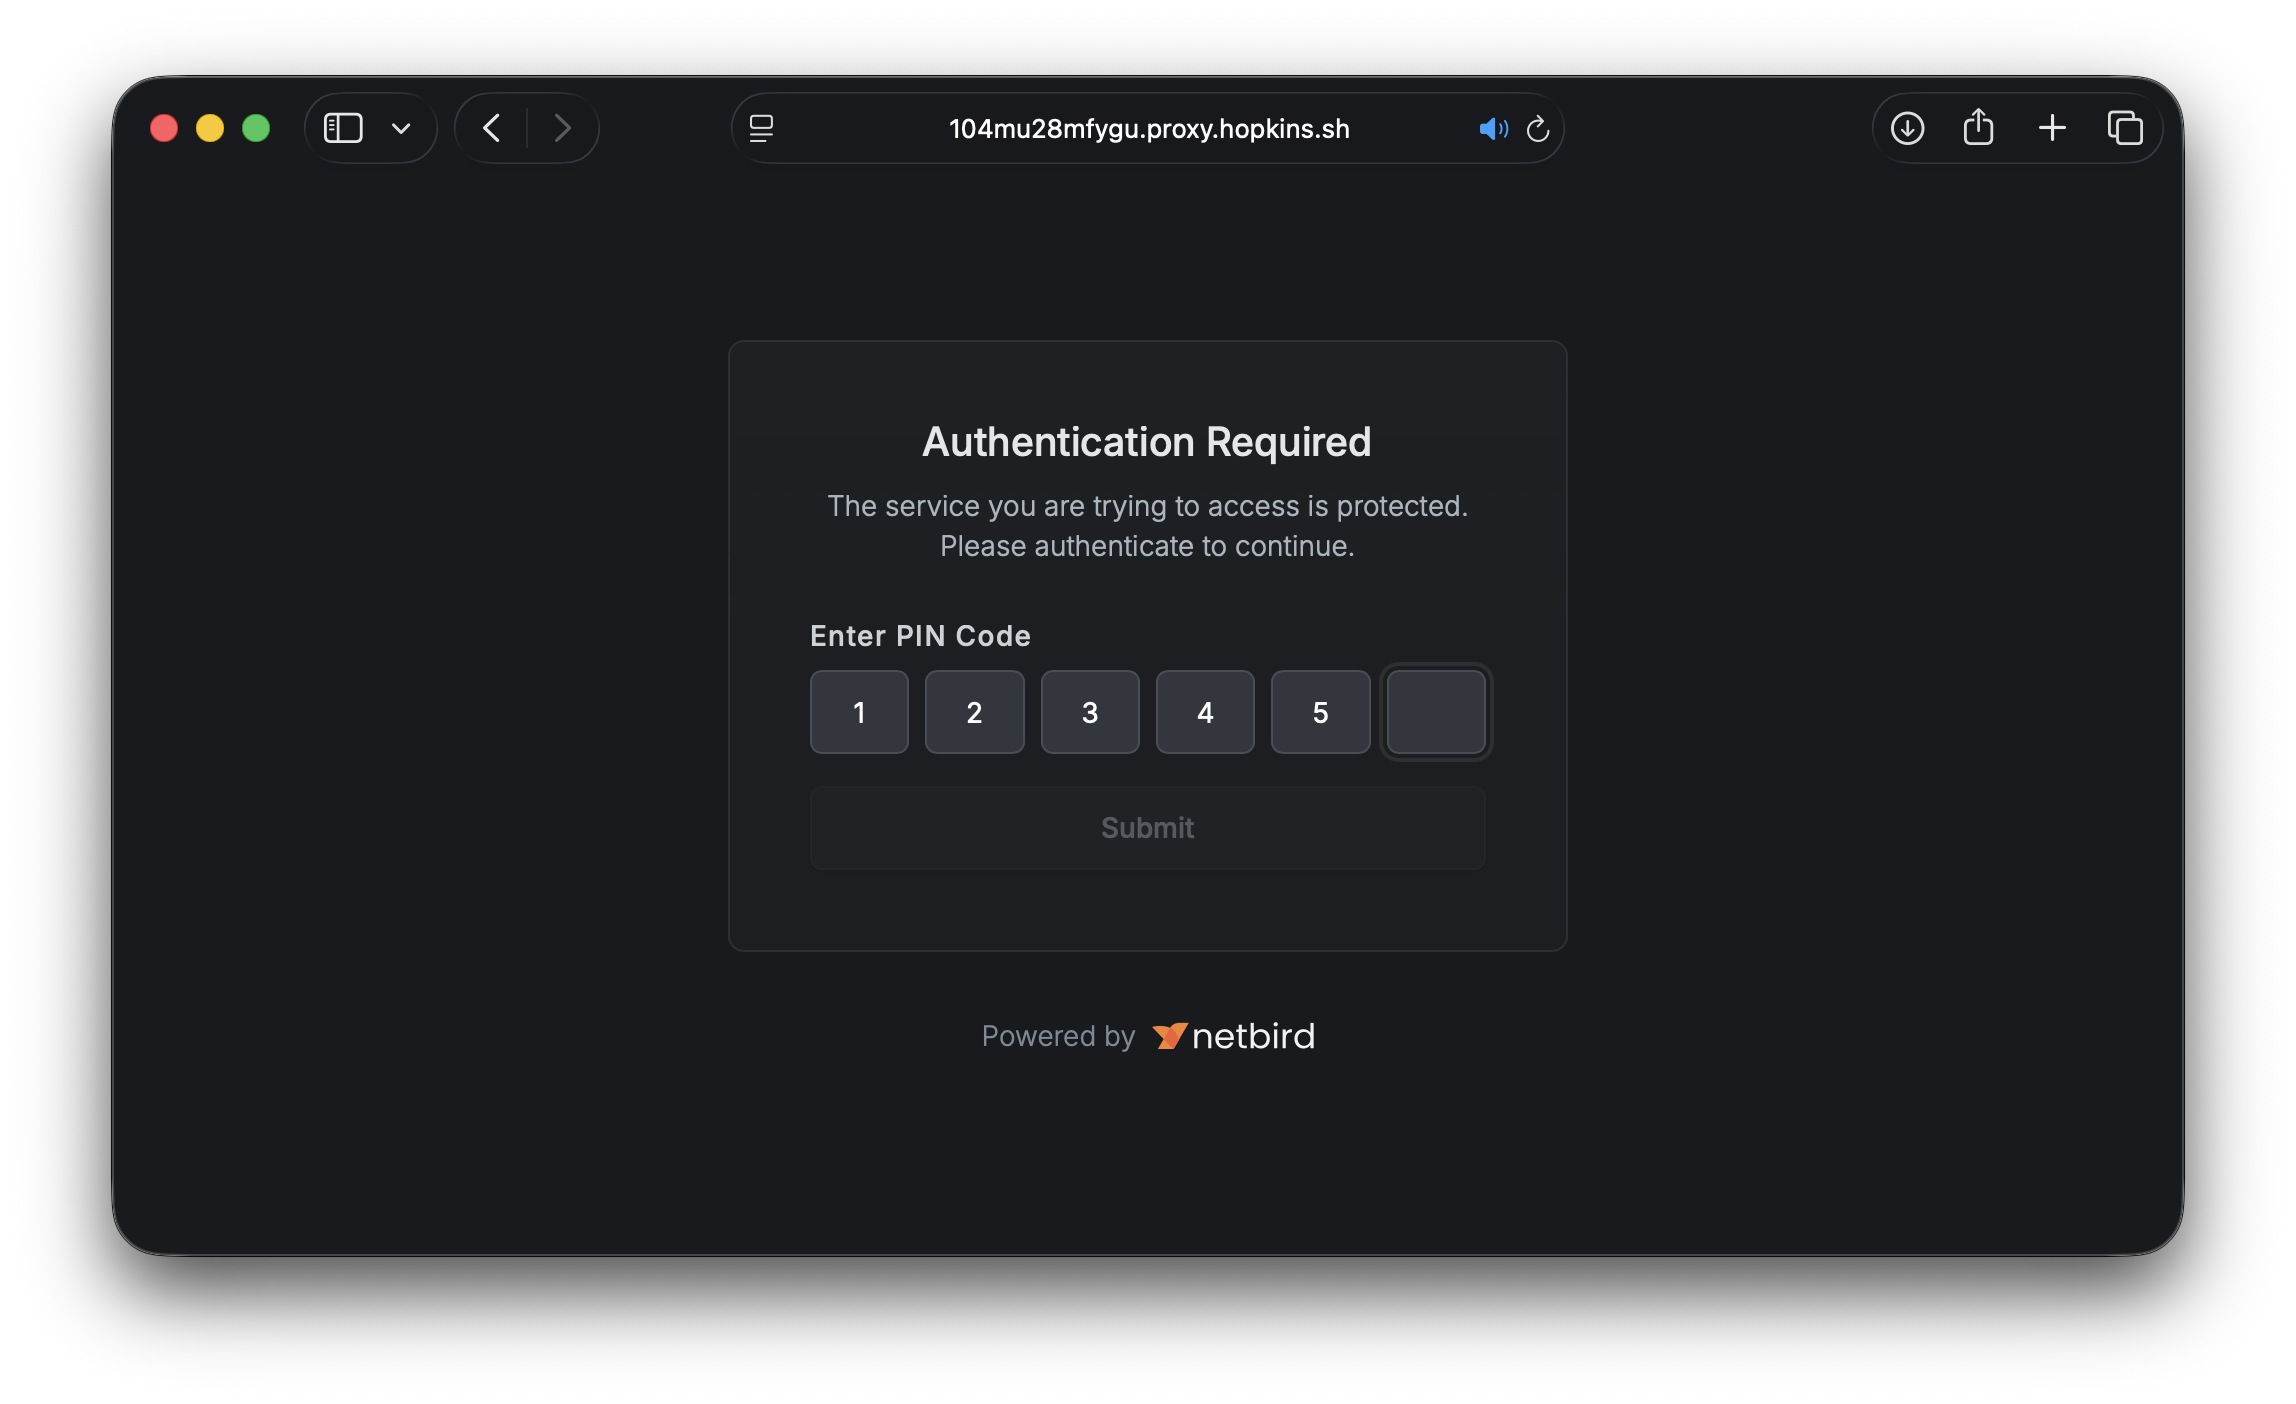
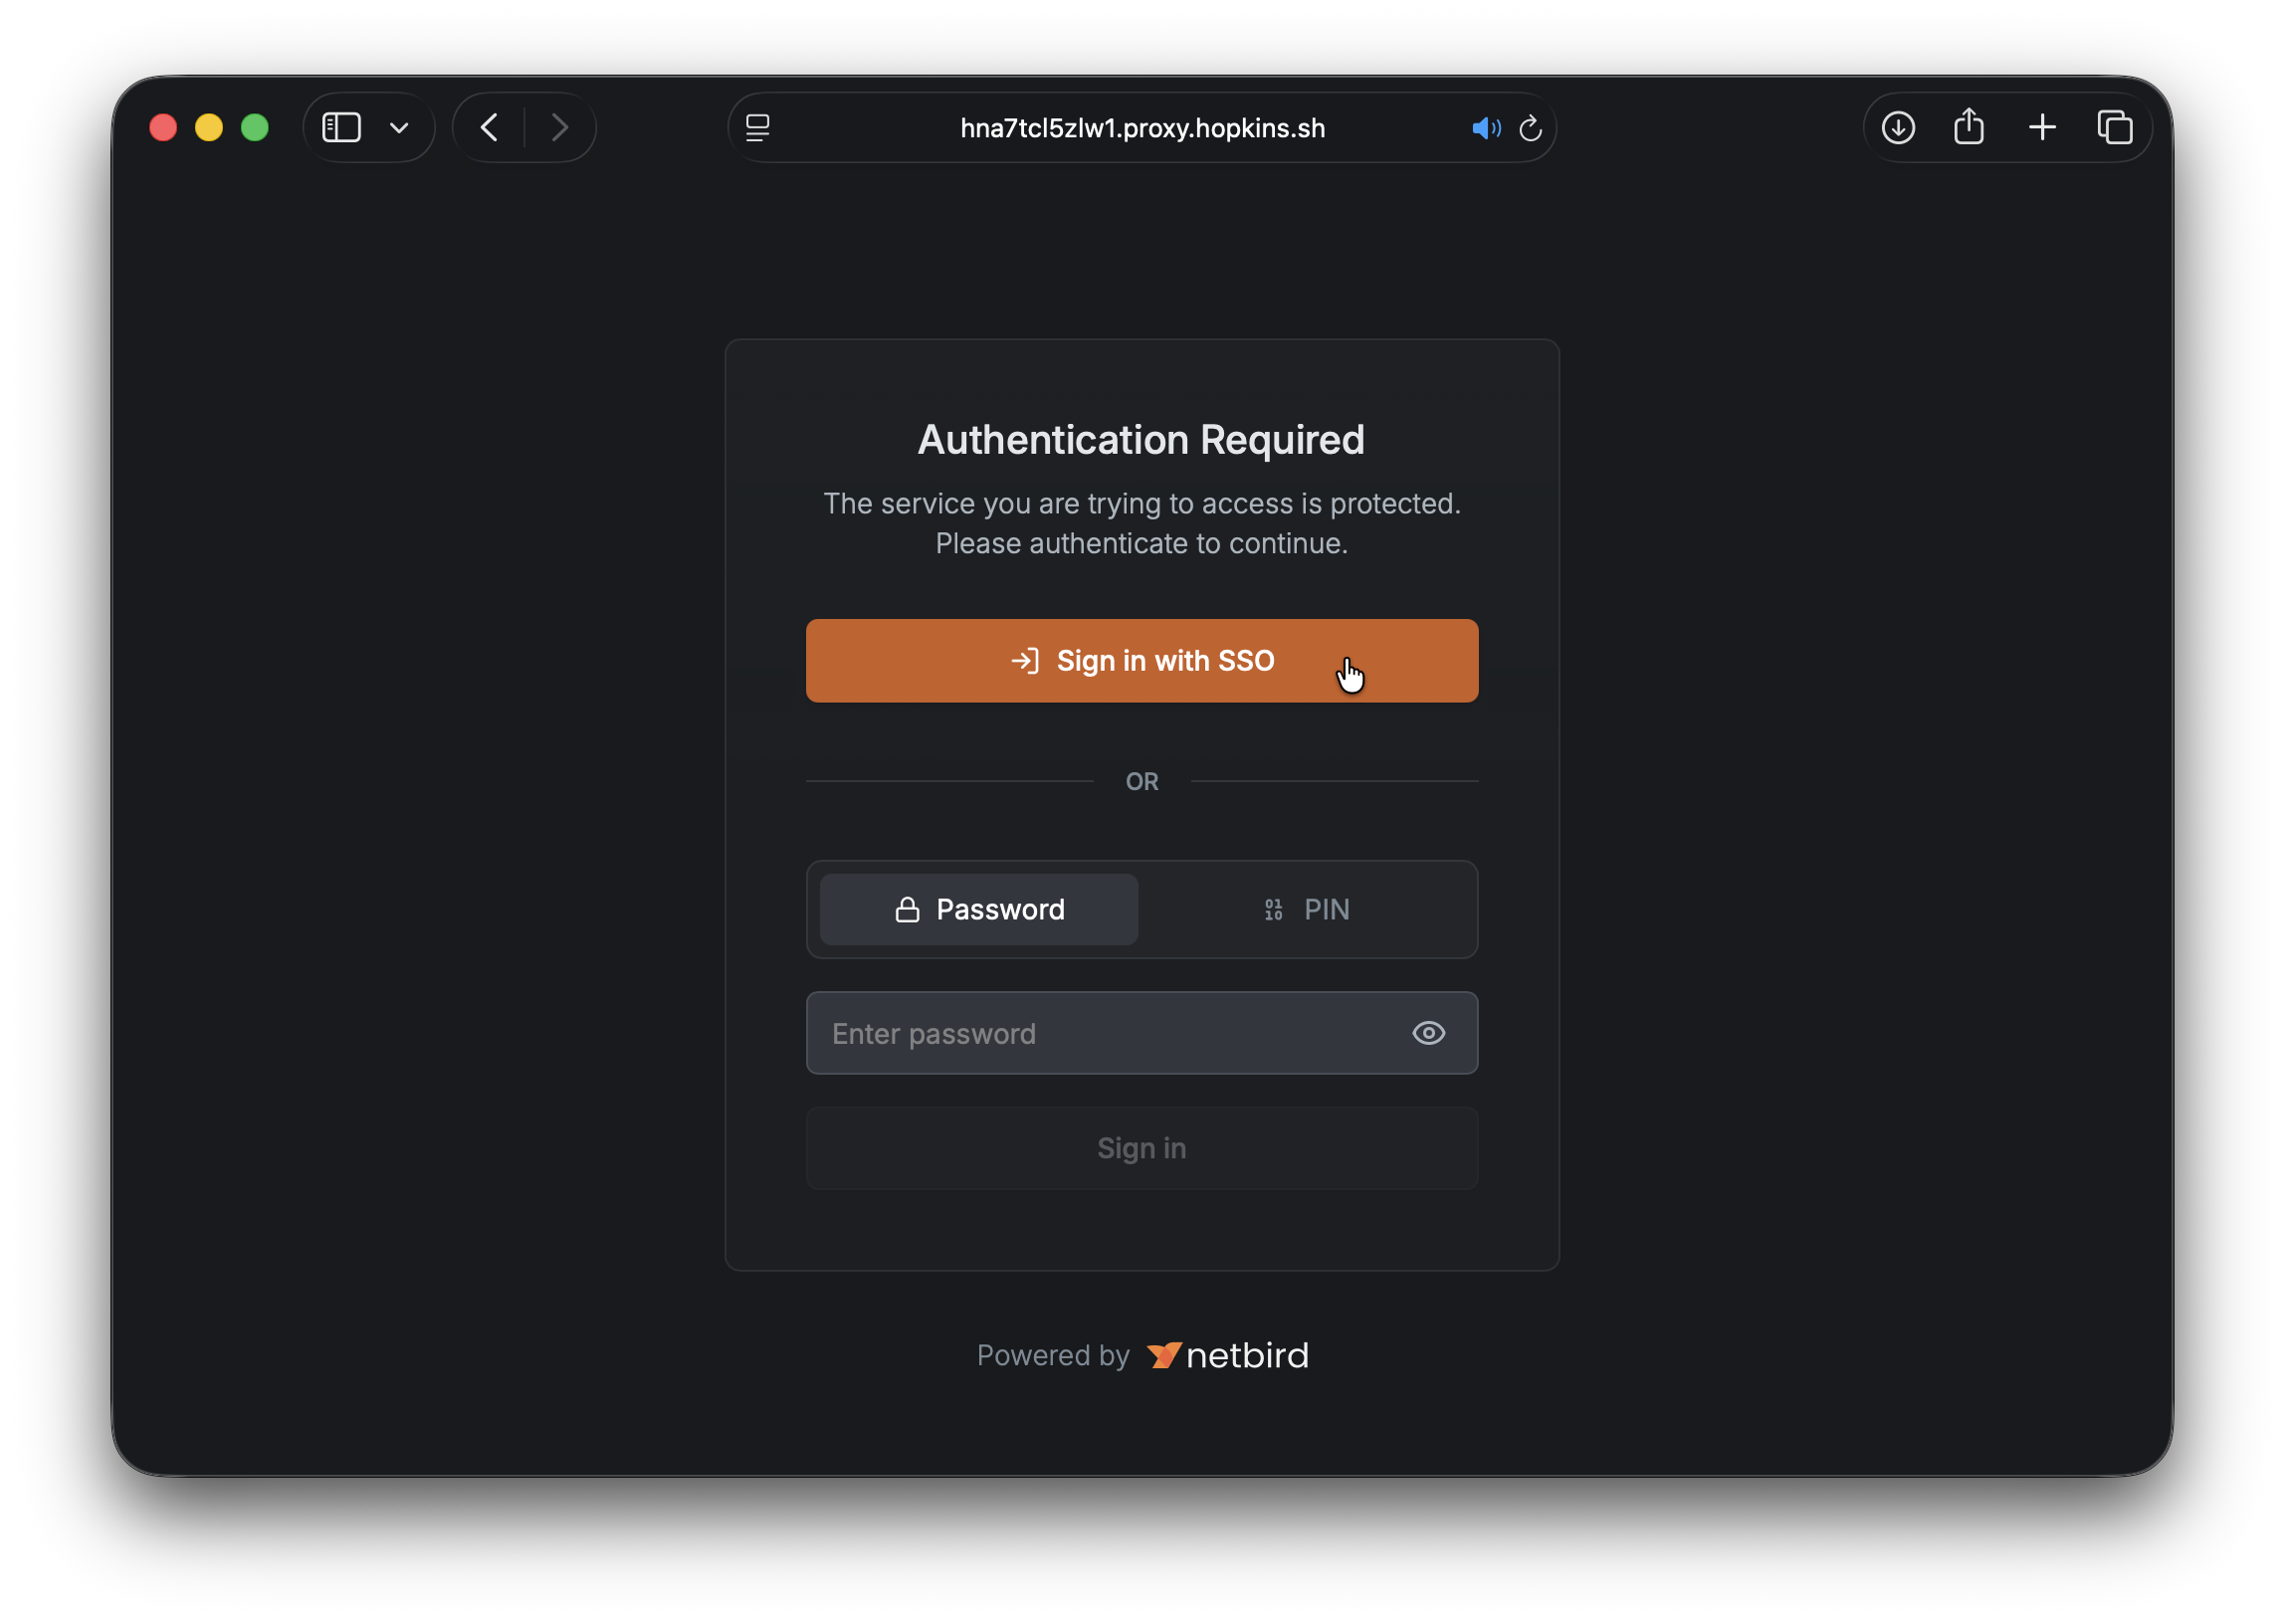
Exposing a port to the internet doesn't mean exposing it to everyone. The expose command supports three authentication methods you can mix and match directly from the CLI.
PIN Protection
Add a 6-digit PIN that visitors must enter before accessing the service:
Password Protection
Protect with a password for slightly more flexibility:
SSO User Group Restriction
Lock it down to specific groups from your identity provider:
Users must authenticate through your configured IdP and belong to one of the specified groups. This is ideal for team-internal sharing where you want SSO-level assurance without setting up a permanent service.
Combine Them
All methods can be combined. When multiple are enabled, visitors can choose which authentication method to use:
Custom Domains and Name Prefixes
By default, exposed services get a randomly generated subdomain. For more readable URLs, you have two options.
Name prefix adds a human-readable prefix to the generated domain:
Custom domain uses a domain you've already configured in your account:
Custom domains must be pre-configured and verified in your NetBird account before they can be used with the expose command. See the Custom Domains documentation for setup instructions.
Ephemeral by Design
Unlike services created through the dashboard, exposed services are intentionally temporary. Here's what that means in practice:
- Automatic cleanup: Stop the command and the service is immediately removed. No orphaned proxy configurations.
- Crash recovery: If the client disconnects unexpectedly (crash, network failure, ), the service automatically expires after 90 seconds.
- Keep-alive: The CLI sends a renewal signal every 30 seconds. The management server maintains a 90-second TTL that resets on each renewal.
- Rate limited: Each peer can run up to 10 concurrent expose sessions.
This lifecycle model means you never have to worry about forgotten services lingering in your infrastructure. Everything cleans itself up.
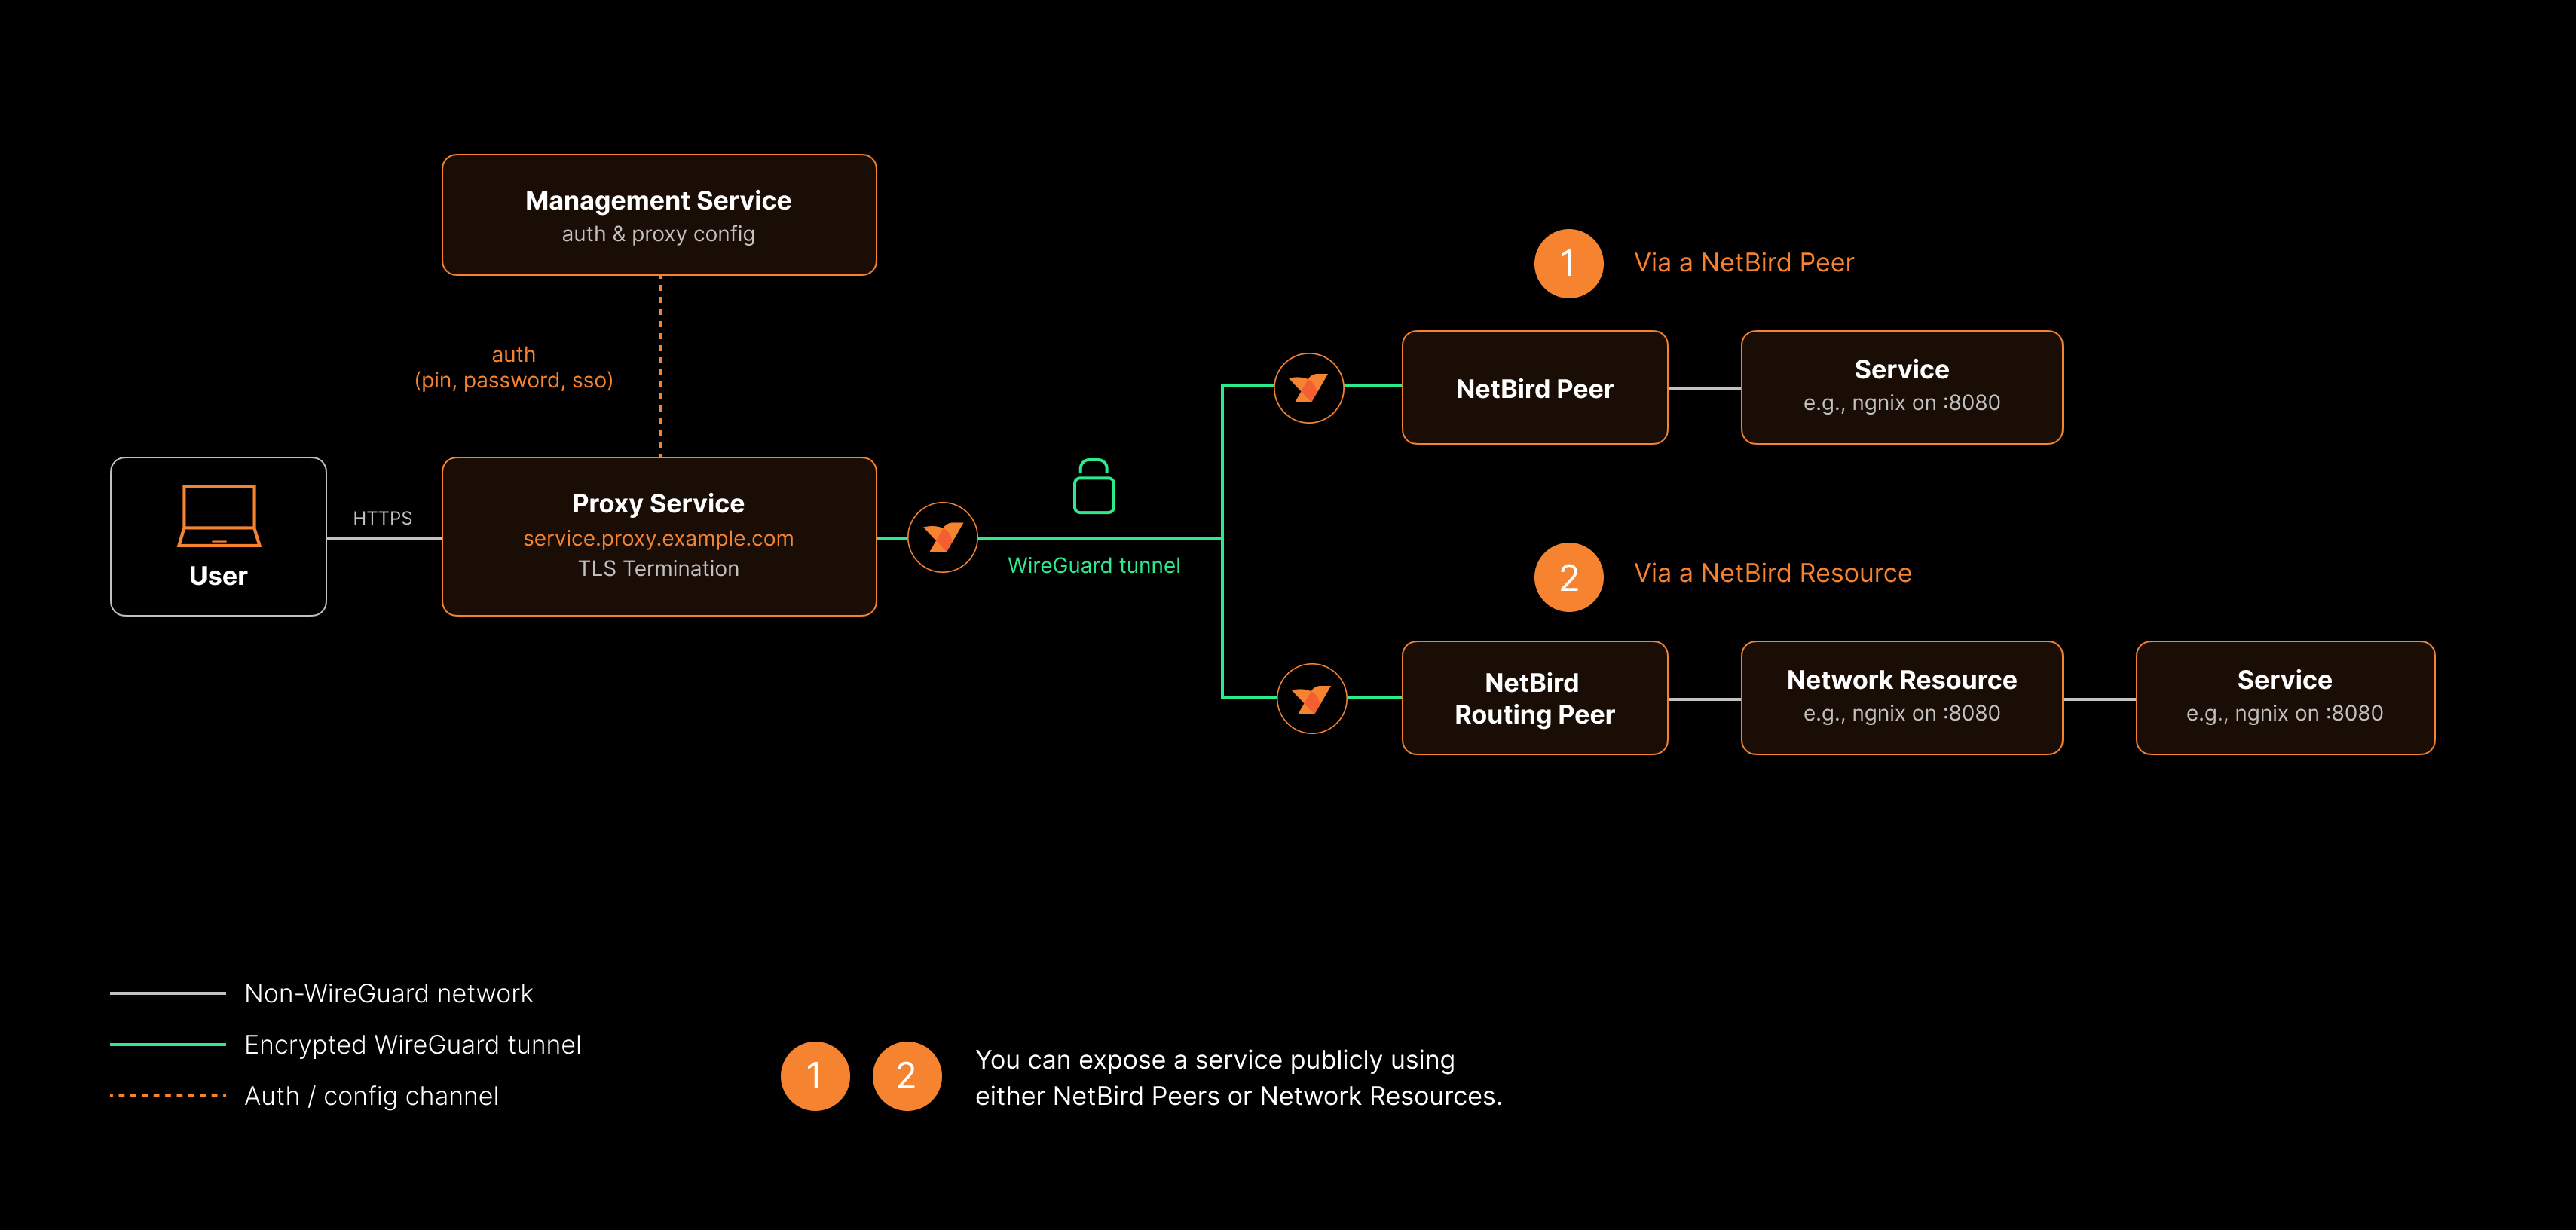
The above diagram is a high-level overview of how the NetBird reverse proxy functionality works. For more details, see the Built-in Reverse Proxy with Custom Domains product update.
Dashboard vs. CLI: When to Use Which
The expose command doesn't replace dashboard-created services. They serve different purposes:
| Dashboard Services | CLI Expose | |
|---|---|---|
| Lifecycle | Persistent | Ephemeral |
| Created via | Dashboard or API | command |
| Best for | Production services, long-running endpoints | Demos, dev sharing, testing, webhooks |
| Multiple targets | Yes (path-based routing) | Single local port |
| Advanced settings | Host headers, redirect rewriting | Not available |
Use the dashboard for anything that should be always-on. Use for everything temporary.
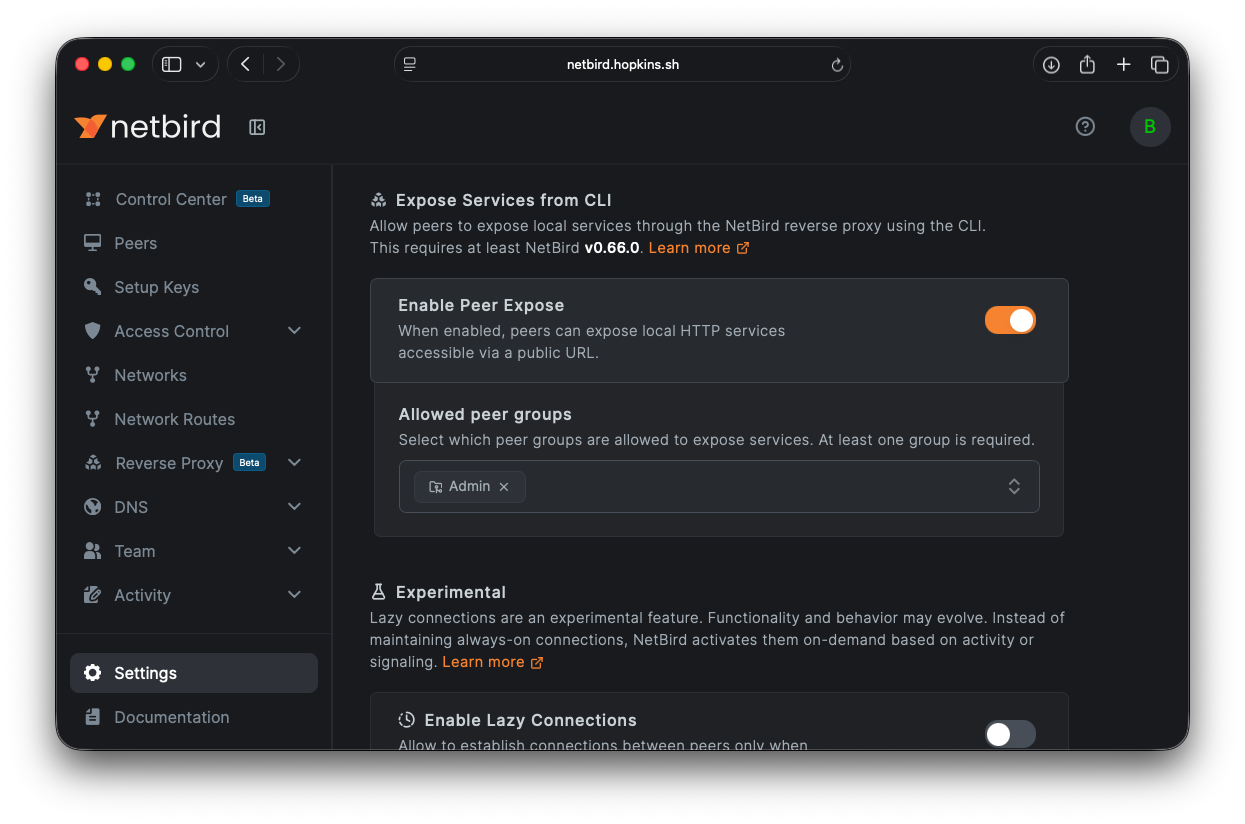
Enabling Peer Expose
Before peers can use the expose command, an account administrator needs to enable the feature:
- Navigate to Settings > Clients in the NetBird dashboard
- Scroll to the Peer Expose section
- Toggle Enable Peer Expose on
- Select at least one peer group that is allowed to expose services
- Click Save Changes
Or via the API:
Only peers belonging to the specified groups can use . Peers outside the allowed groups will receive a error.
Getting Started
- Update your NetBird client to v0.66 or later
- Make sure your NetBird client is connected ()
- Ask your account administrator to enable Peer Expose in Settings > Clients
- Run and share the URL
For the full command reference, authentication details, session lifecycle, and troubleshooting, check out the Expose from CLI documentation .
- Try NetBird: Get started at netbird.io/pricing
- Learn more: Read the full Expose from CLI documentation
- Join the community: Star us on GitHub · Follow us on X