
How to Access Windows Shared Folders from Anywhere with NetBird
Accessing files on a Windows machine remotely typically requires exposing ports to the internet, setting up a traditional VPN, or relying on third-party cloud sync services. This can introduce security risks, configuration complexity, or dependency on external platforms.
NetBird offers a different approach. By creating a WireGuard-based mesh network with zero-trust access controls, you can securely access your Windows file shares from anywhere without opening ports or exposing services to the public internet.
This guide covers two methods for remote file share access:
- Direct peer-to-peer: Install NetBird on both the Windows host and your client device for end-to-end encrypted access
- Routing peer: Use an existing NetBird node (like a Raspberry Pi) to route traffic to Windows machines on your LAN without installing NetBird on each one
Prerequisites
- A Windows machine with files you want to share
- A NetBird account (free tier available at netbird.io )
- For the routing peer method: a device on the same network as the Windows machine with NetBird installed
Understanding SMB and Port Requirements
Windows file sharing uses the Server Message Block (SMB) protocol over TCP port 445. When configuring NetBird access policies later in this guide, you'll restrict access to this specific port rather than allowing all traffic between peers.
Legacy Windows systems may also use port 139 (NetBIOS), but modern Windows networking relies primarily on port 445.
Configure the Windows Share
Before setting up NetBird, configure the folder you want to share on your Windows machine.
Step 1: Enable File Sharing
- Open Settings → Network & Internet → Advanced network settings
- Click Advanced sharing settings
- Under your current network profile, enable:
- Network discovery
- File and printer sharing
Step 2: Share a Folder
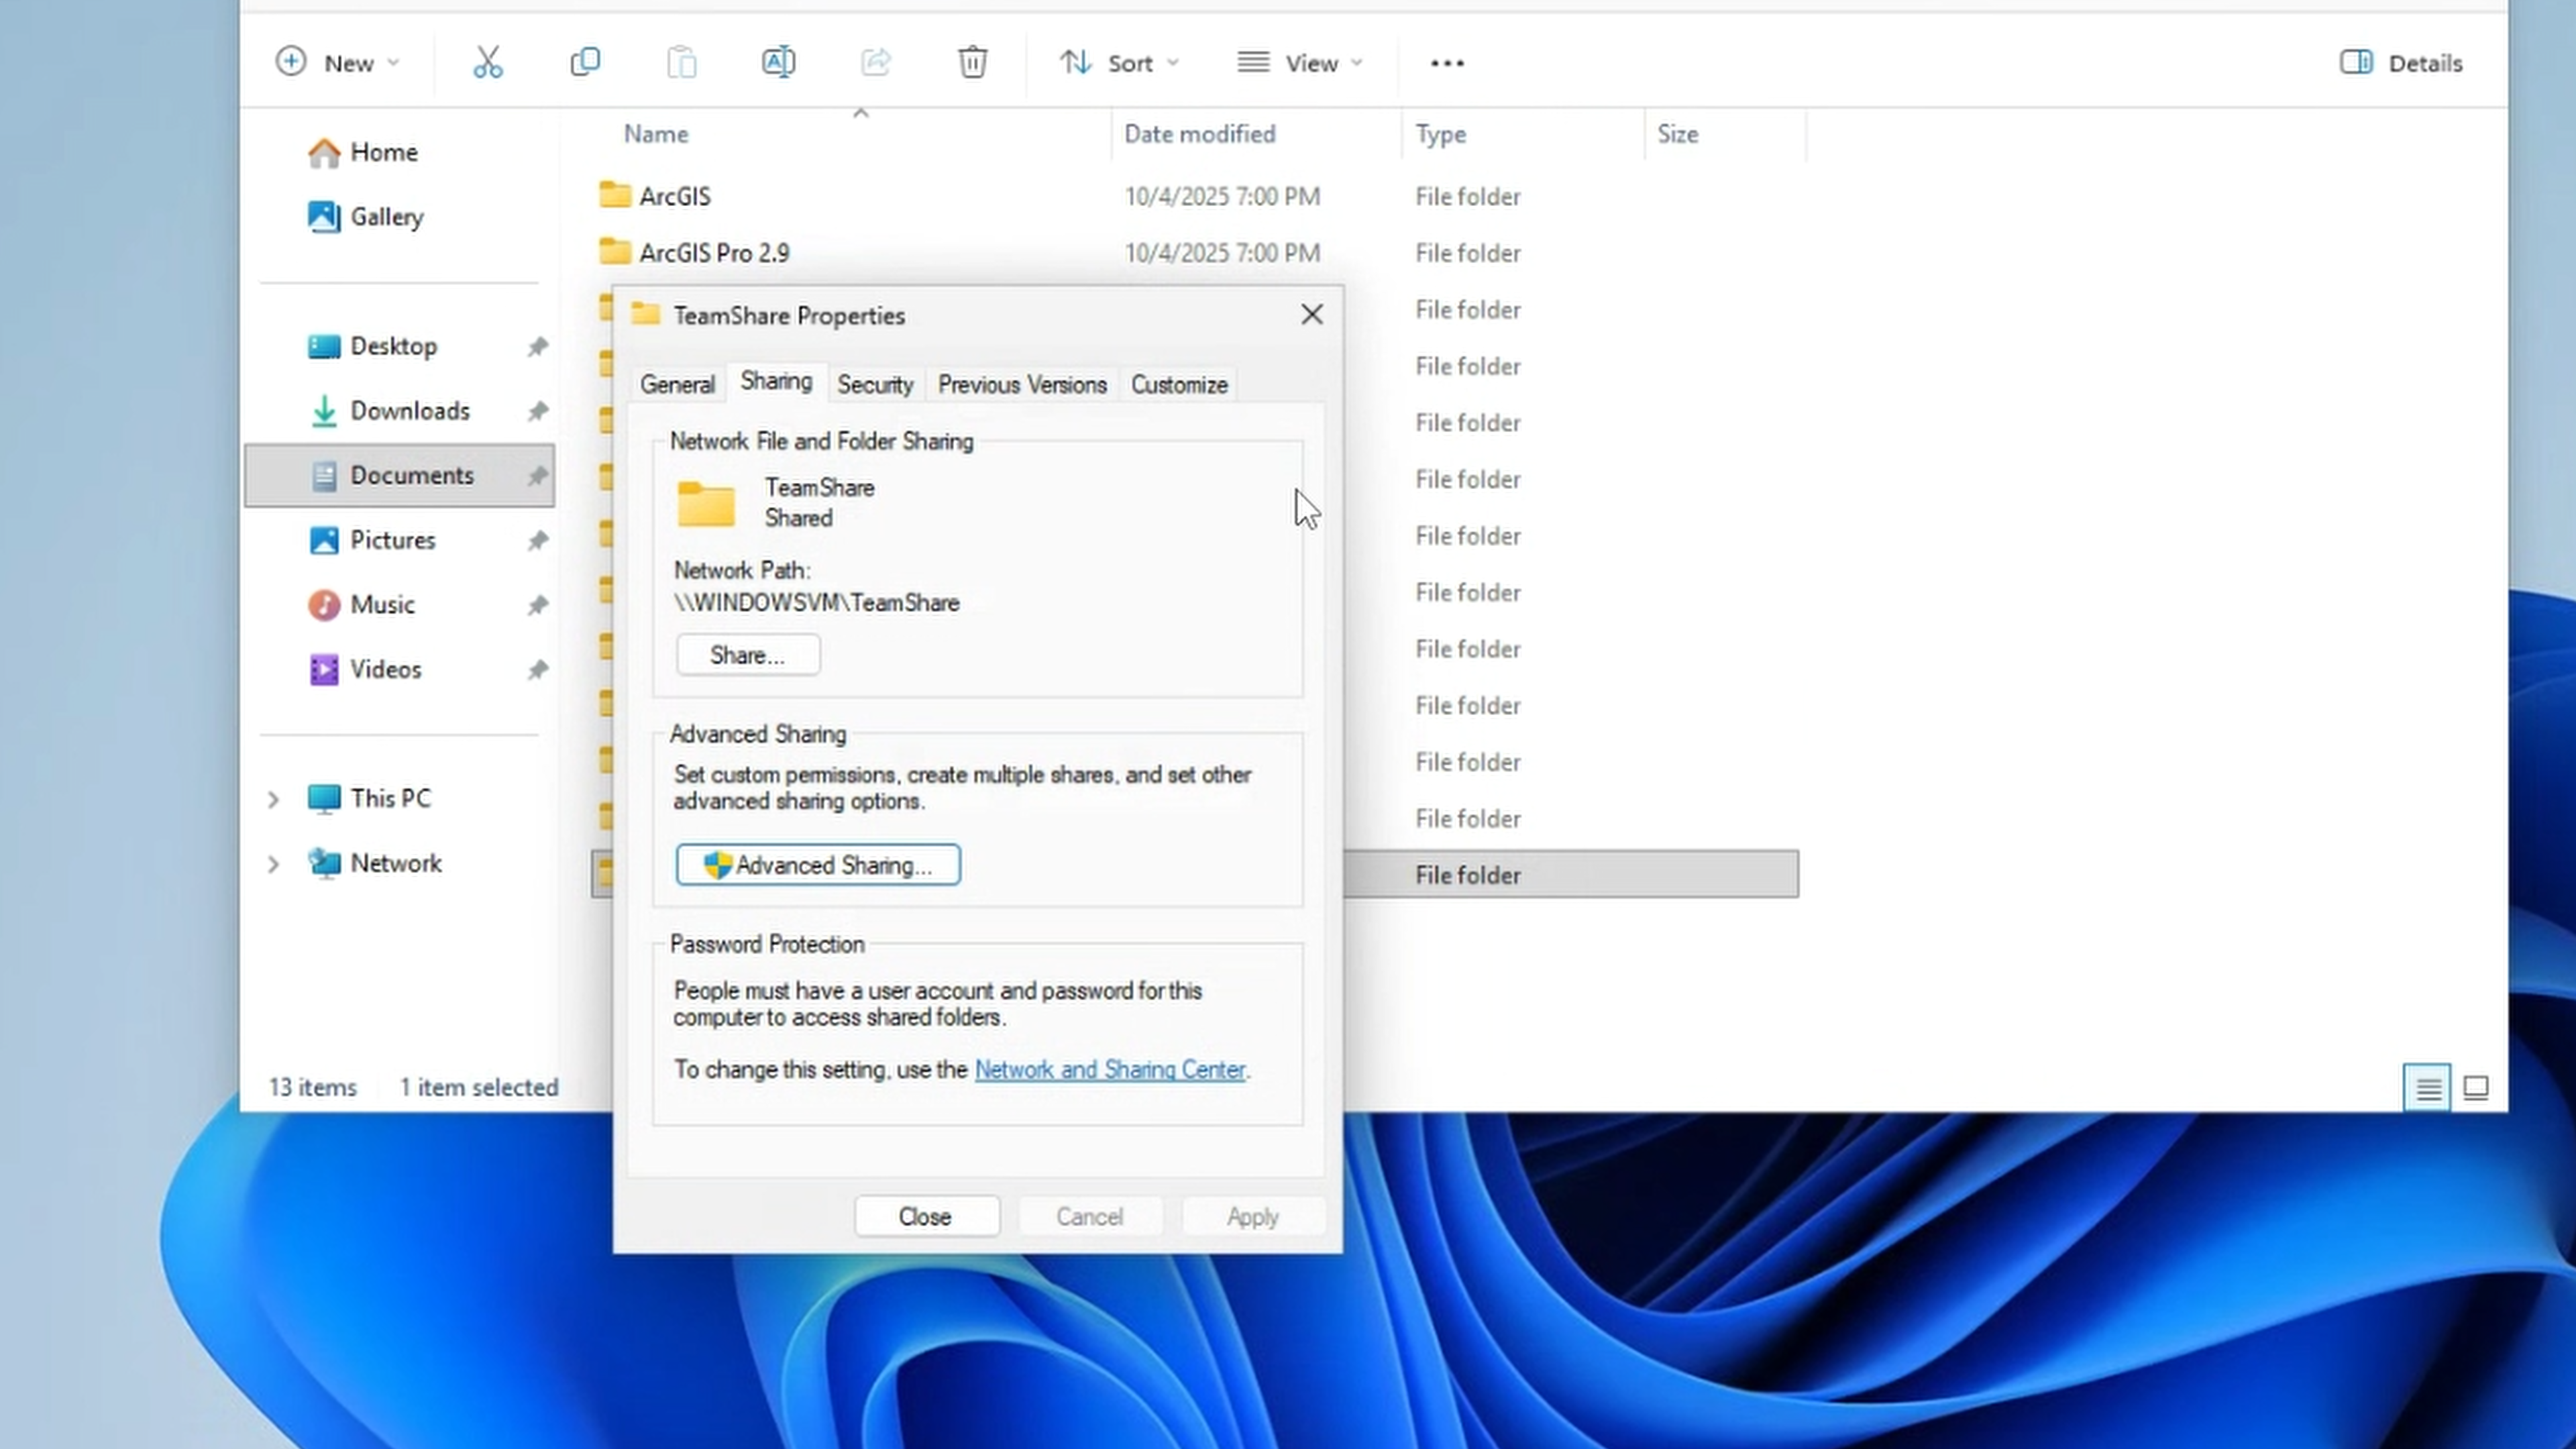
- Right-click the folder you want to share and select Properties
- Navigate to the Sharing tab
- Click Share...
- Add users who should have access.
- Set permission levels (Read or Read/Write)
- Click Share and note the network path displayed (e.g., )
Step 3: Note Your Computer Name or IP
You'll need either:
- The computer name shown in the share path
- The local IP address (run in Command Prompt and look for your IPv4 address)
For the direct peer-to-peer method, you'll use the NetBird-assigned IP instead. For the routing peer method, you'll use the local LAN IP.
Direct Peer-to-Peer Method
This method installs NetBird directly on the Windows machine hosting the share. Both devices connect through an encrypted WireGuard tunnel with no intermediary.
Step 1: Install NetBird on Windows
- Log in to your NetBird dashboard at app.netbird.io
- Navigate to the installation page or download the Windows installer directly
- Run the installer and complete the setup
- Click the NetBird icon in the system tray and select Connect
- Complete authentication in your browser
Once connected, your Windows machine appears in the NetBird dashboard under Peers. Note the assigned NetBird IP (typically in the range).
Step 2: Install NetBird on Your Client Device
Repeat the installation process on the device you'll use to access the share remotely:
For platform-specific instructions, see the NetBird installation documentation .
Step 3: Create an Access Policy
By default, NetBird creates a permissive policy allowing all peers to communicate. For better security, create a specific policy for file share access. Learn more about groups and access policies .
- In the NetBird dashboard, go to Access Control → Groups
- Create two groups:
- — for your Windows machine
- — for devices that should access the share
- Assign your Windows peer to
- Assign your client devices to
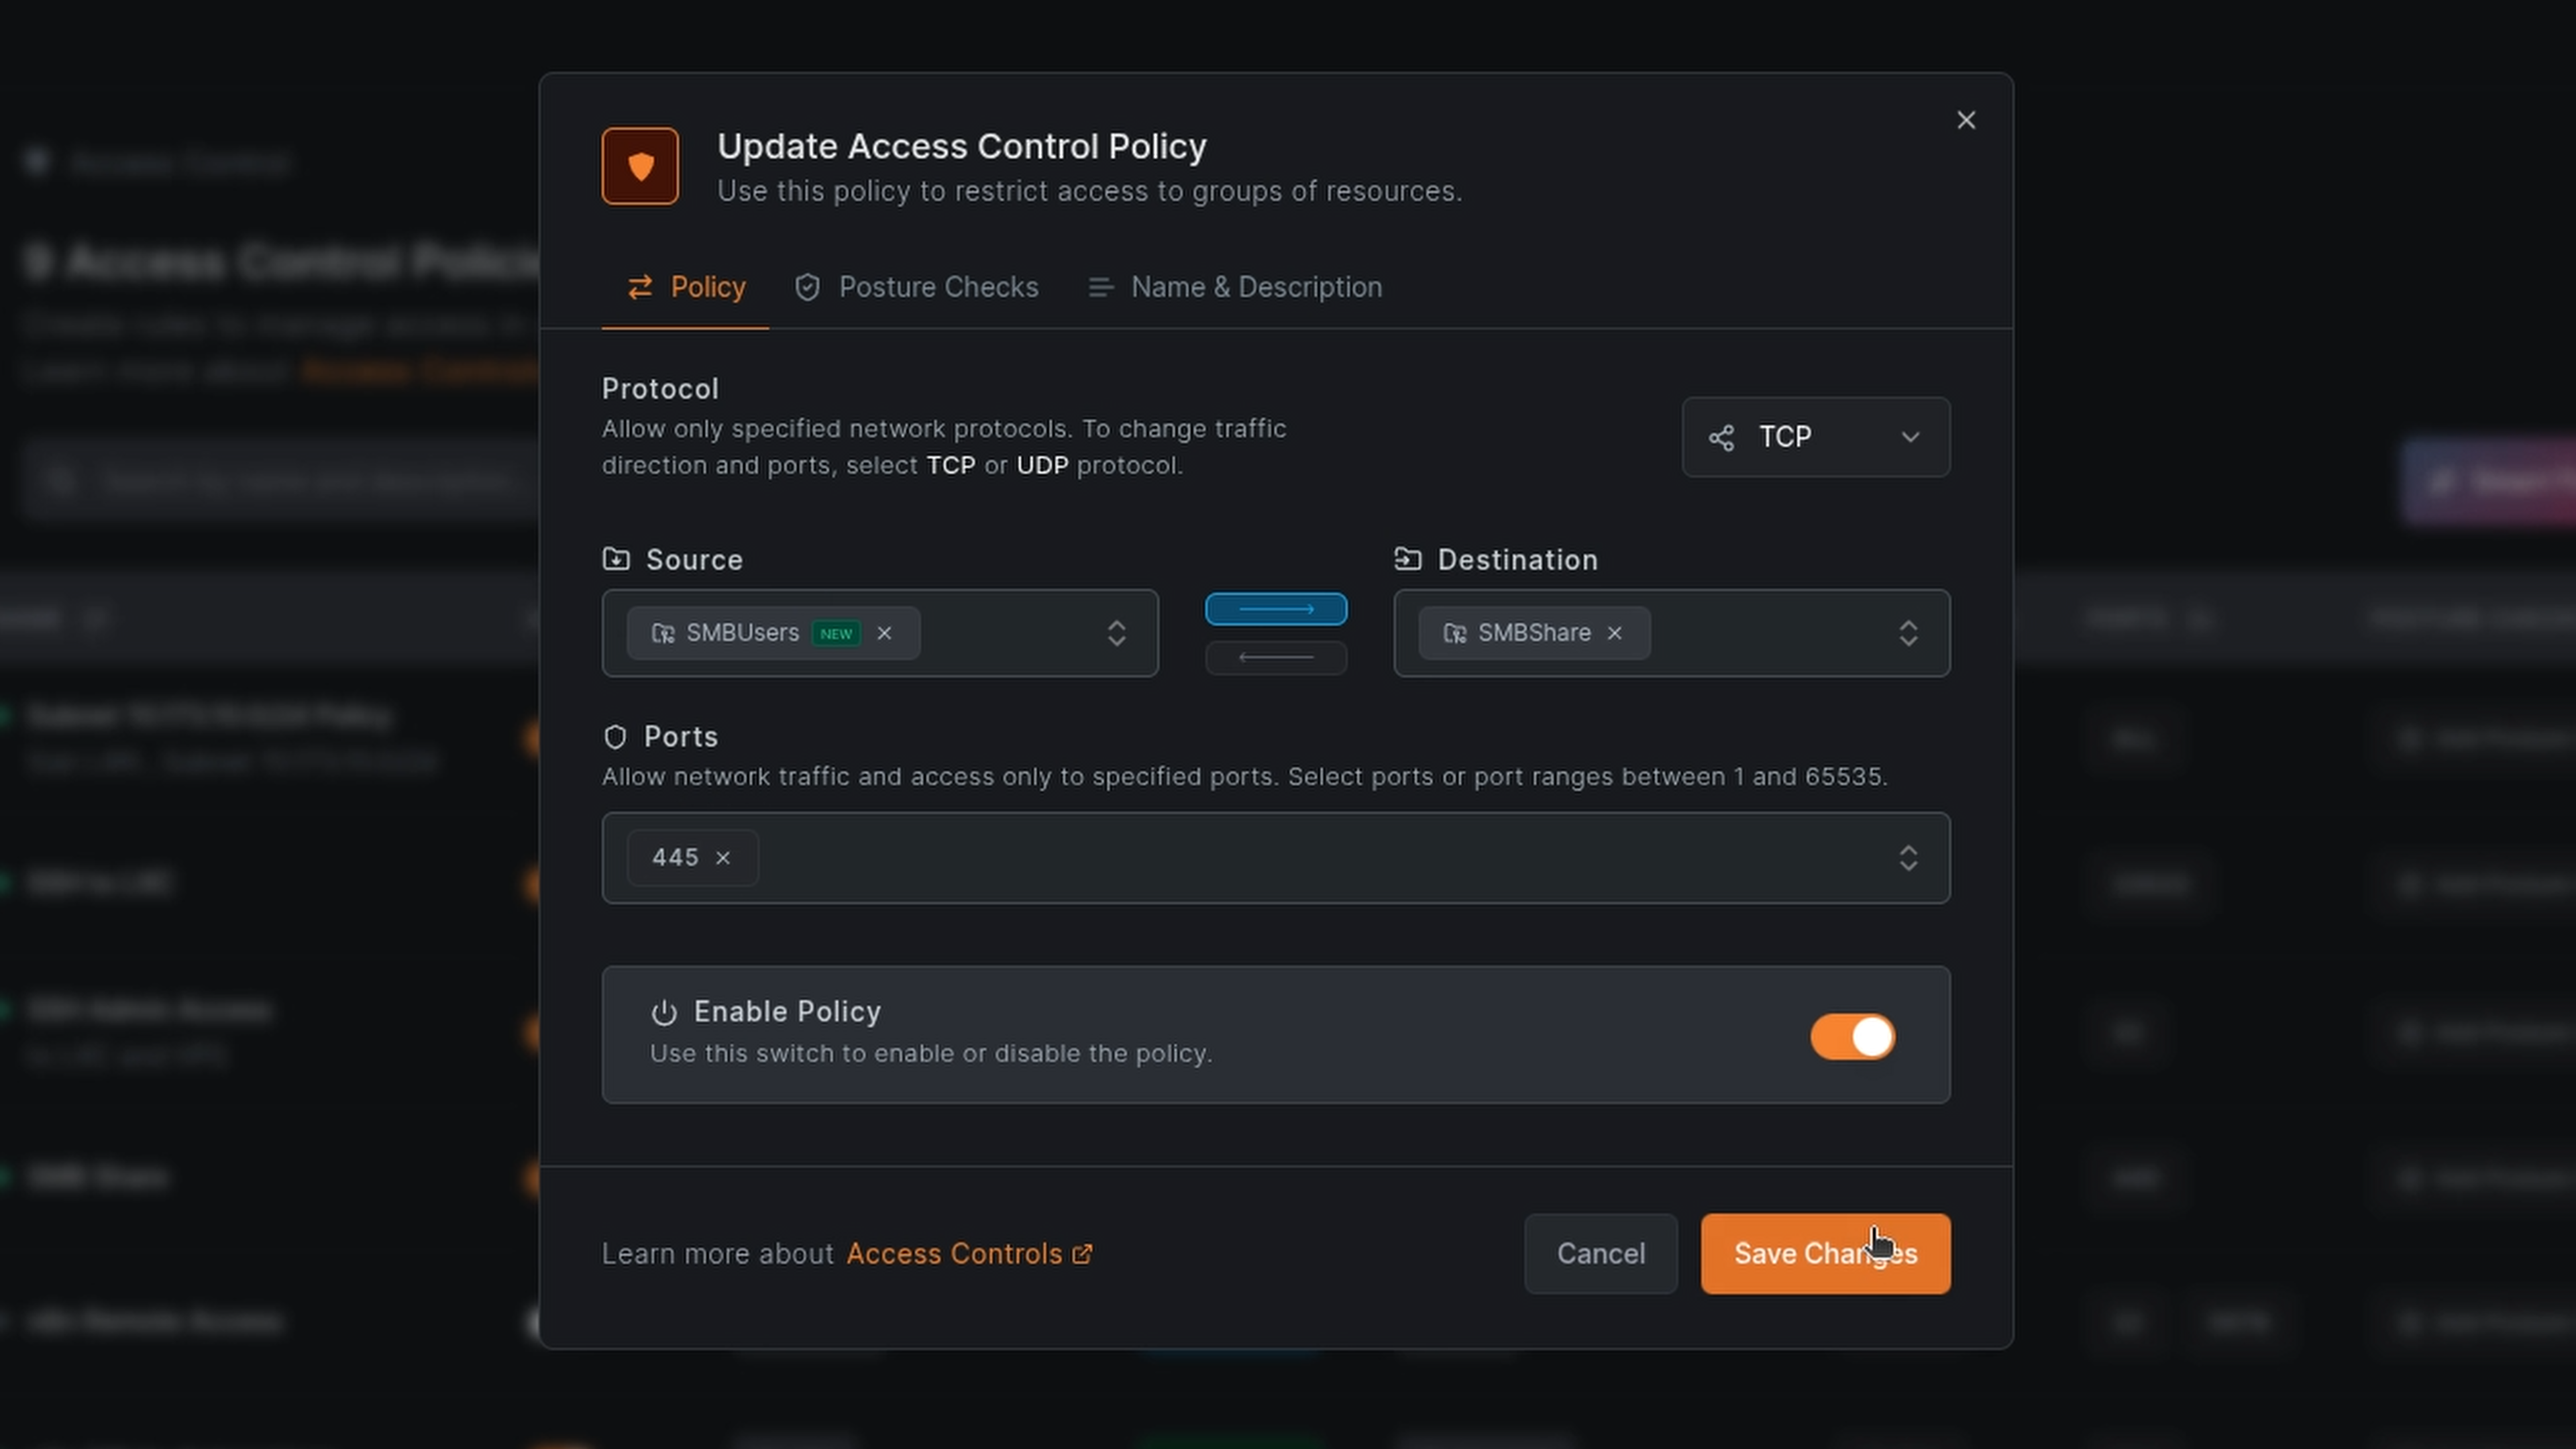
- Navigate to Access Control → Policies
- Click Add Policy and configure:
- Name: Windows File Share Access
- Source:
- Destination:
- Protocol: TCP
- Port: 445
- Direction: Source → Destination (unidirectional)
This policy allows only devices in the clients group to initiate SMB connections to the Windows host. The Windows machine cannot initiate connections back to client devices on this port.
Step 4: Access the Share
From your client device, connect to the share using the Windows machine's NetBird IP (not its local LAN IP):
Windows client:
Or open File Explorer and type the path in the address bar.
macOS:
- Open Finder
- Press or go to Go → Connect to Server
- Enter:
- Enter credentials when prompted
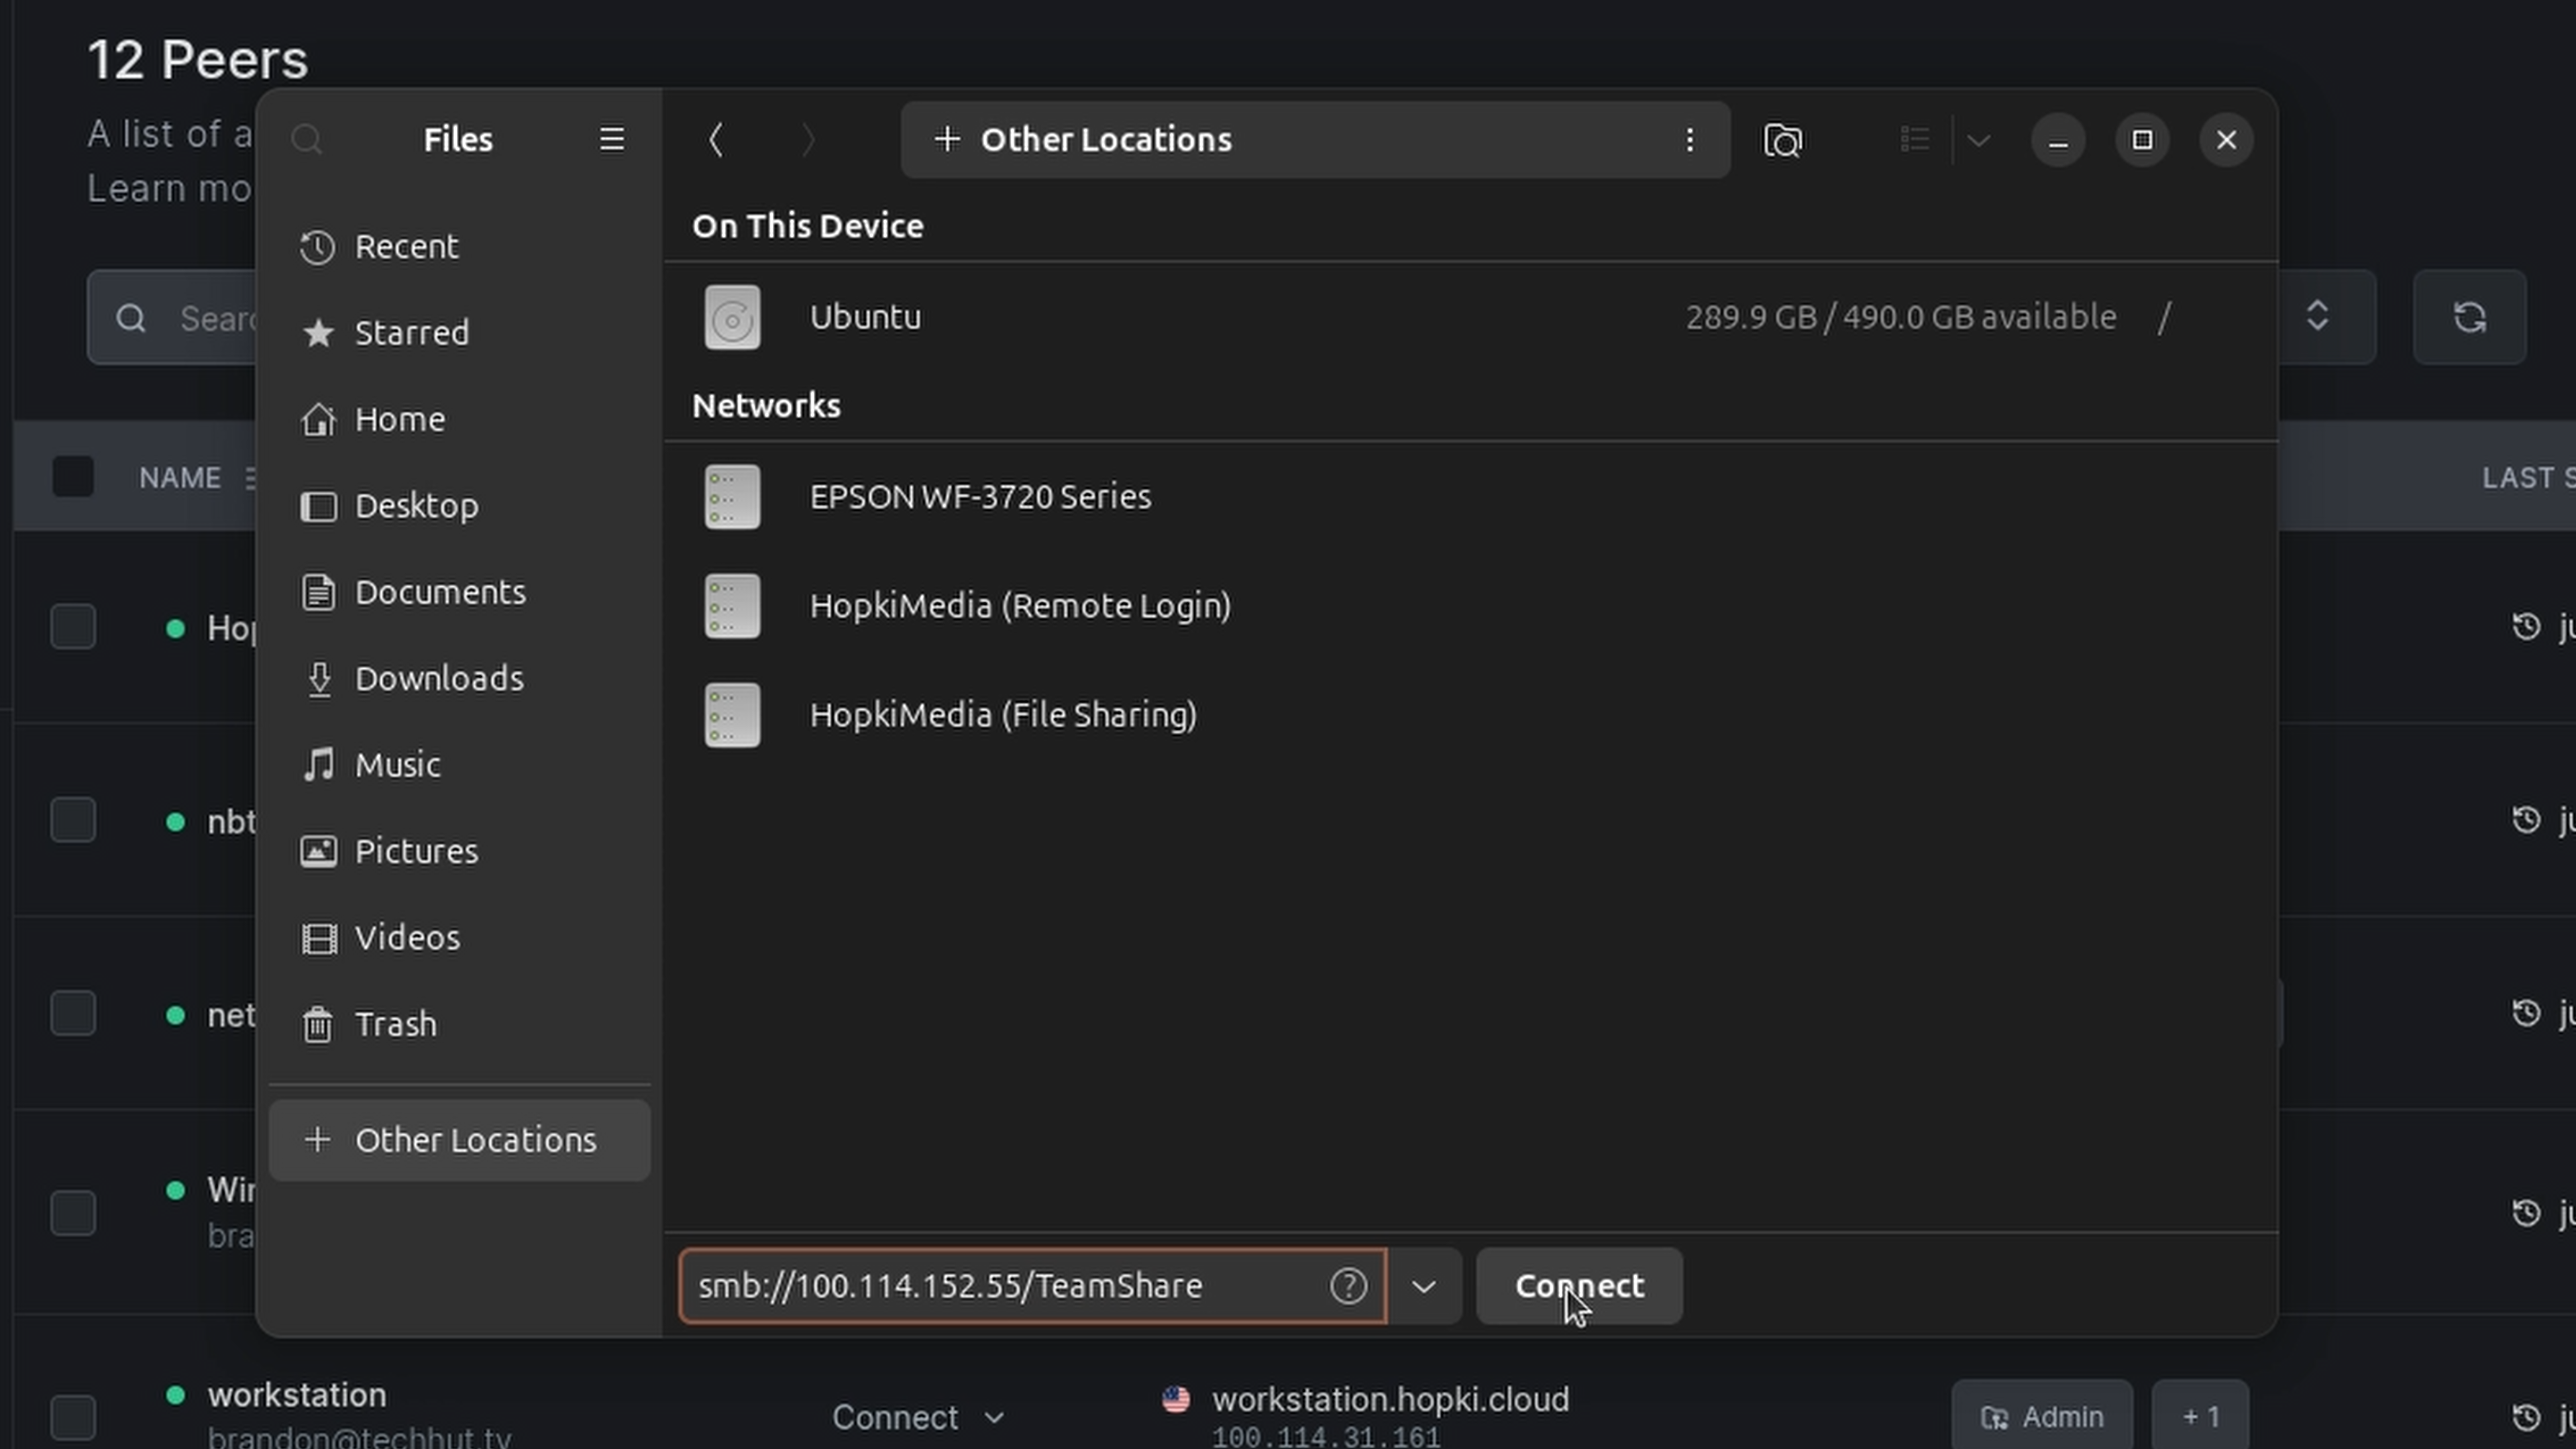
Linux:
Replace with your Windows machine's actual NetBird IP shown in the dashboard.
Routing Peer Method
If you already have a NetBird node running on your network, you can use it as a routing peer to access resources on your LAN without installing NetBird on each machine.
This approach is useful when:
- You want to access multiple devices without individual NetBird installations
- You can't or prefer not to install software on the Windows machine
- You're managing a homelab with many resources
How It Works
The routing peer sits on your LAN and advertises a route to your local subnet through NetBird. When a remote client wants to access (your Windows machine's LAN IP), traffic flows:
- Client → NetBird tunnel → Routing peer
- Routing peer → Local network → Windows machine
The Windows machine sees connections coming from the routing peer's LAN IP, not from NetBird IPs.
Step 1: Set Up the Routing Peer
If you don't already have a NetBird peer on your network, check out the installation documentation . Then login with SSO or generate a setup key from the NetBird dashboard under Setup Keys for headless installation.
Step 2: Create a Network
NetBird's Networks feature (available in version 0.35.0+) replaces the older Network Routes and provides better resource management.
- In the NetBird dashboard, go to Networks
- Click Add Network
- Enter a name (e.g., "Home LAN")
- Click Add Resource:
- Name: Home Subnet
- Address: Your LAN CIDR (e.g., )
- Group: Create or select a destination group (e.g., )
- Click Add Routing Peer:
- Select your Linux device
- Enable Masquerade (recommended—hides NetBird IPs behind the routing peer's local address)
Step 3: Create an Access Policy for the Network
- Go to Access Control → Policies
- Click Add Policy:
- Name: Home LAN SMB Access
- Source: Your client devices group
- Destination: (the group assigned to your network resource)
- Protocol: TCP
- Port: 445
Step 4: Access the Share
From your remote client device (connected to NetBird), access the Windows share using its local LAN IP:
Windows client:
macOS:
Linux:
The routing peer handles forwarding traffic between the NetBird mesh and your local network.
Windows Considerations for Always-On Access
Unlike a dedicated server, a typical Windows desktop may enter sleep or hibernation mode after periods of inactivity. When the machine suspends, the network adapter powers down and your shared folders become inaccessible—even though NetBird remains configured correctly.
If you need reliable, always-available access to your Windows file shares, consider these adjustments to keep the machine running like a server.
Disable Sleep and Hibernation
Open Settings → System → Power & battery (or Power Options in Control Panel) and set the following:
- Screen: Turn off after your preferred time (this doesn't affect network availability)
- Sleep: Set to Never when plugged in
- Hibernate: Disable if enabled
For more granular control, open an elevated Command Prompt and run:
Use the High Performance Power Plan
Windows' balanced power plan may still aggressively sleep components. Switch to High Performance:
- Open Control Panel → Power Options
- Select High performance (you may need to click "Show additional plans")
- Click Change plan settings → Change advanced power settings
- Under Sleep, set all options to Never or 0
- Under USB settings, disable USB selective suspend
- Under PCI Express → Link State Power Management, set to Off
Prevent Network Adapter Sleep
Windows can power down network adapters to save energy, which kills remote connections:
- Open Device Manager
- Expand Network adapters and right-click your adapter
- Select Properties → Power Management
- Uncheck Allow the computer to turn off this device to save power
Repeat for both wired and wireless adapters if applicable.
Consider Wake-on-LAN (Optional)
If you'd rather let the machine sleep and wake it on demand, configure Wake-on-LAN (WoL):
- Enable WoL in your BIOS/UEFI settings
- In Device Manager → Network adapter → Properties → Advanced, enable:
- Wake on Magic Packet
- Wake on Pattern Match (optional)
- In the Power Management tab, check Allow this device to wake the computer
You can then send a magic packet from another device on your network (or through your routing peer) to wake the Windows machine. Note that WoL typically only works within the same broadcast domain, so the routing peer method is required if waking remotely through NetBird.
Keep the NetBird Service Running
The NetBird Windows client installs as a system service that starts automatically with Windows. Verify it's configured correctly:
- Press , type , and press Enter
- Find NetBird in the list
- Ensure Startup type is set to Automatic
- Verify Status shows Running
If the service stops unexpectedly, check the Windows Event Viewer for errors.
Security Considerations
Principle of Least Privilege
The access policies created in this guide restrict access to TCP port 445 only. Avoid using the default "All" policy in production environments, as it creates a full mesh where every peer can reach every other peer on all ports.
Posture Checks
NetBird supports posture checks that can enforce additional requirements before allowing connections, such as:
- Operating system version
- NetBird client version
- Geographic location
Consider enabling posture checks for sensitive file shares.
Audit Logging
NetBird logs connection events in the dashboard. Review the activity logs periodically to identify unexpected access patterns.
Conclusion
NetBird provides a straightforward path to secure remote file access without the complexity of traditional VPNs or the exposure of port forwarding. The zero-trust policy model ensures only authorized devices can reach your resources.
For more advanced configurations, including DNS-based routing, high-availability setups with multiple routing peers, and integration with identity providers, consult the NetBird documentation .