
Zero Trust sounds great on paper, but actually implementing it is where most teams get stuck. You know the principles: continuously authenticate, enforce least privilege, assume breach. The challenge is turning those ideas into real network configuration without breaking everything in the process.
This guide walks through a practical approach to implementing Zero Trust Architecture (ZTA) with NetBird, aligned with NIST SP 800-207. The focus is on protecting resources like applications, services, and data rather than locking down entire network segments. For deeper reading on data-level security, federated identity, and service-to-service patterns, NIST SP 1800-35 is worth a look.
For a full step-by-step walkthrough with detailed configuration instructions, check out the NetBird documentation page for Implementing Zero Trust.
Key Takeaways
- Plan before you configure — map your resources, dependencies, and traffic flows before touching NetBird
- Every connection must be explicitly allowed — NetBird is deny-by-default; define specific policies with exact protocols and ports rather than broad access rules
- Start small and iterate — pilot with a small group, keep the Default policy during testing, then replace it with specific policies before production
- Identity is the foundation — your IdP is the single source of truth; connect it early, enforce MFA, and use groups to map who can access what before defining network policies
- Plan for high availability — run at least two routing peers in separate failure domains for anything critical
- Enable Traffic Events early — use real traffic data and SIEM streaming to refine policies instead of guessing
Before You Start
This guide touches features across different NetBird plans. The Team plan covers user and group provisioning from your IdP along with audit event logging. The Business plan adds device posture checks, connection traffic event logging (beta, requires client v0.39+), and audit/traffic event streaming to platforms like Datadog, S3, or Firehose for SIEM integration. Access control policies, groups, Networks, routing peers, private DNS, and the Control Center topology view are available on all plans, including Free.
If you self-host, make sure Management, Signal, and Relay are running supported versions (preferably the latest) for these features.
Firewall Considerations
NetBird peers don't need inbound ports open. They initiate outbound connections to Management, Signal, and Relay services over HTTPS (TCP 443) and UDP/STUN/TURN protocols. If your firewall restricts outbound traffic, you'll need to allow these endpoints and ports.
Here's how the services work together:
- Management handles peer authentication, access policies, and configuration
- Signal coordinates peer-to-peer connections and helps peers discover each other
- Relay provides fallback connections when direct peer-to-peer connections can't be established (for example, behind restrictive NATs)
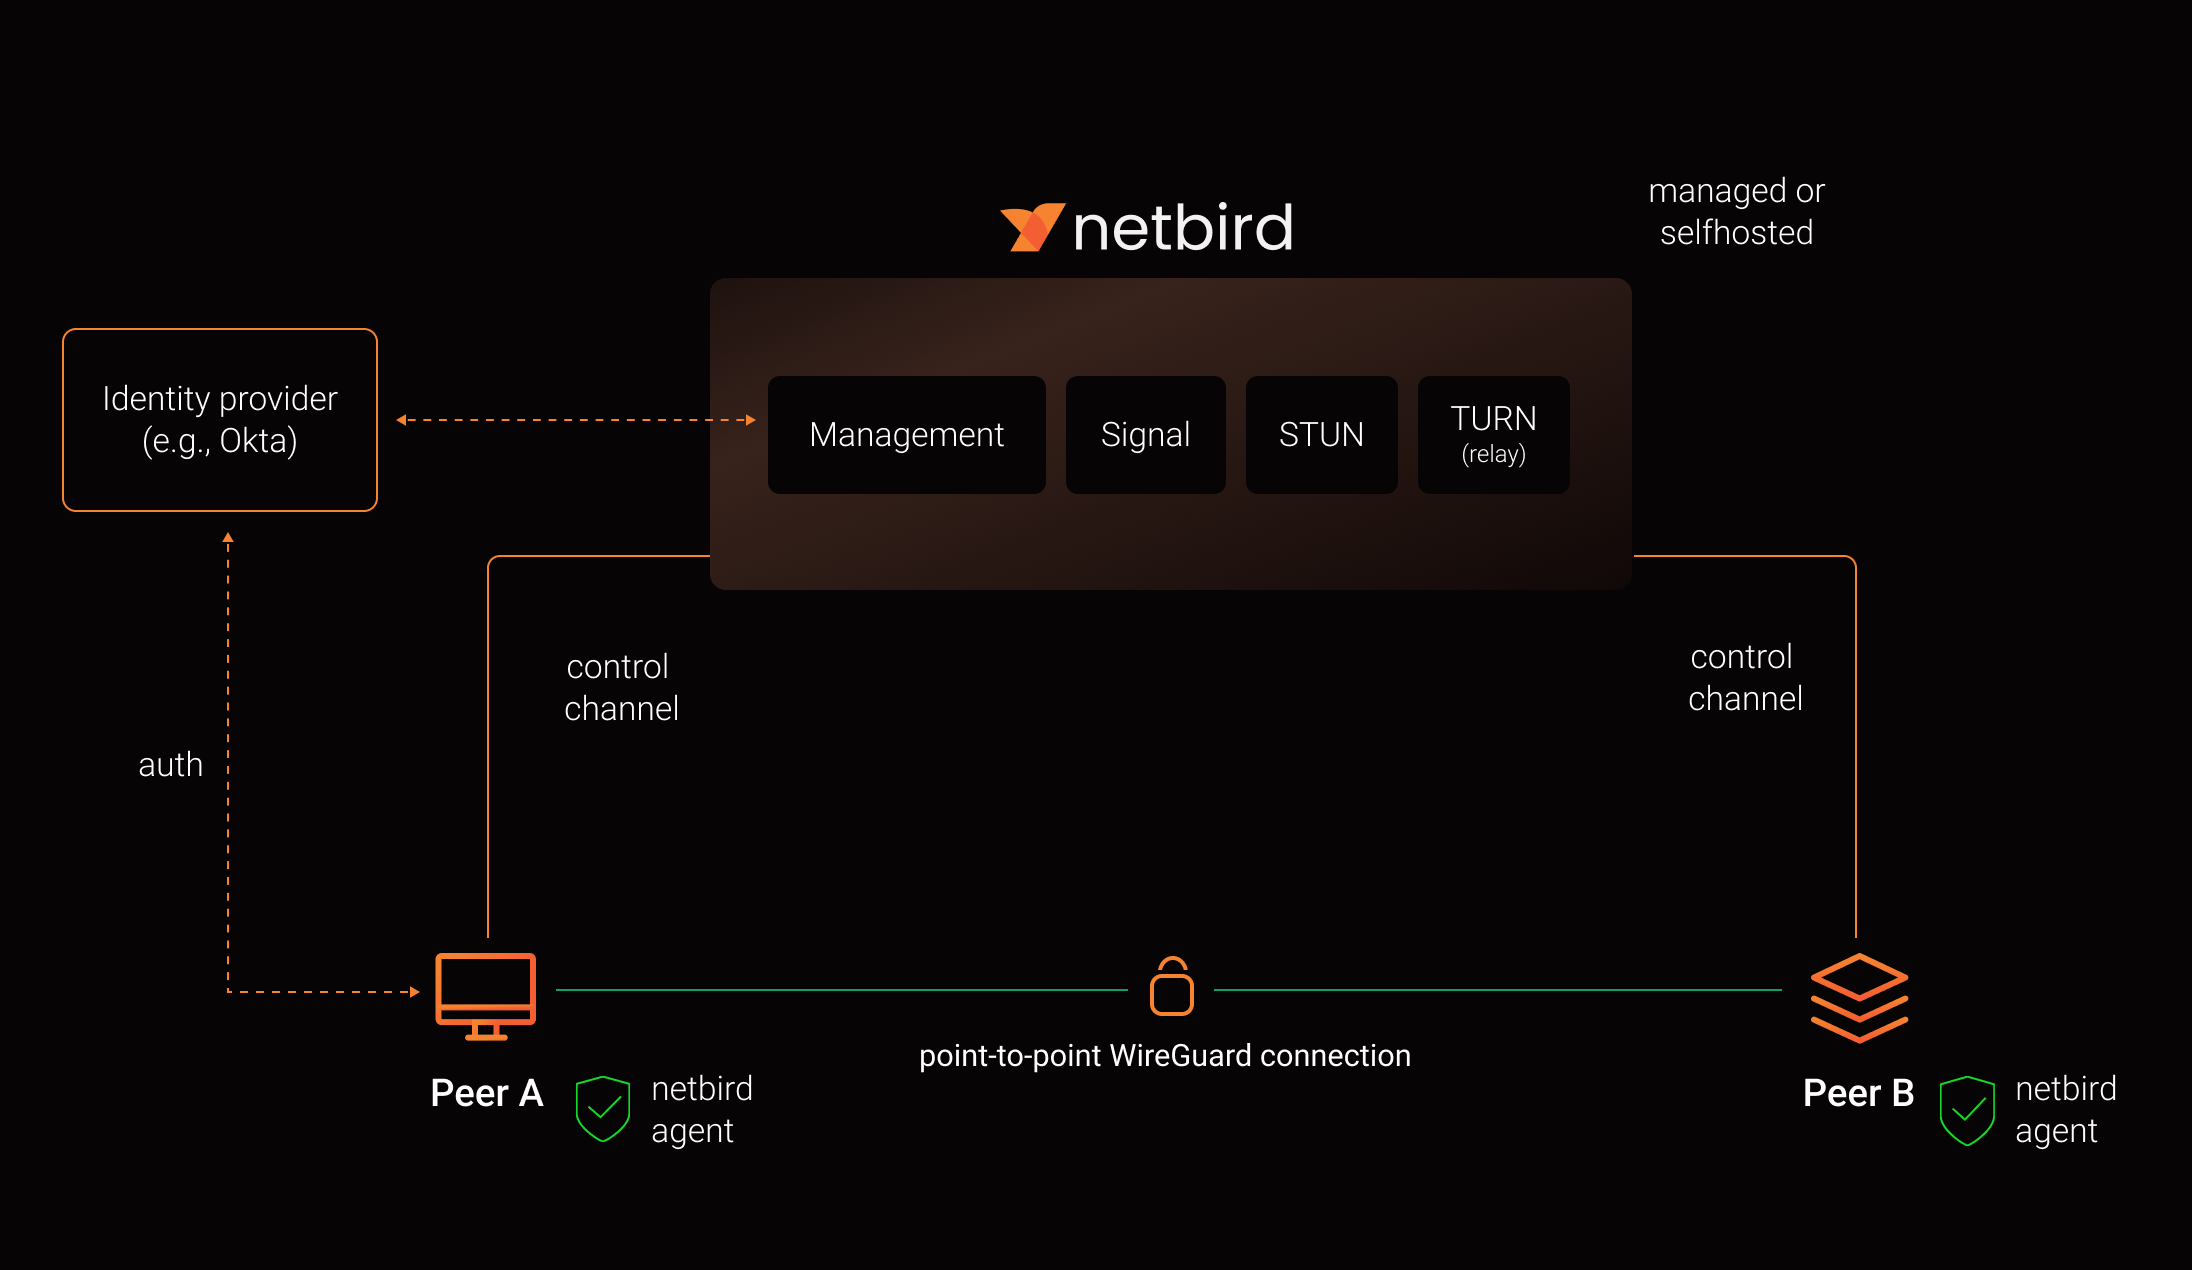
Quick Terminology
Before diving in, a few terms worth clarifying. In this guide, Network (capital N) refers to the NetBird object that represents CIDR ranges and DNS resources behind routing peers. Lowercase network means generic networking concepts like LANs and VPCs.
A peer is any device running the NetBird client. A routing peer is a peer that acts as a gateway, forwarding traffic between the NetBird overlay and internal subnets like a VPC, data center, or office LAN. The overlay network is the virtual network NetBird creates on top of your existing infrastructure. Each tenant gets a random /16 block within , and every peer gets an overlay IP from that range.
Posture checks evaluate device state (OS version, client version, location, running processes) before allowing traffic. SIEM platforms like Datadog or AWS Firehose ingest NetBird events for visibility and compliance.
Planning Before Configuration
The biggest mistake teams make is jumping straight into NetBird configuration without planning. These three phases keep the scope manageable and make everything downstream more predictable.
Pick Your Starting Resources
Start with one or two concrete resources, not "our whole network." Maybe it's a customer-facing admin portal, remote access to internal developer tools, or a critical internal app with its web, API, and database tiers.
For each resource, list the users and service accounts that need access, the devices they use, and the systems the resource touches. You're not configuring anything yet. You're deciding what to bring under Zero Trust control first and defining what "working as intended" looks like. Assign an owner for each resource who can confirm whether the rollout broke anything.
Map Dependencies and Communication Flows
Next, figure out how each resource actually works on the wire. Which users, groups, or peers talk to which resources? What protocols and ports are in use? Don't forget supporting services like DNS, your IdP, logging, and metrics.
If you have existing diagrams or runbooks, start there. Then validate against real firewall rules, security groups, and application configs. Most admins don't have perfect flow logs, and that's fine. Treat this as a rough first pass that you'll refine once NetBird's Traffic Events give you real data.
Design Your Segmentation Policies
For each flow you mapped, ask: is this actually required or is it legacy? Which side should initiate the connection? What specific protocol and port does it need? Should it be allowed, restricted, or blocked?
Capture this as a simple matrix with users/groups/peers on one axis and resources on the other, with allowed protocols and ports in each cell. You can start slightly more permissive and tighten things down once you have Traffic Events data confirming your assumptions.
These three phases directly feed into your NetBird configuration. Your resource selection drives IdP integration, groups, and setup keys. Your dependency mapping feeds into Networks and routing peers. And your segmentation design becomes access policies, posture checks, and monitoring.
Integrating Identity and Onboarding Peers
Connect Your Identity Provider
Connect NetBird to your IdP (Microsoft Entra ID, Google Workspace, Okta, etc.) and enable SSO with MFA. Map your IdP groups to NetBird groups where it makes sense, and start with a small pilot, maybe your DevOps team and the owners of whatever resources you picked in the planning phase.
Don't expose production Networks yet. At this stage, you just need authenticated identities and a few test peers.
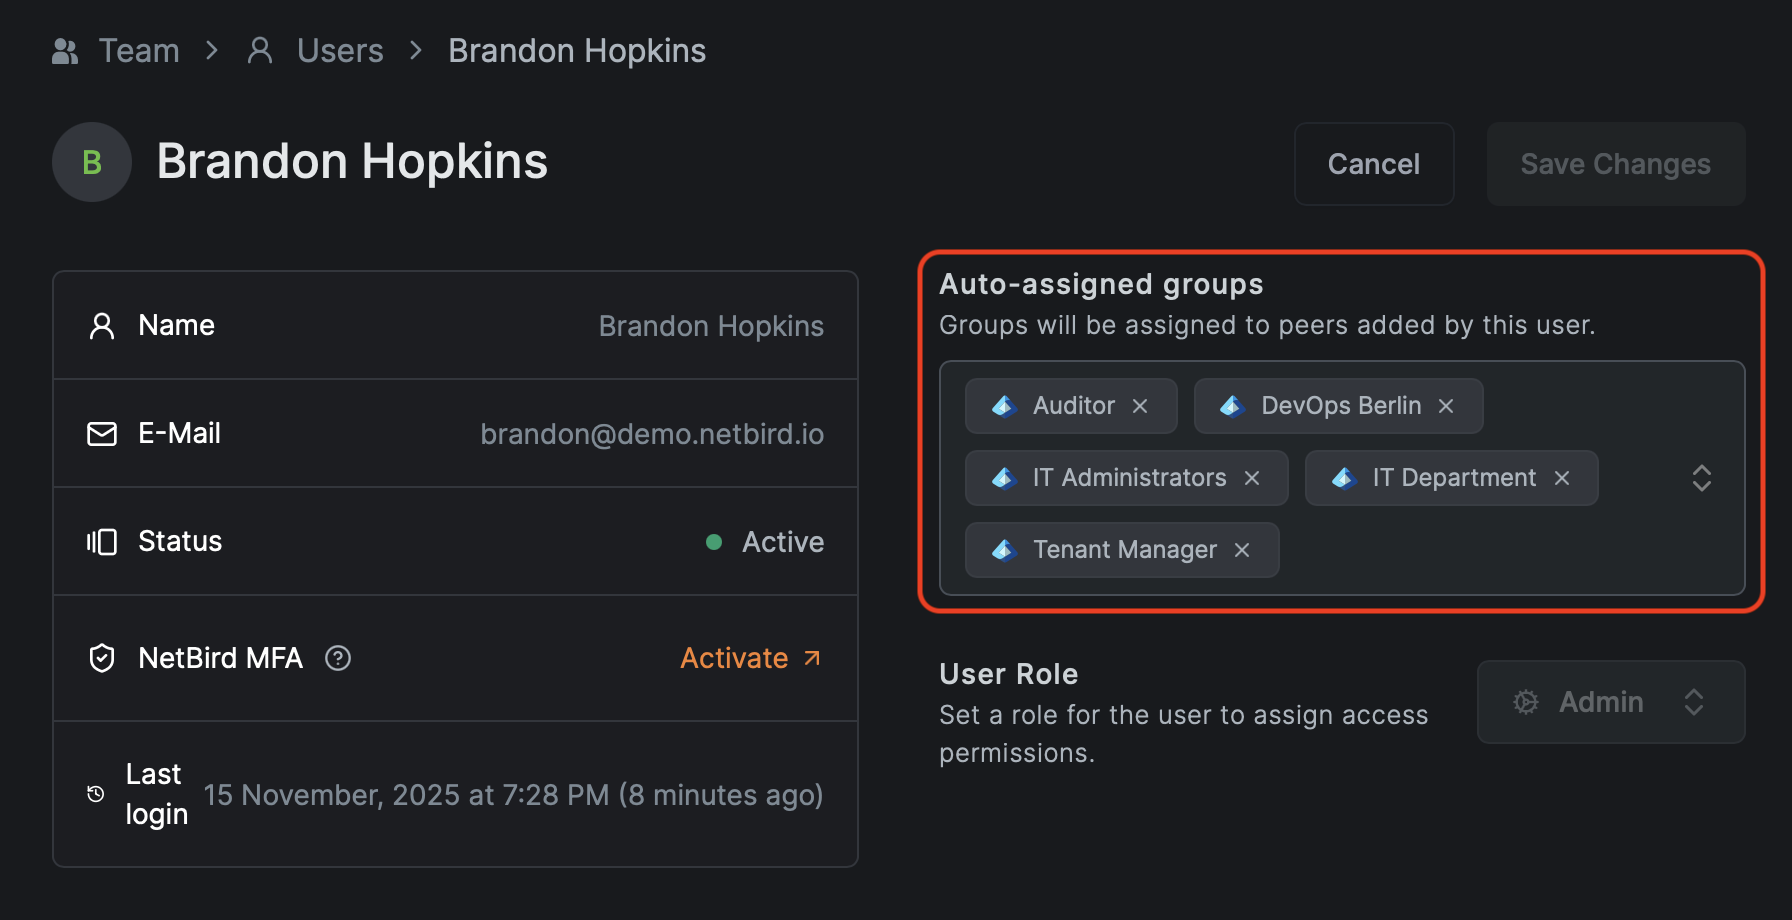
Groups and Naming Conventions
Groups serve two purposes: source groups define who is initiating a connection (users, teams, service accounts) and resource groups define what's being accessed (servers, apps, networks). Ideally, your source groups in access policies are synced user groups from your identity provider — this keeps your IdP as the single source of truth for who has access to what.

A consistent naming convention saves a lot of headaches down the road. Here's a pattern that works well:
- for user devices (, , )
- for services and hosts (, )
- for routed Networks (, )
The exact scheme is up to you. What matters is picking one and sticking with it. Without a convention, the group and policy list will become unmanageable fast.
Setup Keys
Setup keys handle onboarding for machines without human login: routing peers, CI runners, Kubernetes nodes, headless Linux boxes, and anything deployed through MDM or RMM tooling.
Create scoped keys per environment. A key like auto-assigns groups, while handles staging. For bulk enrollment, use reusable keys with a limited usage count and delete them once enrollment is complete.
When you need to rotate a key, create a new one with the same auto-assign groups, update your automation, verify new peers land in the right groups, then revoke the old key. Rotation doesn't affect existing peers, only new enrollments.
Access Policies and Posture Checks
Starting from Default Deny
NetBird is deny-by-default. Without policies, peers can't talk to each other at all. To ease initial setup, NetBird creates a Default policy that allows every peer to communicate on all protocols and ports. This is a temporary onboarding aid, not something you want in production.
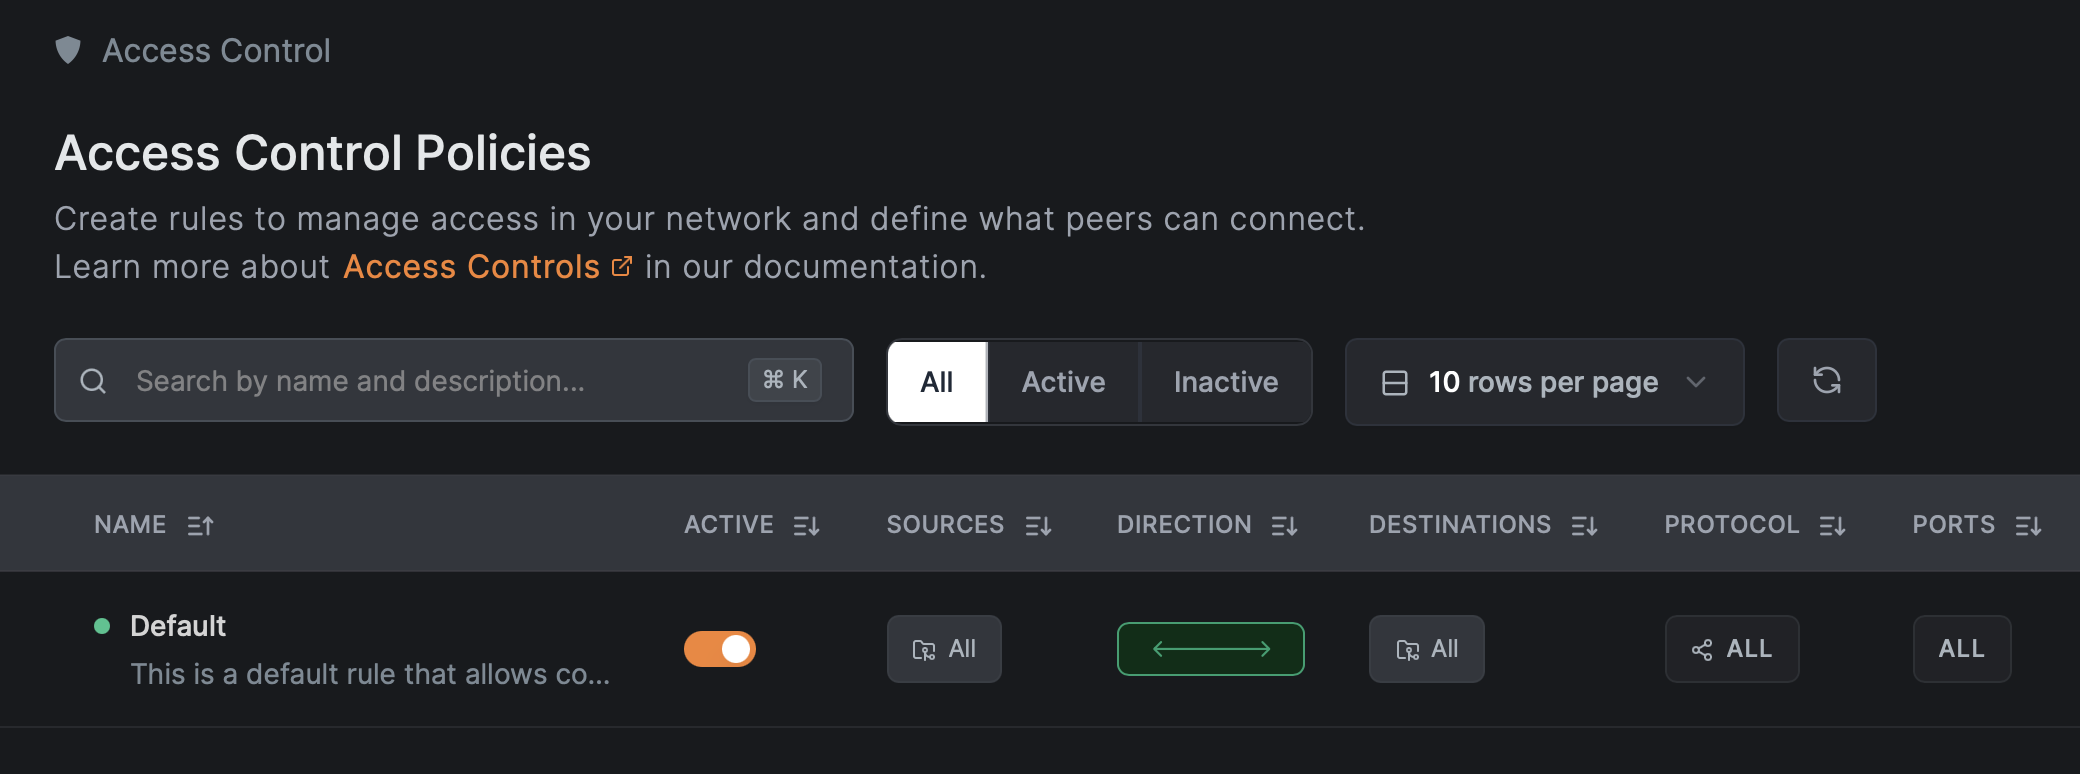
Keep it while you're enrolling and testing. Before going to production, replace it with specific policies and then delete it. Just make sure you've created and tested at least one specific Allow rule first, otherwise you'll immediately lose connectivity to everything.
Posture Checks
Posture checks evaluate device state before allowing traffic. They can validate NetBird client version, OS type and version, geographic location, network CIDR, and the presence of specific processes like your EDR or RMM agent.
One important caveat: posture checks validate configuration and policy compliance, not trustworthiness. An attacker with admin rights on a device can bypass them. Design your policies with that in mind.
Good starting combinations include:
- Enforcing a minimum NetBird client version for critical access
- Blocking unsupported OS versions from production
- Restricting access to known countries or corporate CIDRs
- Requiring security agent processes to be running
The Peer Network Range check isn't supported on iOS and Android, so use Geolocation for mobile clients instead.
Start with client and OS version checks. Add process checks once you can reliably identify the right process names per platform.
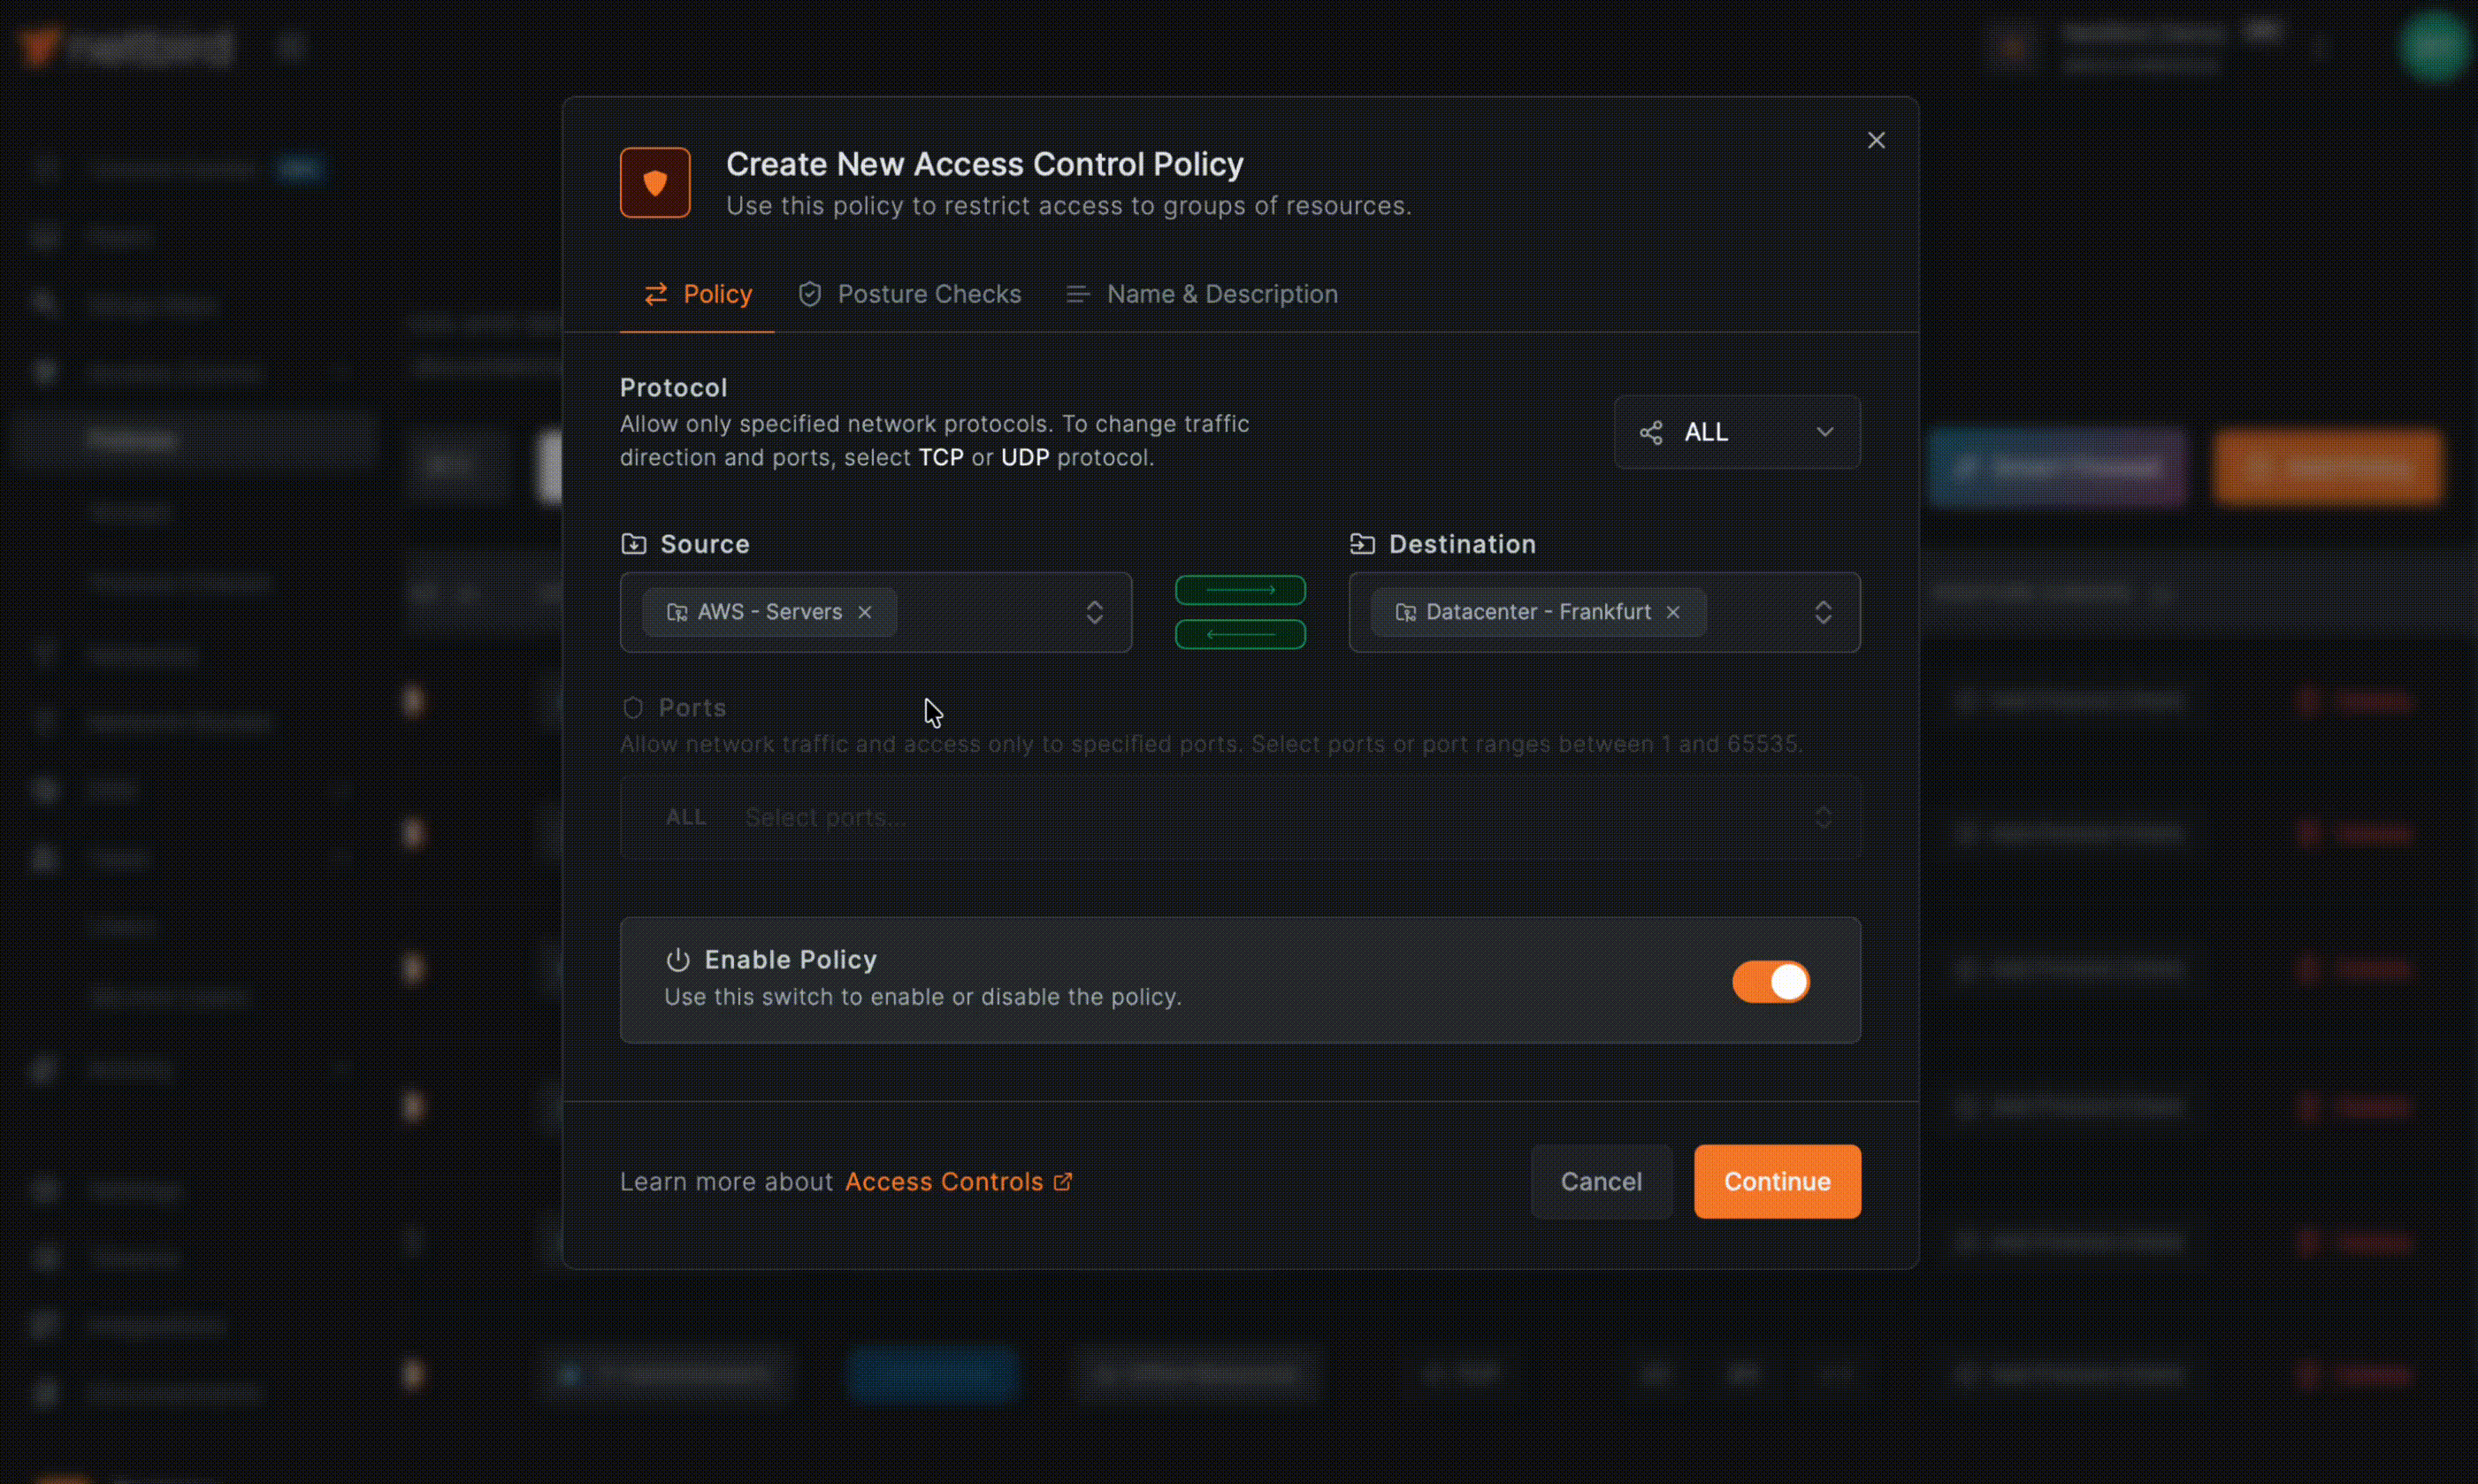
Structuring Policies
Most application traffic has a clear direction: user device to web frontend, web to app backend, app to database, monitoring to metrics endpoints. Use TCP or UDP with exact ports to create unidirectional rules. Policies targeting network resources are always unidirectional, since resources don't run NetBird agents. Avoid "All" protocol policies and portless rules — they're effectively wide open, and "All" protocol policies are always bidirectional regardless of your direction setting.
A Worked Example: Three-Tier App
Consider a production orders application with web, app, and database tiers. Here's how you'd structure it:
- Web tier: on TCP/443
- App tier: on TCP/8443
- DB tier: on TCP/5432
- DNS resolvers: and
- Monitoring: scraping on ports 9100 and 9200
The policies follow the traffic flow:
- and can reach the web tier on TCP/443
- Web tier can reach the app tier on TCP/8443
- App tier can reach the DB tier on TCP/5432
- Monitoring can reach all tiers on TCP/9100 and 9200
- All relevant peer groups can reach DNS on UDP and TCP/53
What's explicitly not allowed: any user group directly to the database, the database initiating connections outward, or support laptops accessing the app backend or DB.
That last policy for DNS is the one people forget most often. Broken DNS is the number one cause of "NetBird is broken" complaints, so check the DNS for Routed Networks documentation when setting up your environment.
If you're creating policies through the API, the structure looks like this:
Note that the API requires group IDs (UUIDs), not the human-readable names shown here.
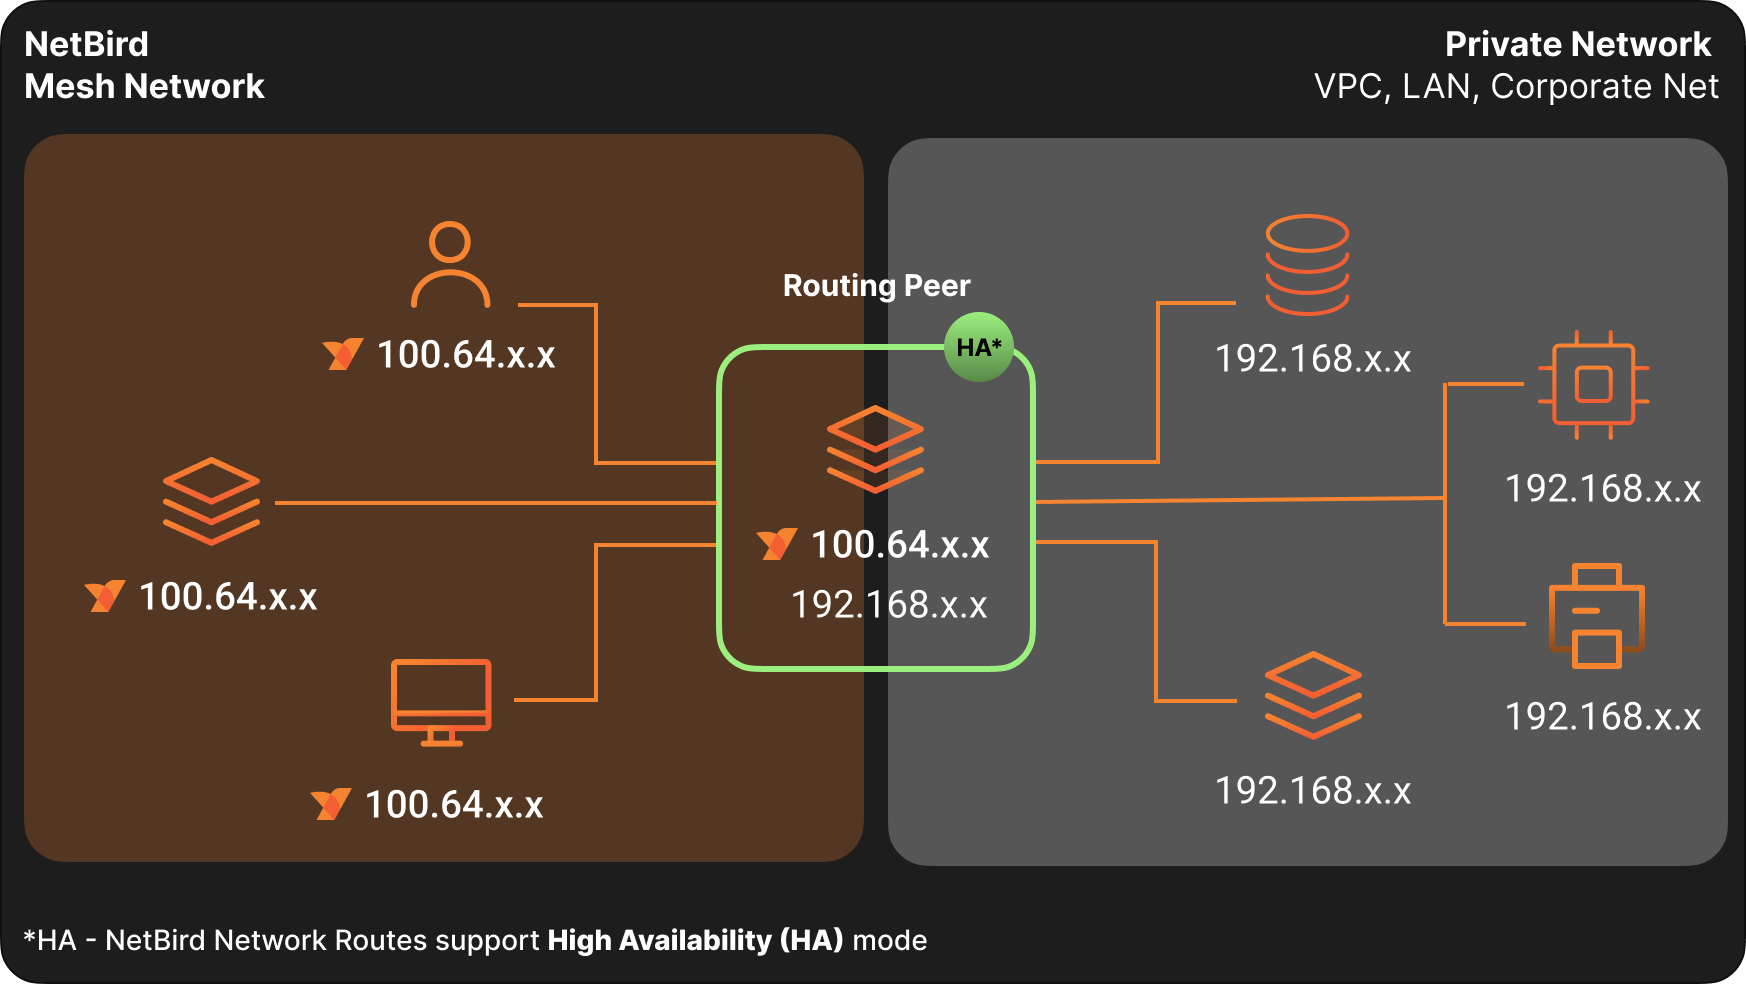
Connecting Private Networks with Routing Peers
When you need to reach private subnets and resources (LAN, VPC, on-premises) rather than just overlay peers, you'll use routing peers and Networks.
One important distinction: legacy Network Routes bypass Access Control policies by default unless you explicitly configure Access Control Groups. The newer Networks feature (v0.35.0+) handles this automatically, and resources only become visible after a policy grants access. For Zero Trust, stick with Networks. Note that network resources are not automatically members of the built-in "All" group — they must be explicitly added to resource groups and referenced in policies.
Network Routes are now deprecated outside of two specific use cases: site-to-site connectivity between different LANs or private networks, and exit node routes for routing internet traffic through a specific peer. All other functionality is already available in Networks, and these remaining use cases will eventually be incorporated into the Networks feature as well.
A routing peer needs two things: network access to internal subnets (like ) and to be selected as a routing peer in a Network configuration.
Traffic Direction
Network access policies are unidirectional. They allow traffic from NetBird peers toward the routing peer and the routed network. Replies work as expected, but new connections can't originate from the private network back toward a NetBird peer through the routing peer. If you need true bidirectional initiation, install NetBird on both endpoints and create policies for both directions.
DNS for Routed Networks
Routed environments almost always rely on internal DNS. If peers can reach but can't resolve , applications will fail because they use hostnames, not raw IPs.
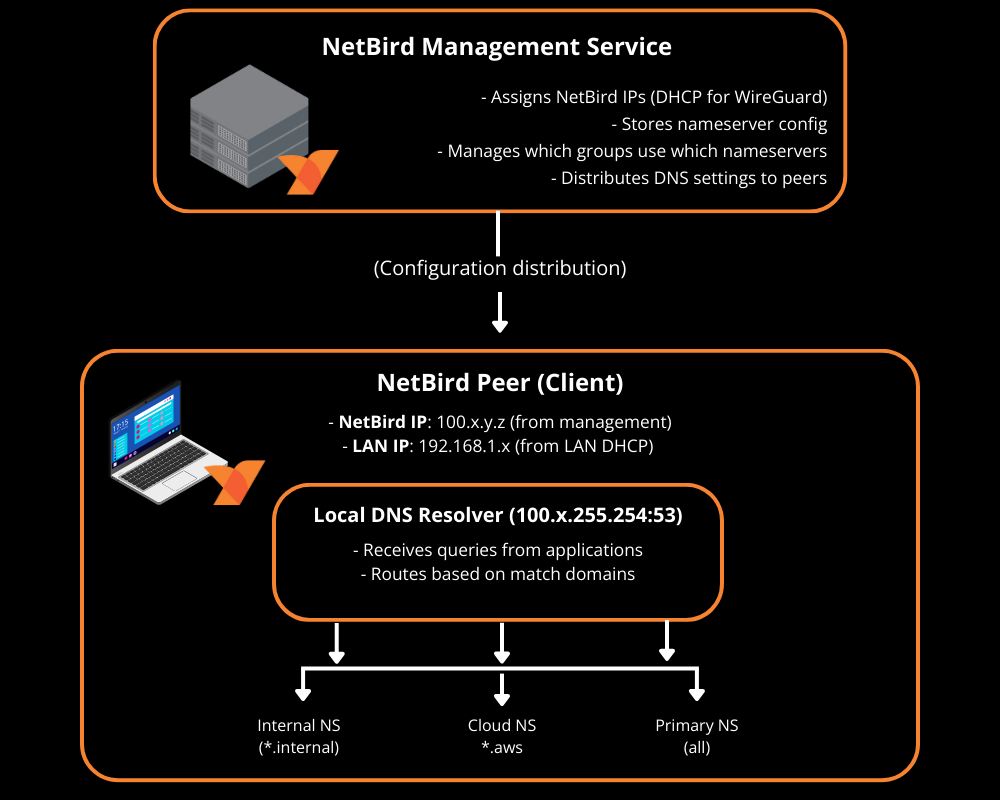
With Networks and domain resources, NetBird can route both IP ranges and DNS-based resources like . When you define a network resource by domain name , the routing peer resolves DNS on behalf of connected peers — no additional DNS configuration is needed. If your environment relies on private DNS servers that peers can't reach directly, you'll also need to add a nameserver configuration with the right match domain and a policy allowing traffic to the DNS servers on UDP and TCP/53.
Worth noting: starting with NetBird v0.59.0, the local DNS forwarder port changed from 5353 to 22054. The Management Service only applies the new port when all peers run v0.59.0 or newer, so mixed versions may behave differently.
High Availability and Scaling
Routing Peer Redundancy
You can assign multiple routing peers to the same Network for high availability. Selection is based on route priority (metric): lower is preferred, and when metrics are equal, the client picks the lowest-latency option.
A good approach is to set your primary routing peer at metric 100 and a backup or cross-region peer at metric 200. For anything critical, run at least two routing peers in separate failure domains. Test failover by simulating a routing peer failure and verifying with .
Masquerading
Masquerading controls how routed traffic appears to internal networks. When enabled (the default), NetBird rewrites the source IP so traffic appears to come from the routing peer's internal IP. Internal firewalls already trust that subnet, so it just works.
With masquerading disabled, internal systems see the original overlay IP (something in ). This requires adding return routes and firewall rules for the overlay range.
The decision is straightforward: if you don't control the internal router, you must use masquerading. If you do and need to see actual user IPs in app logs, disable masquerading and add return routes. Otherwise, leave masquerading on.
For health checks and load balancers where internal systems initiate traffic toward NetBird peers, keep masquerading enabled and add a peer access policy from the routing peer group for the relevant ports.
Scaling Considerations
At larger scale, watch out for overlapping routes to different environments (multiple networks) and connection overhead with many peers. Use network/route selection to avoid accidentally routing into the wrong VPC when CIDRs overlap.
Lazy connections can reduce CPU and battery usage by establishing tunnels only when traffic is sent. This is still experimental, requires client v0.50.1+, and doesn't currently support routing peer access.
Visibility and Monitoring
Enable Traffic Events Early
Turn on Traffic Events and event streaming to your SIEM as soon as possible, ideally right after IdP integration. These are essential for discovering real traffic flows, verifying that policies work as expected, and detecting blocked legitimate traffic after changes.
Data-Driven Policy Refinement
For each new scope you bring under Zero Trust, follow this pattern:
- Create a temporary broad policy from the relevant source group to the target resource
- Run for 48 to 72 hours during normal use
- Filter your SIEM by source group, destination, and resource to extract the actual ports and protocols in use
- Replace the broad policy with specific allow rules
- Keep monitoring for newly blocked flows
This turns "guessing the flows" into a data-driven process.
The Control Center
NetBird's Control Center provides a topological view of who can reach what, based on policies, groups, and Networks. It's invaluable for understanding your access landscape at a glance.
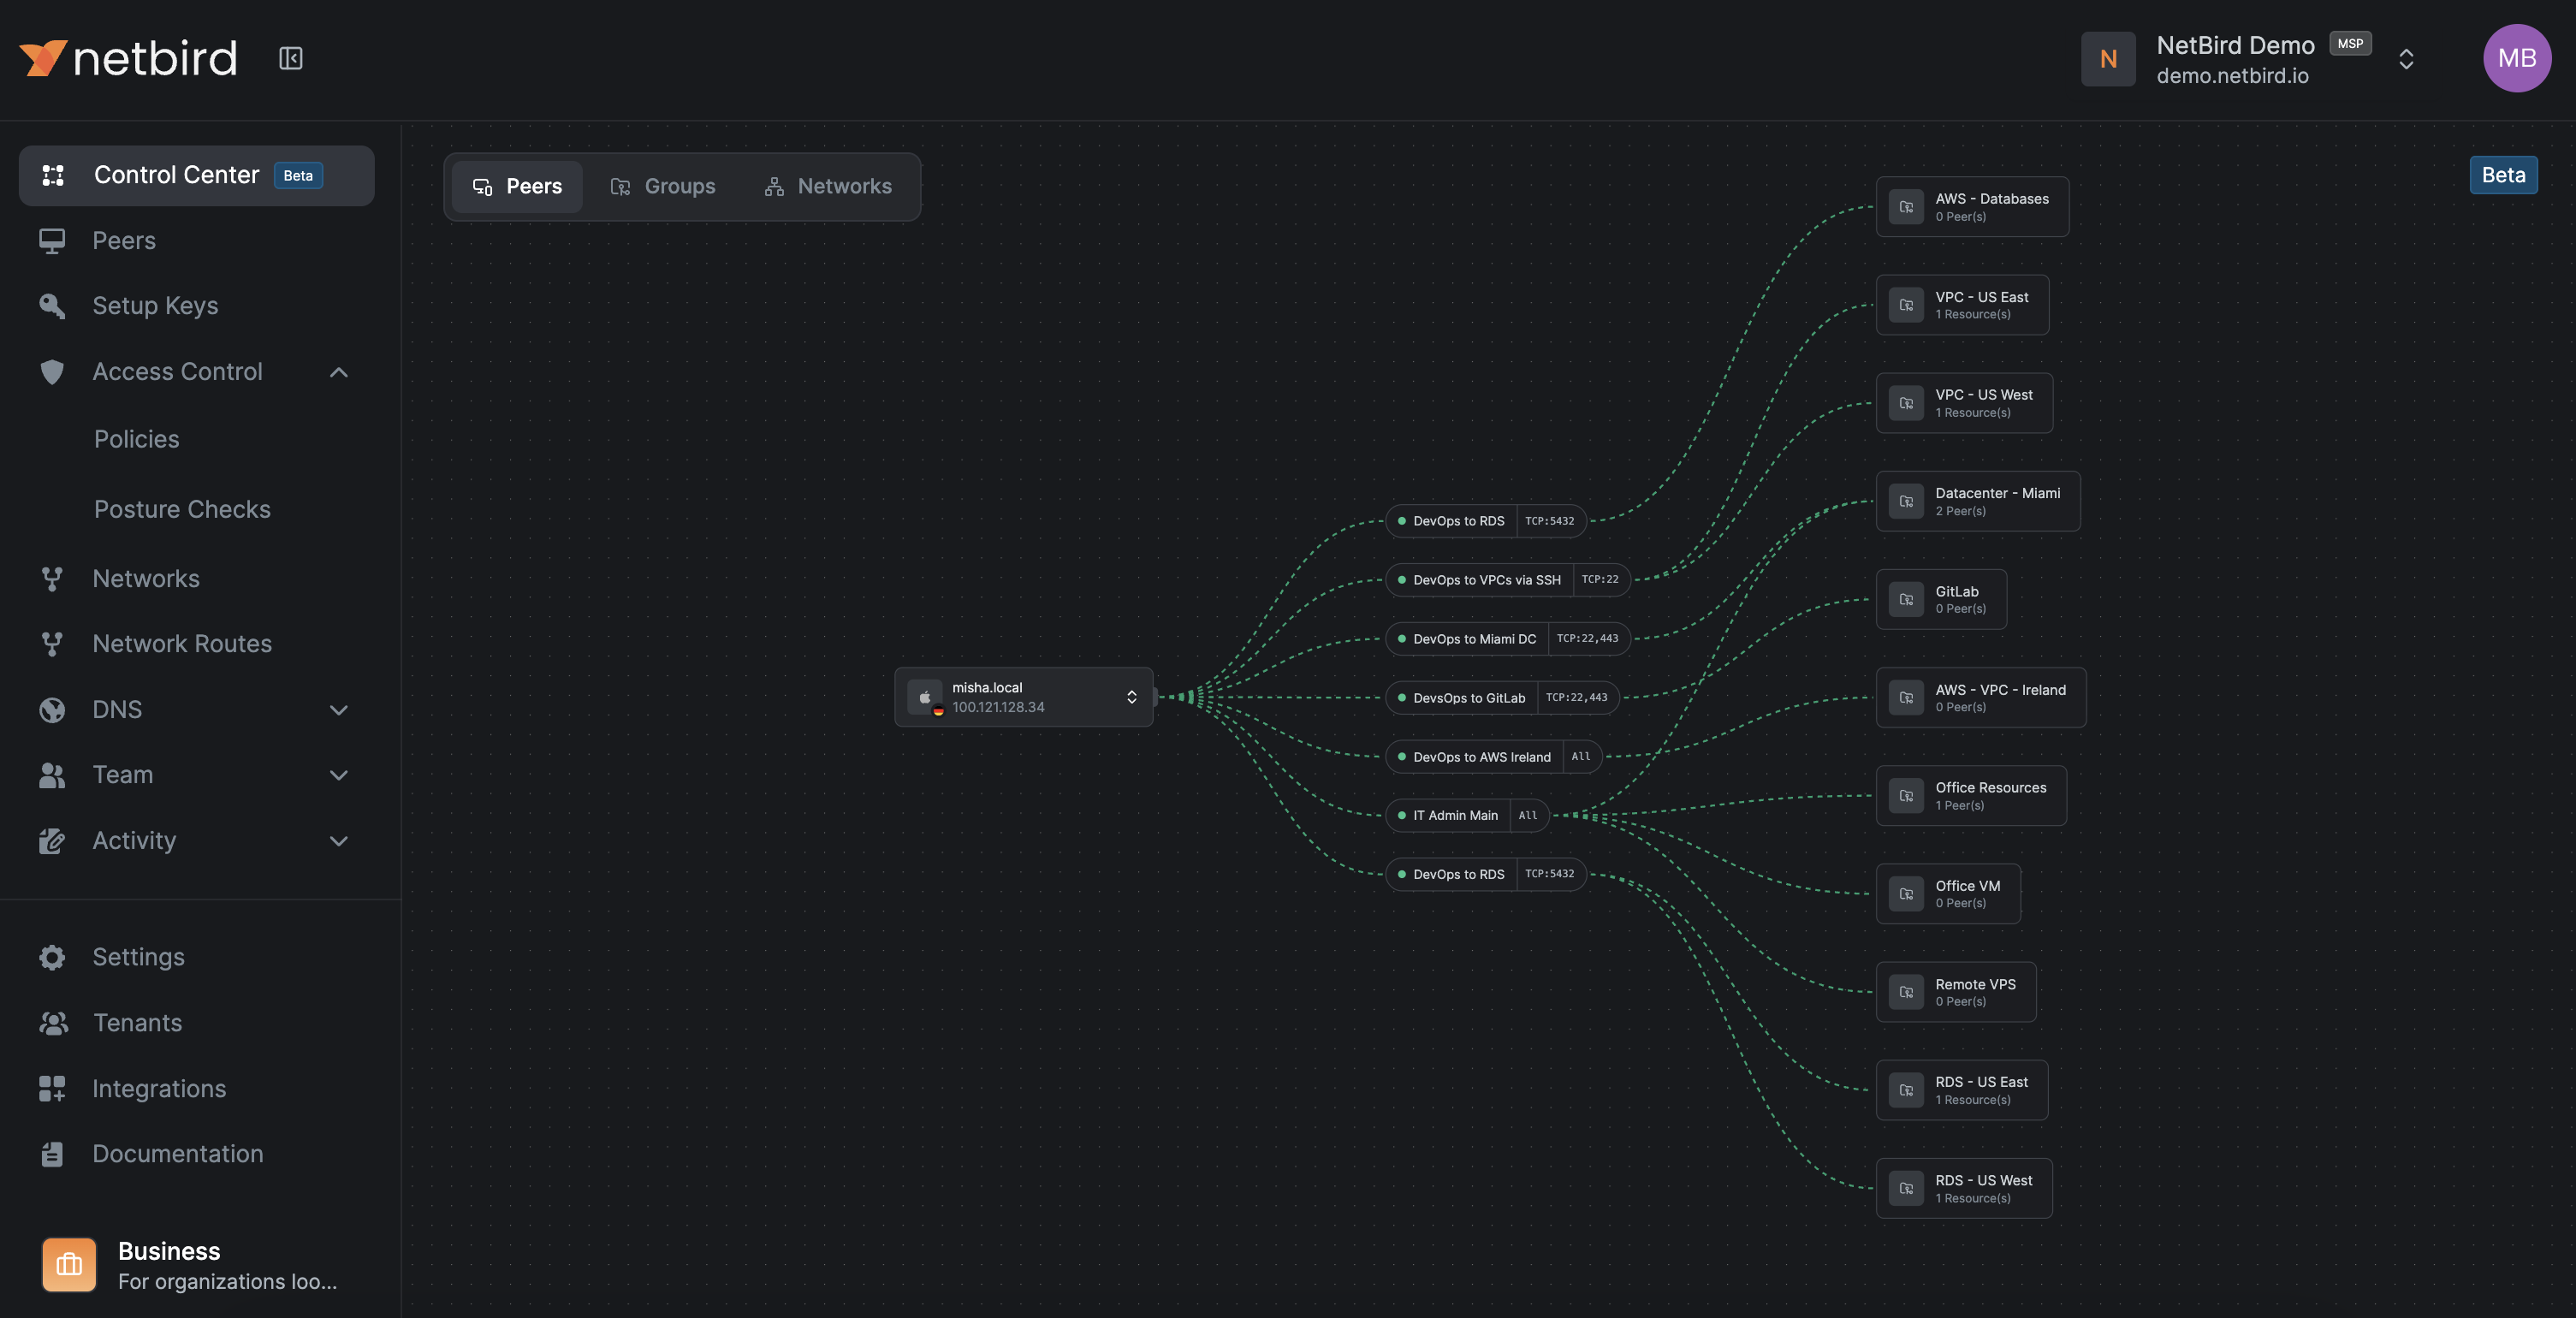
The Peers view shows which resources a specific peer can reach and through which policies. The Users view shows all of a user's peers and their accessible resources.
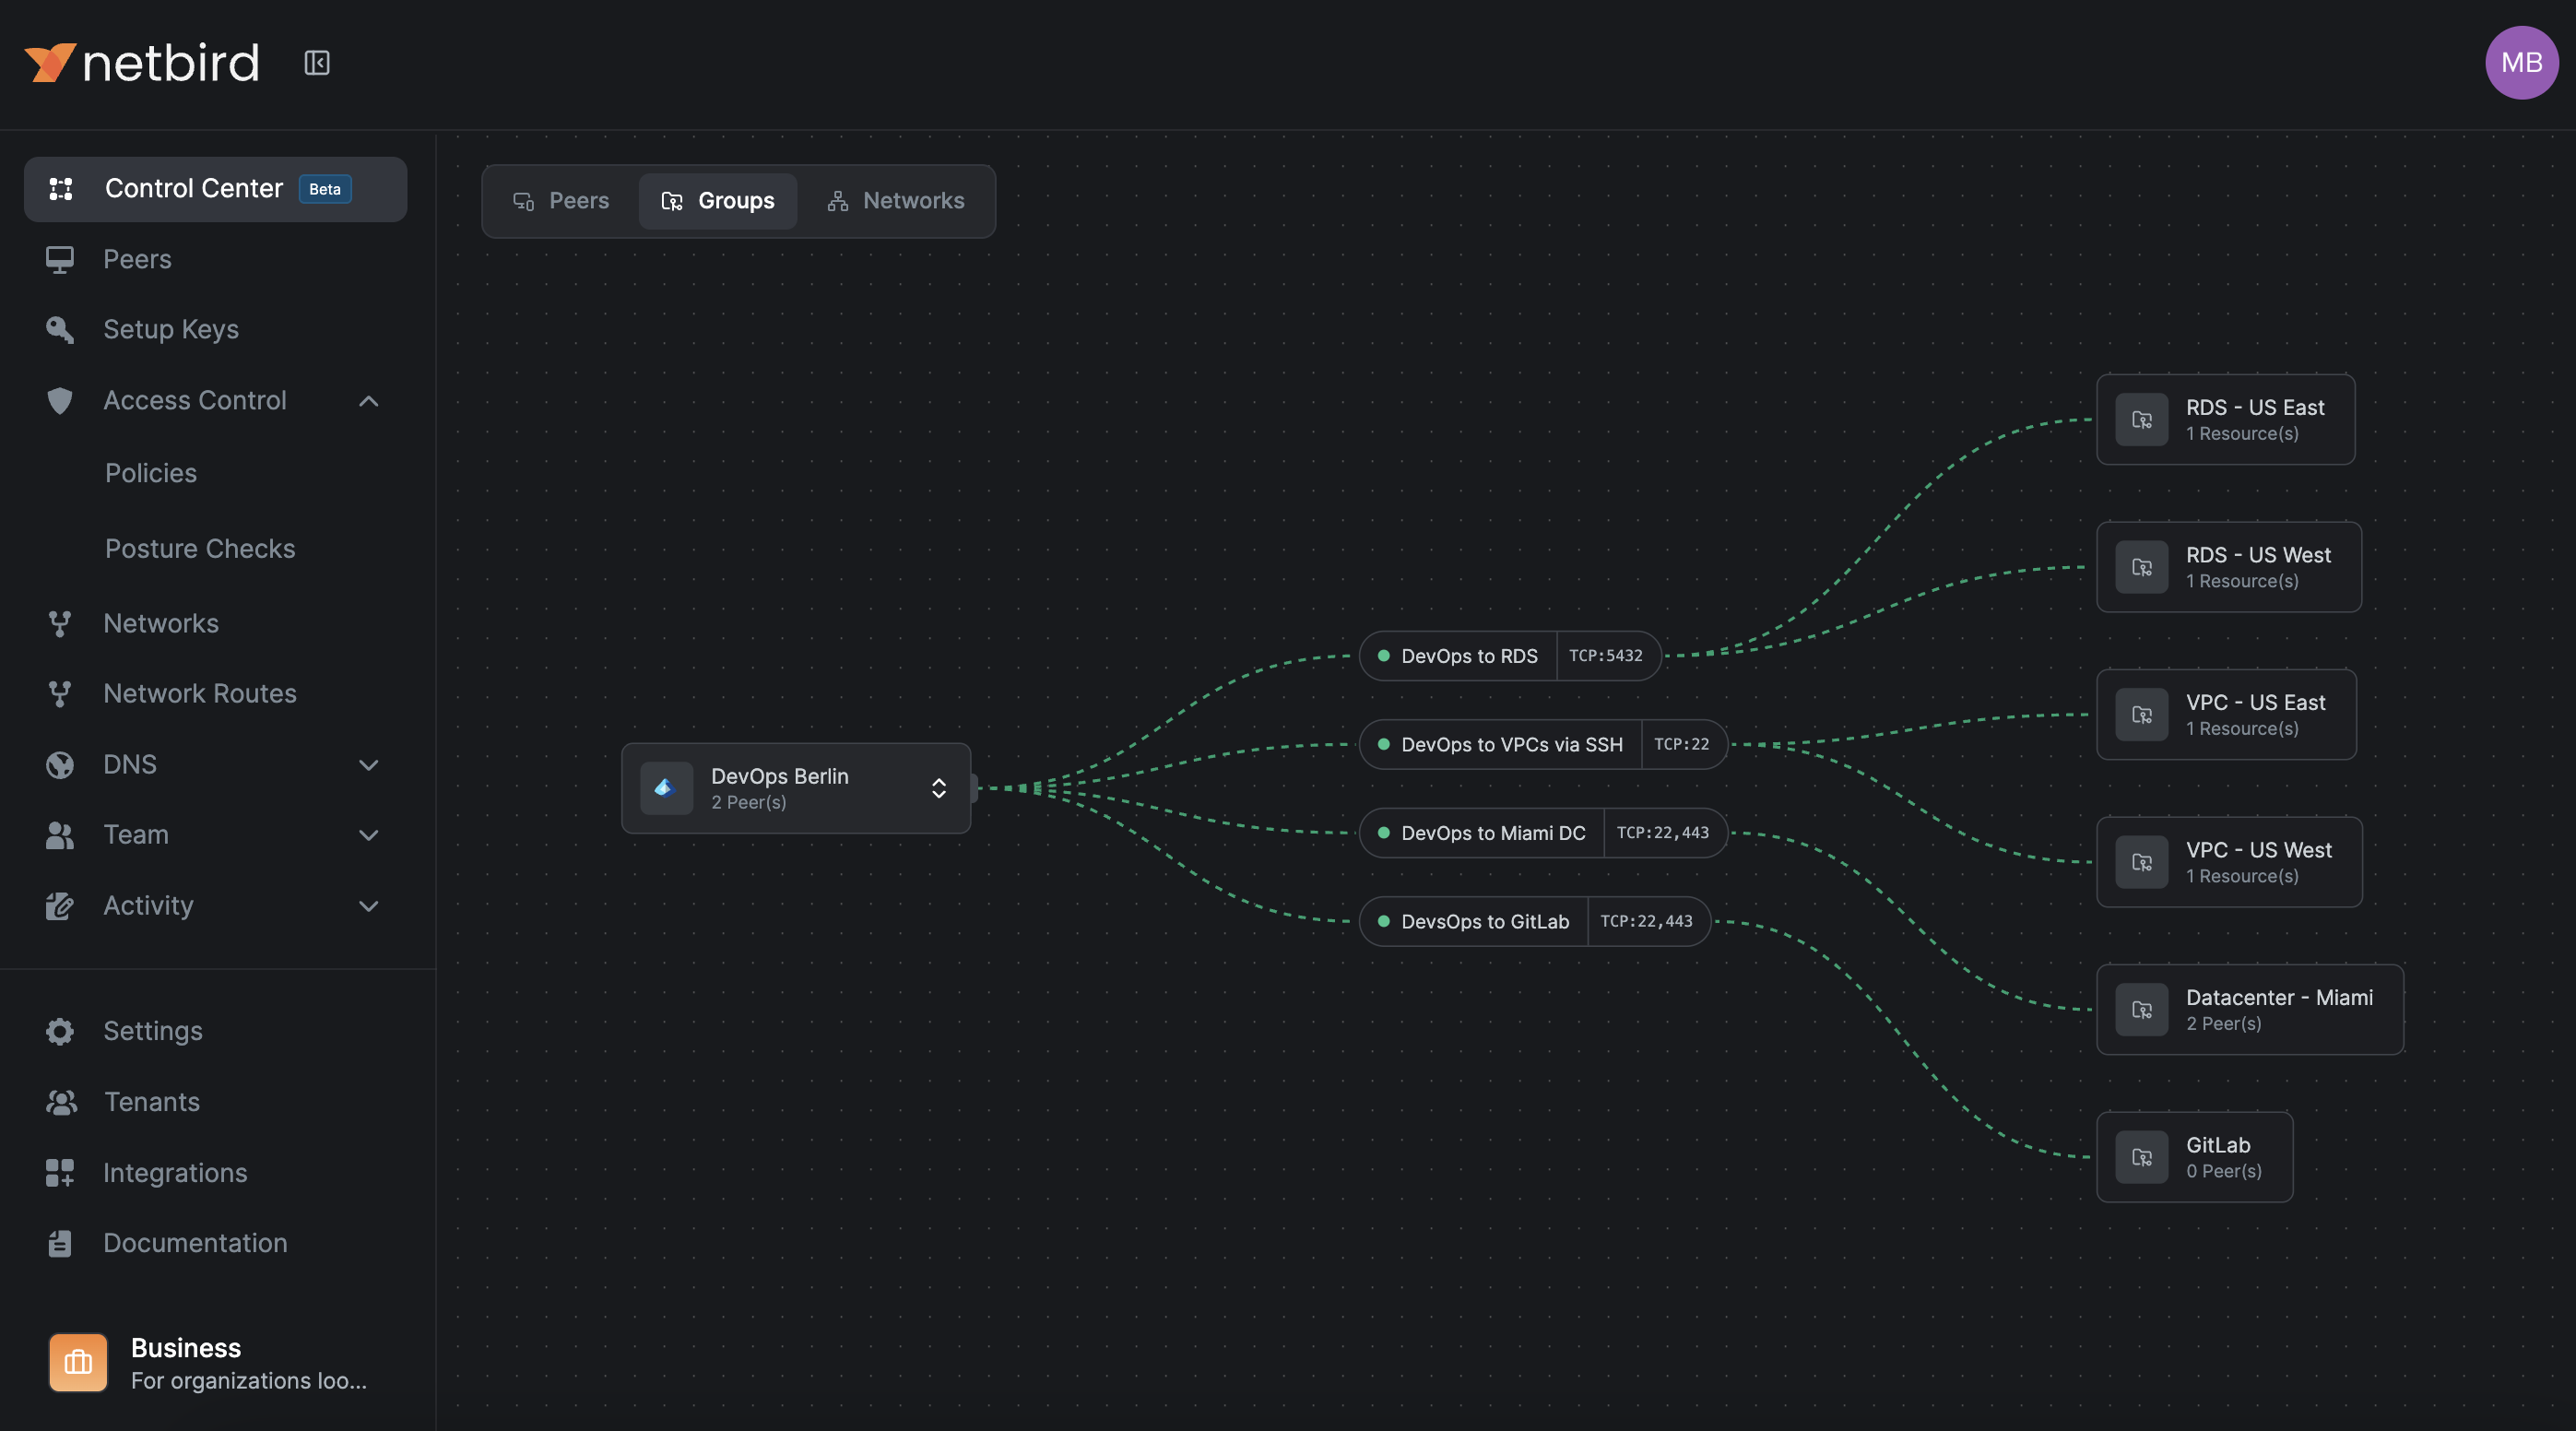
The Groups view shows what a group's members can access, while the Network view shows which groups have access to a Network and on which ports.
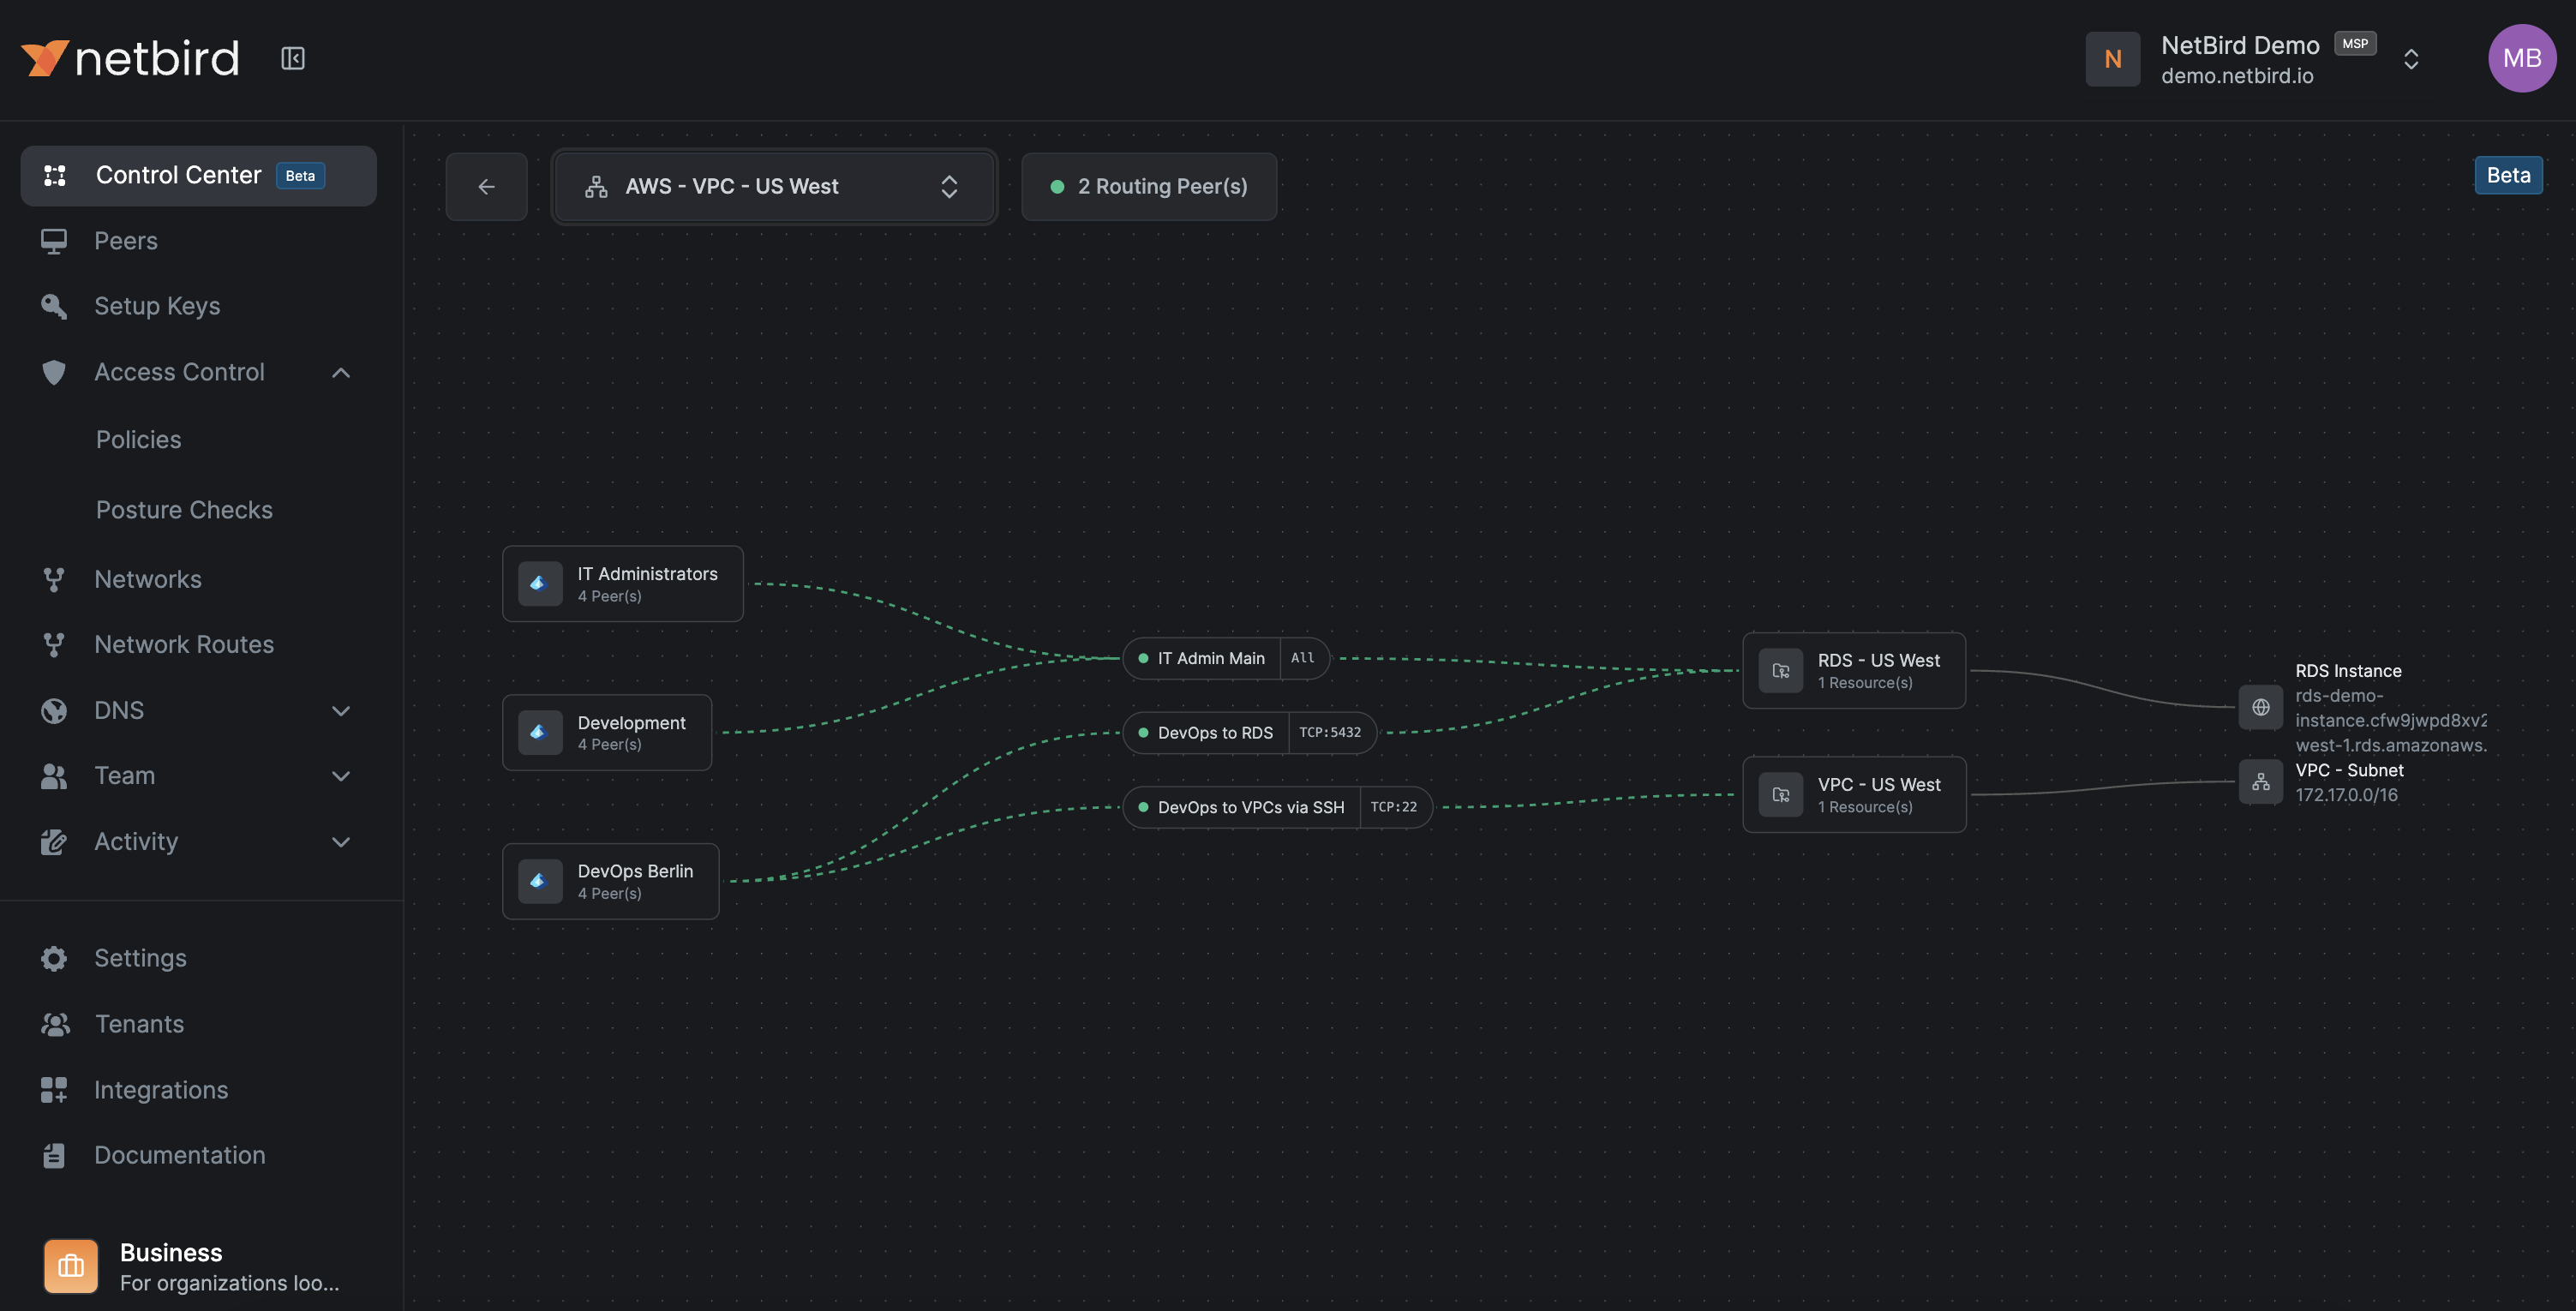
For larger organizations, this is the fastest way to spot redundant policies, overly broad access, and missing segmentation. It's also the right tool for periodic Zero Trust reviews and debugging access issues.
Rolling Out and Operating
Go Progressive
Don't start with production. Apply each pattern to dev first using the same group and policy structure, mirror to staging, refine there, then apply to prod. Keep your naming aligned across environments, only changing the , , suffix. This keeps cognitive load low and reduces surprises.
Have a Rollback Plan
When moving from broad access to strict Zero Trust, you need a way back if things go wrong.
Maintain a "break glass" access method that doesn't rely on NetBird, like a physical console or separate VPN/bastion. Keep an emergency broad policy (something like ) but leave it disabled. If production breaks and you can't immediately identify the cause, enable the emergency policy, confirm recovery, investigate with Traffic Events and SIEM, then replace it with a precise fix and disable it again.
Test the rollback once before you go live.
Ongoing Maintenance
Keep things healthy by enforcing naming conventions consistently, using policy descriptions to record business justification and ownership, and periodically reviewing unused groups, redundant policies, and peers that haven't connected recently. Enforce minimum client versions through posture checks and monitor routing peer health.
Troubleshooting Common Issues
"Policy exists but connection is still blocked" is usually a posture check failing (wrong OS version, security agent not running) or a group mismatch (IdP group not synced, wrong setup key). Check the policy's posture checks, confirm group membership in the dashboard, and look at Traffic Events for blocked entries. Running on the peer will show you the details.
"Connection works sometimes" typically means a routing peer is flapping and clients are alternating between a healthy and unhealthy one, or you have overlapping routes and the client picks the wrong one. Check routing peer health and use to see which routes are active. Try deselecting a suspect route to isolate the problem.
"After deleting the Default policy, nothing works" means you deleted it before creating replacement policies. Create a broad but scoped policy for your critical environment, verify access works, then tighten from there.
DNS resolution failures (peers can ping IPs but can't resolve hostnames) usually mean you're missing a policy allowing traffic to DNS servers on UDP and TCP 53, or your DNS match domains aren't configured correctly. Test from a client with or . On Linux, shows whether the NetBird interface has the right DNS domains. On Windows, shows active Name Resolution Policy Table rules.
Hardening Dashboard Settings
A few dashboard settings are worth enabling to tighten your security posture:
- Manual peer approval prevents unauthorized devices from joining automatically
- User approval ensures only authorized personnel can enroll and access resources
- Peer session expiration (24 hours or lower) forces regular re-authentication
- Global MFA adds a second factor at the NetBird level if your IdP doesn't already enforce it
- Restrict dashboard access to administrators only, keeping regular users from viewing or modifying configurations
Naming Cheat Sheet
For quick reference, here's the naming pattern that keeps everything organized:
- Peers: (e.g., , )
- Services: (e.g., , )
- Networks: (e.g., , )
- Policies: (e.g., )
- Setup keys: (e.g., )