
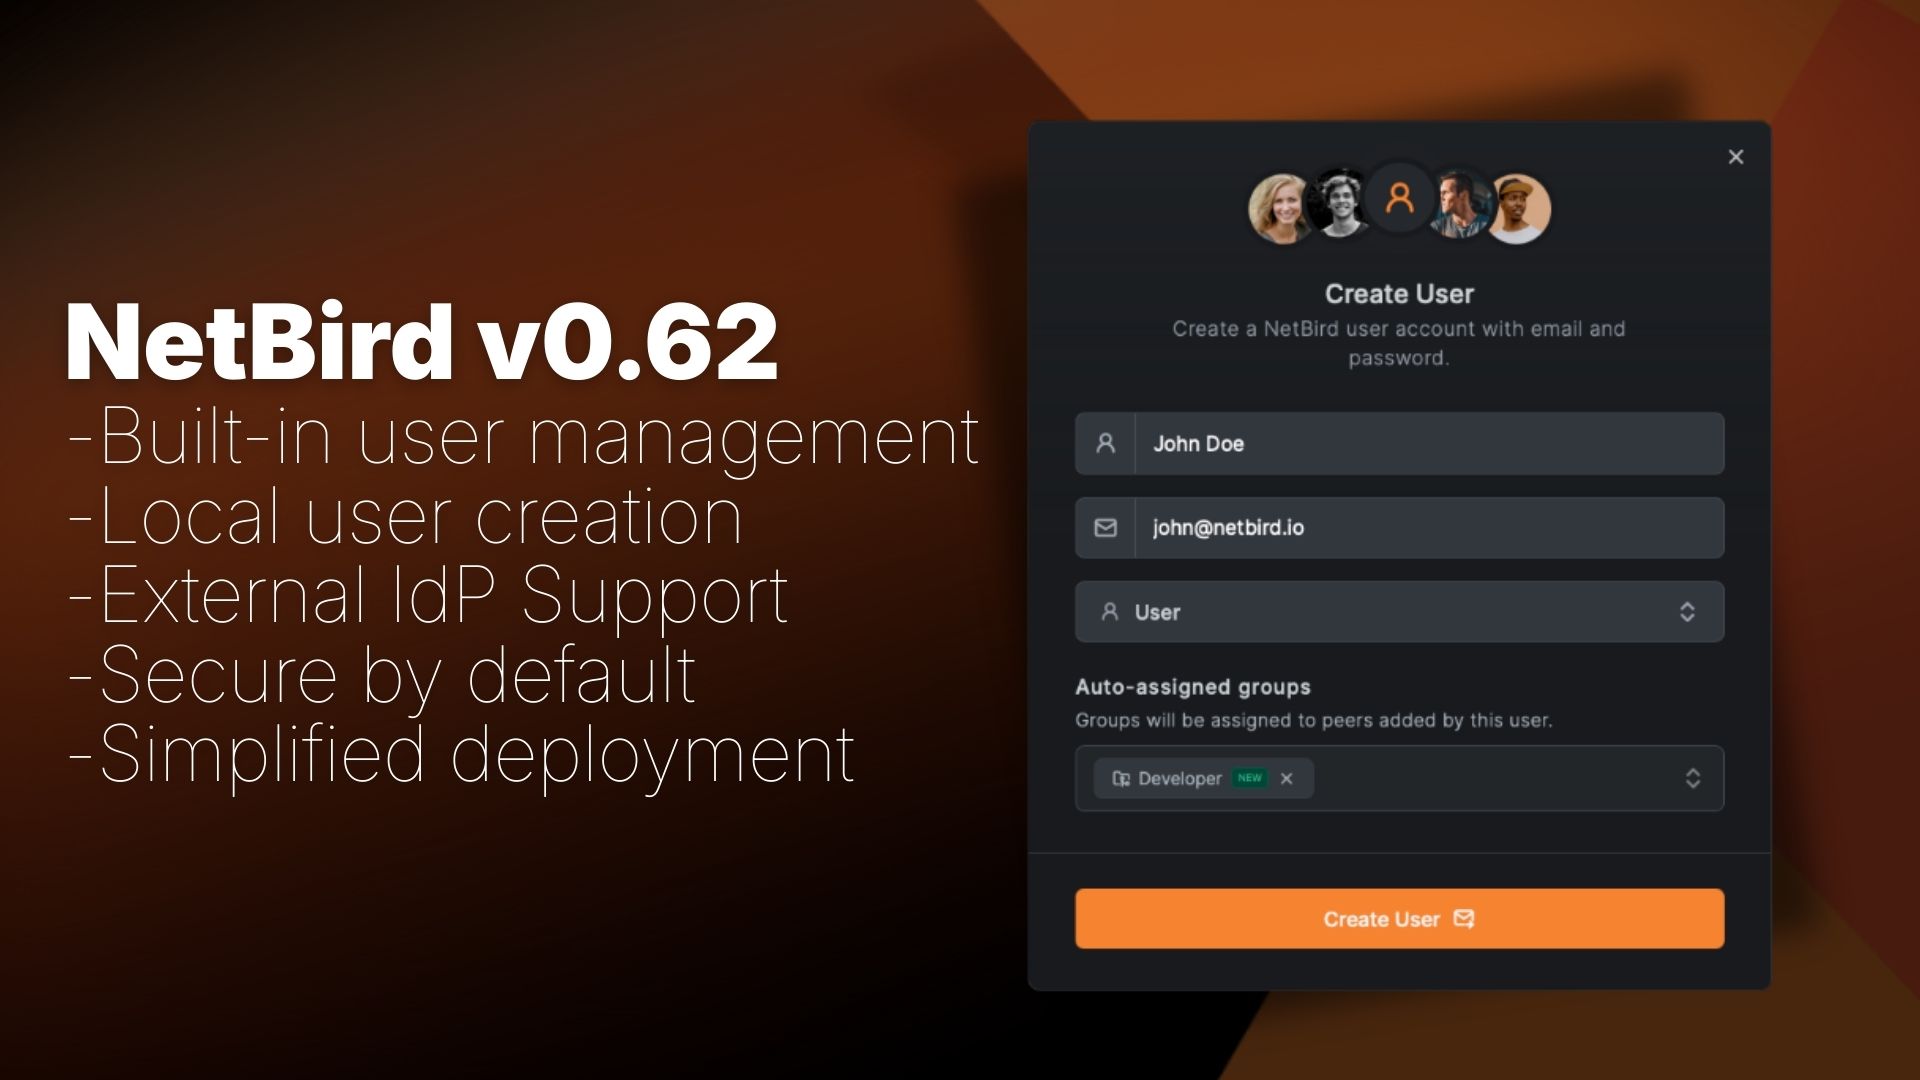
Self-hosting NetBird just got a lot simpler. Version 0.62 removes the requirement for an external identity provider—you can now create and manage users directly from the Dashboard. No Zitadel, no Keycloak, no Auth0 setup required.
The new quickstart script gets you up and running in about 5 minutes with a single command. It handles everything: deploys all services, sets up TLS certificates, and even walks you through reverse proxy selection if you're using Traefik, Nginx, or something else instead of the built-in Caddy.
Here's what changed:
- Built-in user management - Create users directly from the Dashboard using the embedded Dex server—no external IdP required. Secure by default with bcrypt-hashed passwords and AES-256-GCM encryption
- Simplified deployment - Reduced from 7+ containers down to just 5. No separate database for the IdP, no extra containers to maintain. The quickstart script handles everything automatically—from container deployment to reverse proxy configuration
- Interactive setup wizard - When you first access the Dashboard, a setup wizard guides you through creating your admin account. That's it—you're done
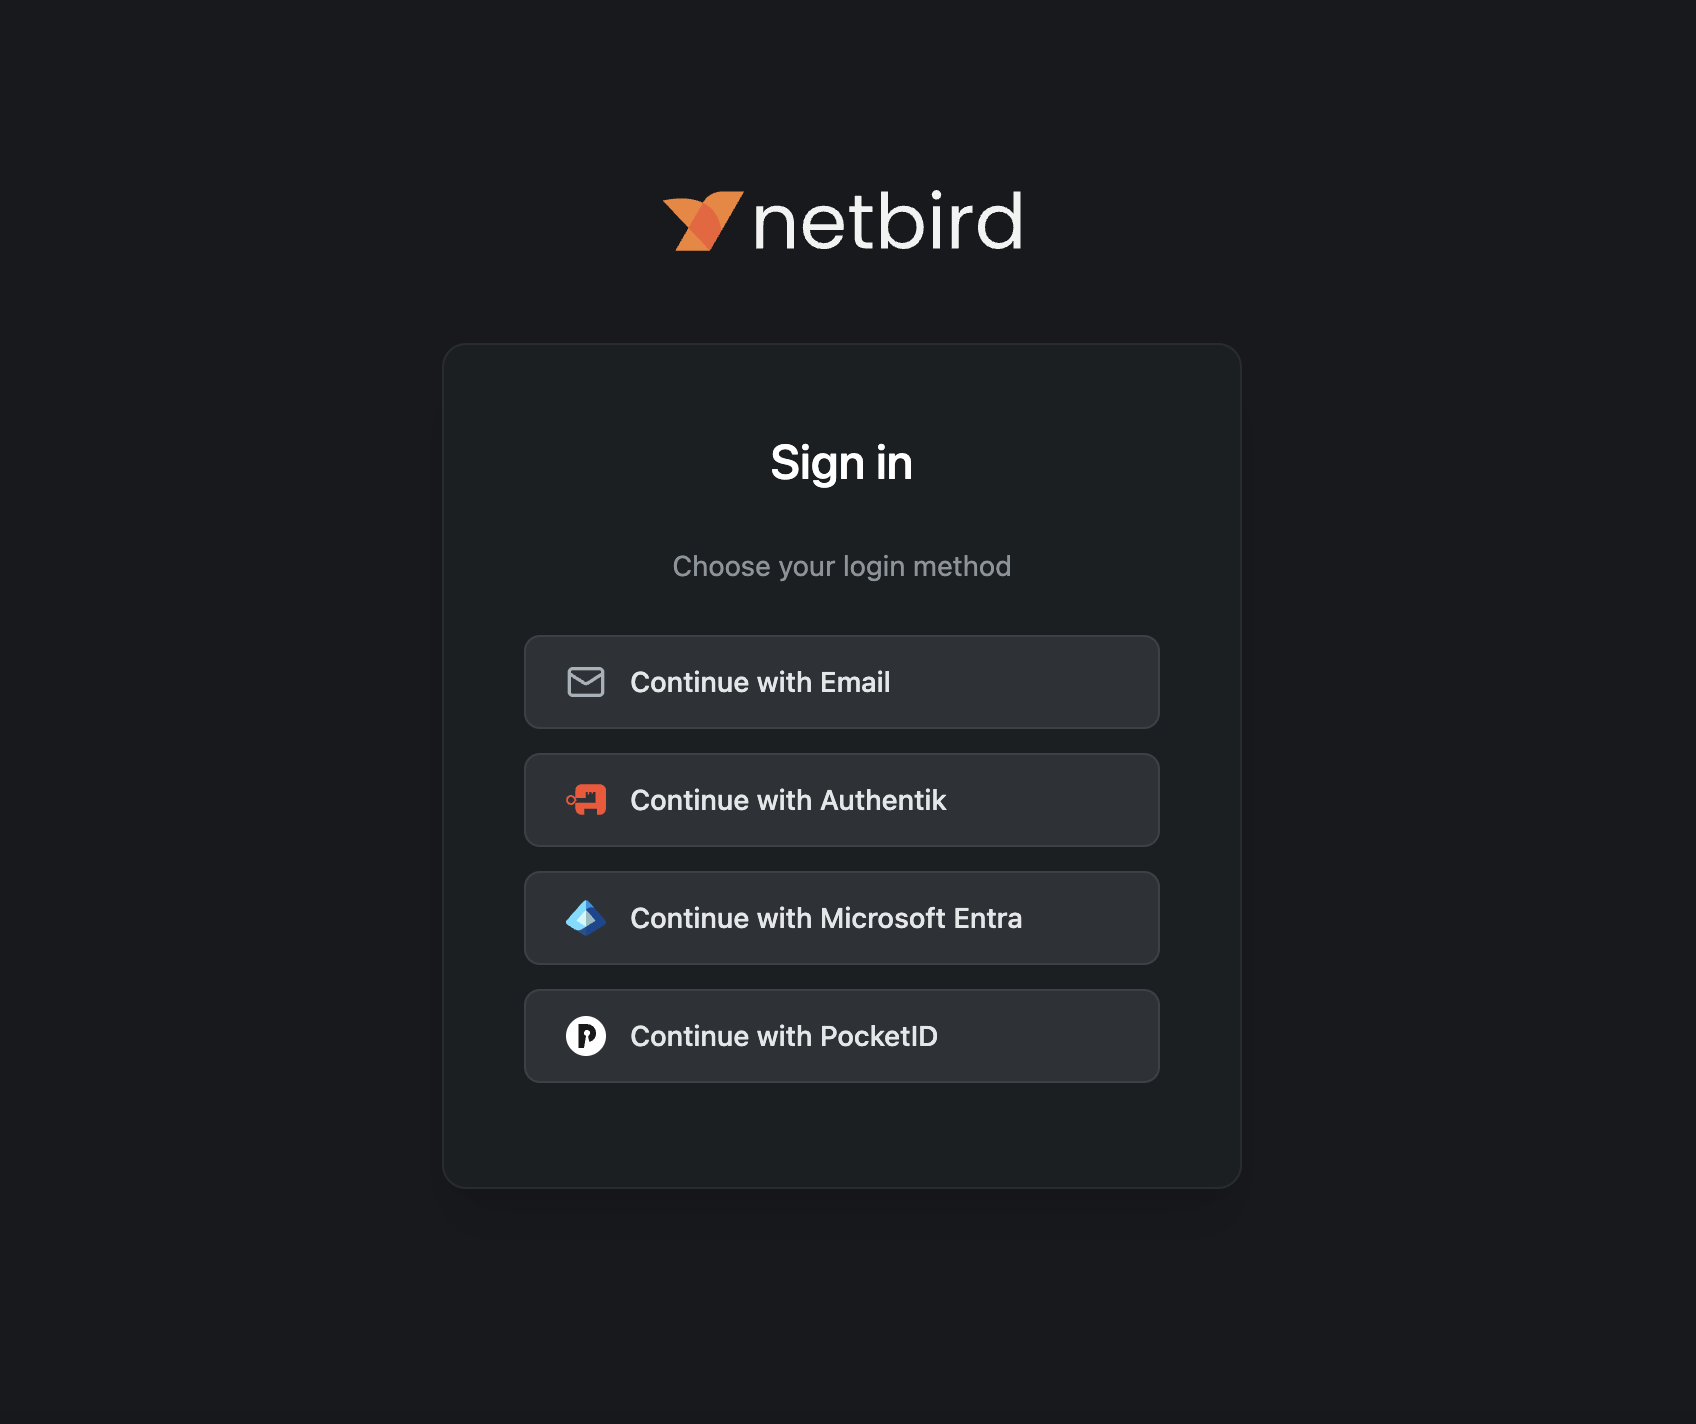
- Easy external IdP integration - Connect multiple SSO providers simultaneously (Google, Microsoft, Okta, Keycloak, etc.) directly from the Dashboard. No config files to edit, no service restarts. Optional JWT group sync automatically provisions groups from your IdP
If you're already running NetBird with Zitadel, don't worry. You can keep using it as-is, add it as an external provider alongside local users, or migrate to local users entirely. We've got you covered either way.
Simplified Quickstart
Getting started with self-hosted NetBird is now faster than ever. The new quickstart script handles everything automatically—from container deployment to reverse proxy configuration.
You'll need a Linux VM (1 CPU, 2GB RAM) with public access on ports 80, 443, and UDP 3478, plus a public domain name. The script requires Docker with docker-compose, jq, and curl. For detailed requirements and setup instructions, see the Quickstart Guide .
Installation
Run the installation script:
The script will:
- Deploy all NetBird services with Docker Compose
- Configure the embedded IdP (enabled by default)
- Set up automatic TLS certificates via built-in Caddy
- Guide you through reverse proxy selection if you prefer an external proxy
Reverse Proxy Options
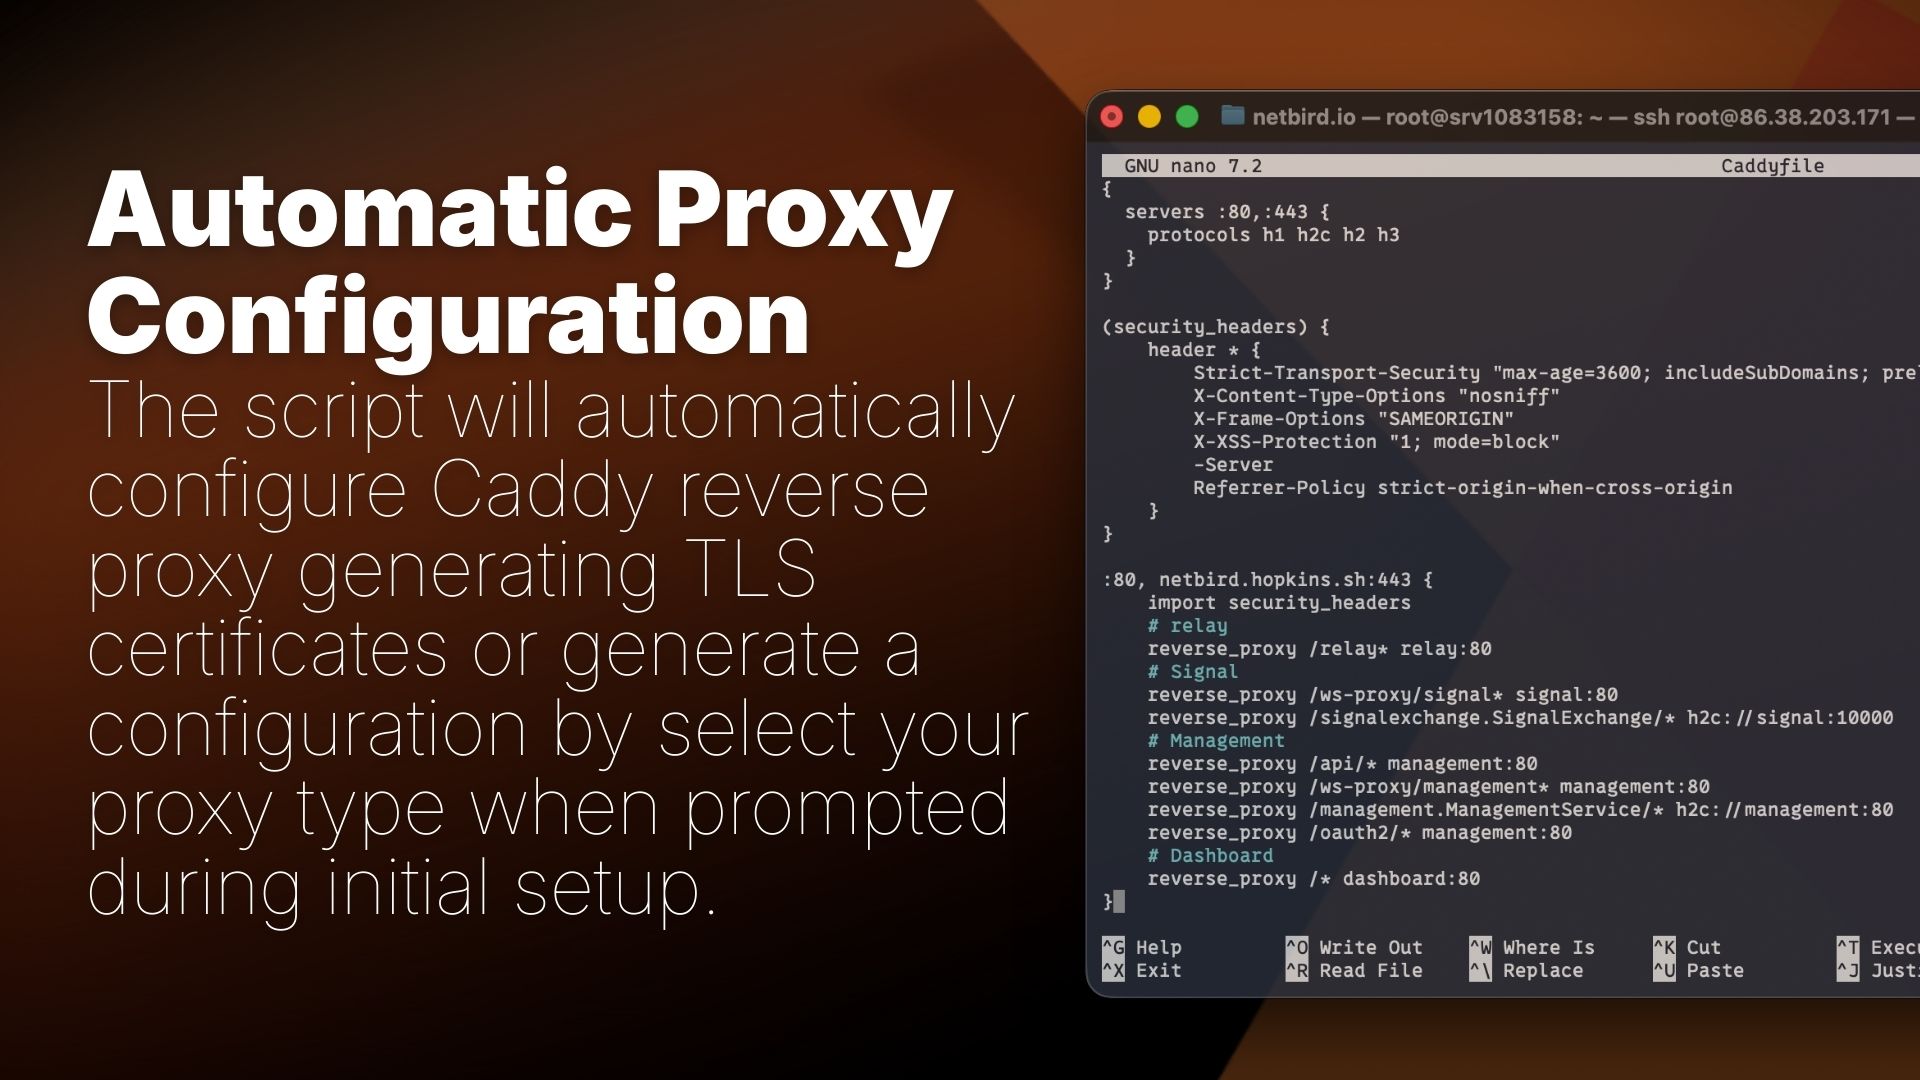
During installation, you can choose your reverse proxy configuration:
- Built-in Caddy (recommended) - Automatic TLS certificates, zero configuration
- Traefik - Automatic service discovery via Docker labels
- Nginx - Configuration templates for Docker or host-based setups
- Nginx Proxy Manager - Step-by-step instructions for GUI-based configuration
- External Caddy - Caddyfile snippets for existing Caddy deployments
- Other/Manual - Documentation links for custom setups
The script generates all necessary configuration files and provides setup instructions for your chosen proxy. No manual routing configuration required. Once finished, you can manage the deployment via commands.
The Problem with External IdPs
Setting up self-hosted NetBird has always required deploying an identity provider alongside the core services. Our quickstart script used Zitadel, which meant spinning up additional containers (Zitadel itself plus CockroachDB) and managing yet another piece of infrastructure.
For homelabs, small teams, and proof-of-concept deployments, this was overkill:
- More containers to deploy and maintain (7+ vs 5 now)
- Additional configuration for OAuth clients, redirect URIs, and scopes just to get started
- Separate user management in the IdP console instead of NetBird
Many self-hosters just wanted to create a few local users and get their network running. They didn't need federated SSO or enterprise identity management, they needed simplicity.
Local User Management
Version 0.62 embeds user management directly into the NetBird Management service with the help of Dex in the backend. When you deploy NetBird, you get:
- Local user creation - Add users with email/password directly from the Dashboard
- No external dependencies - Works out of the box, no IdP setup required
- Dashboard-based management - Create, view, and manage users where you manage everything else
- Secure by default - Passwords are bcrypt-hashed, sensitive data encrypted at rest with AES-256-GCM
Onboarding Flow
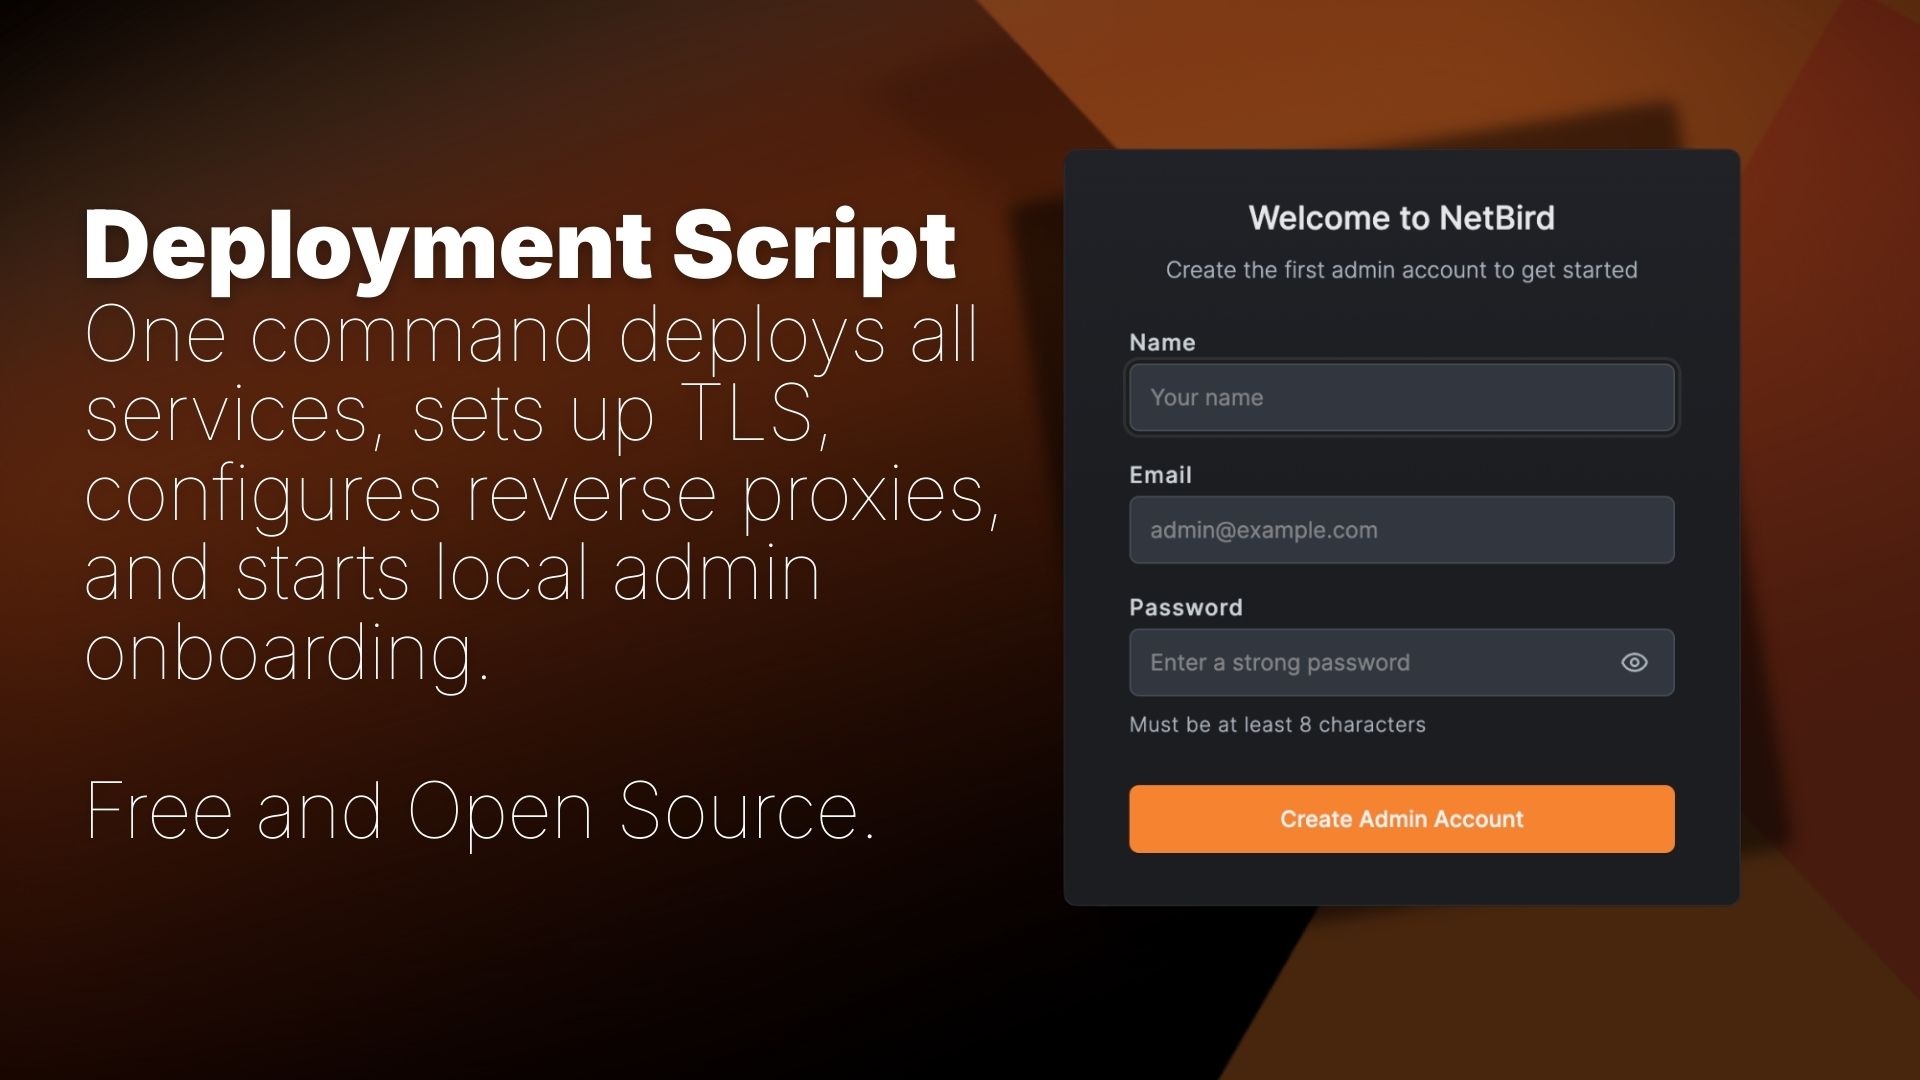
New deployments start without any users. When you first access the Dashboard, you're guided through a setup wizard:
- Navigate to your NetBird Dashboard URL
- You're redirected to the page
- Create your admin account (email, name, and password)
- Log in and you're ready to go
That's it. No separate IdP console, no OAuth configuration, no client ID juggling.
Embedded IdP Configuration
The embedded IdP is enabled by default when using the quickstart script . For manual deployments or custom configurations, you can enable it in :
Adding More Users
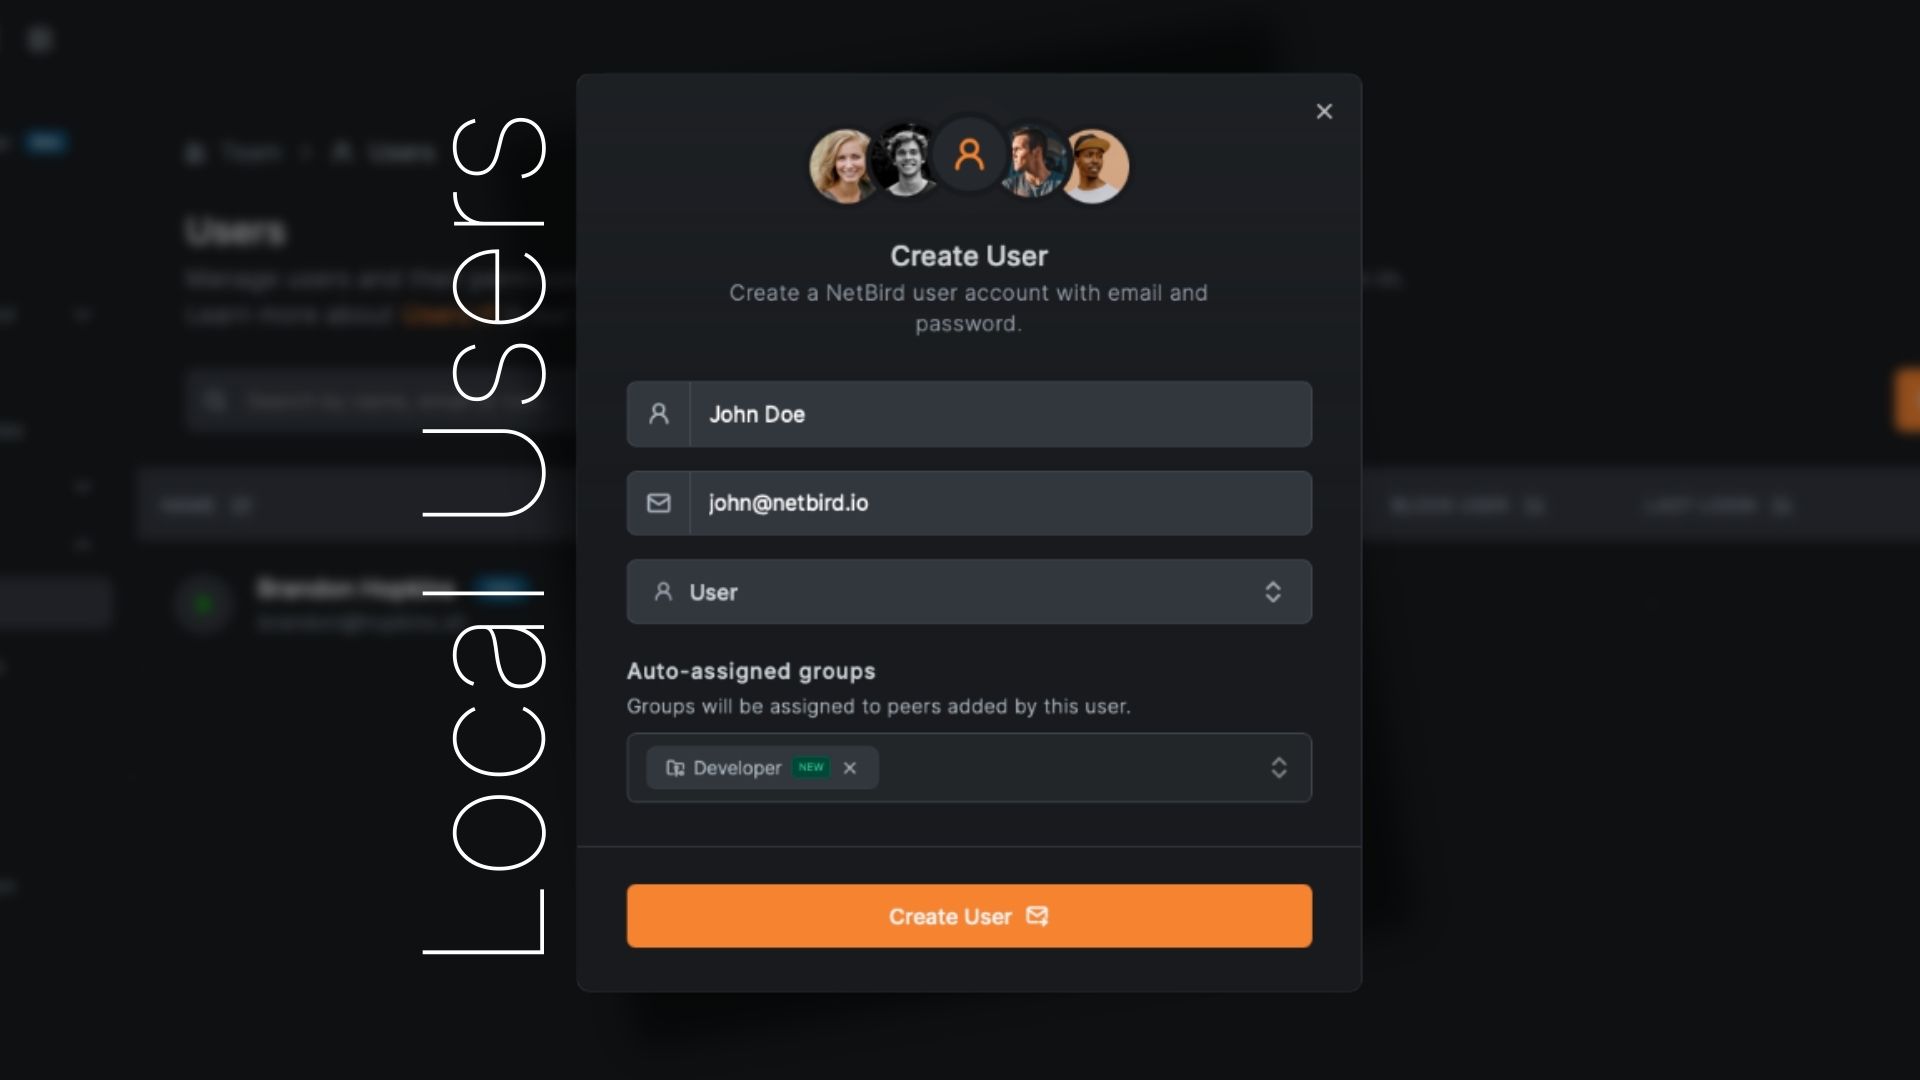
Once logged in, adding users is straightforward:
- Navigate to Team → Users
- Click Create User
- Fill in the user details:
- Email (required) - User's email address for login
- Name (required) - Display name
- Groups (optional) - Auto-assign to groups
- Click Create
A secure password is generated and displayed once in a modal with a copy button. This password will only be shown once—make sure to copy it and share it securely with the user.
User Roles
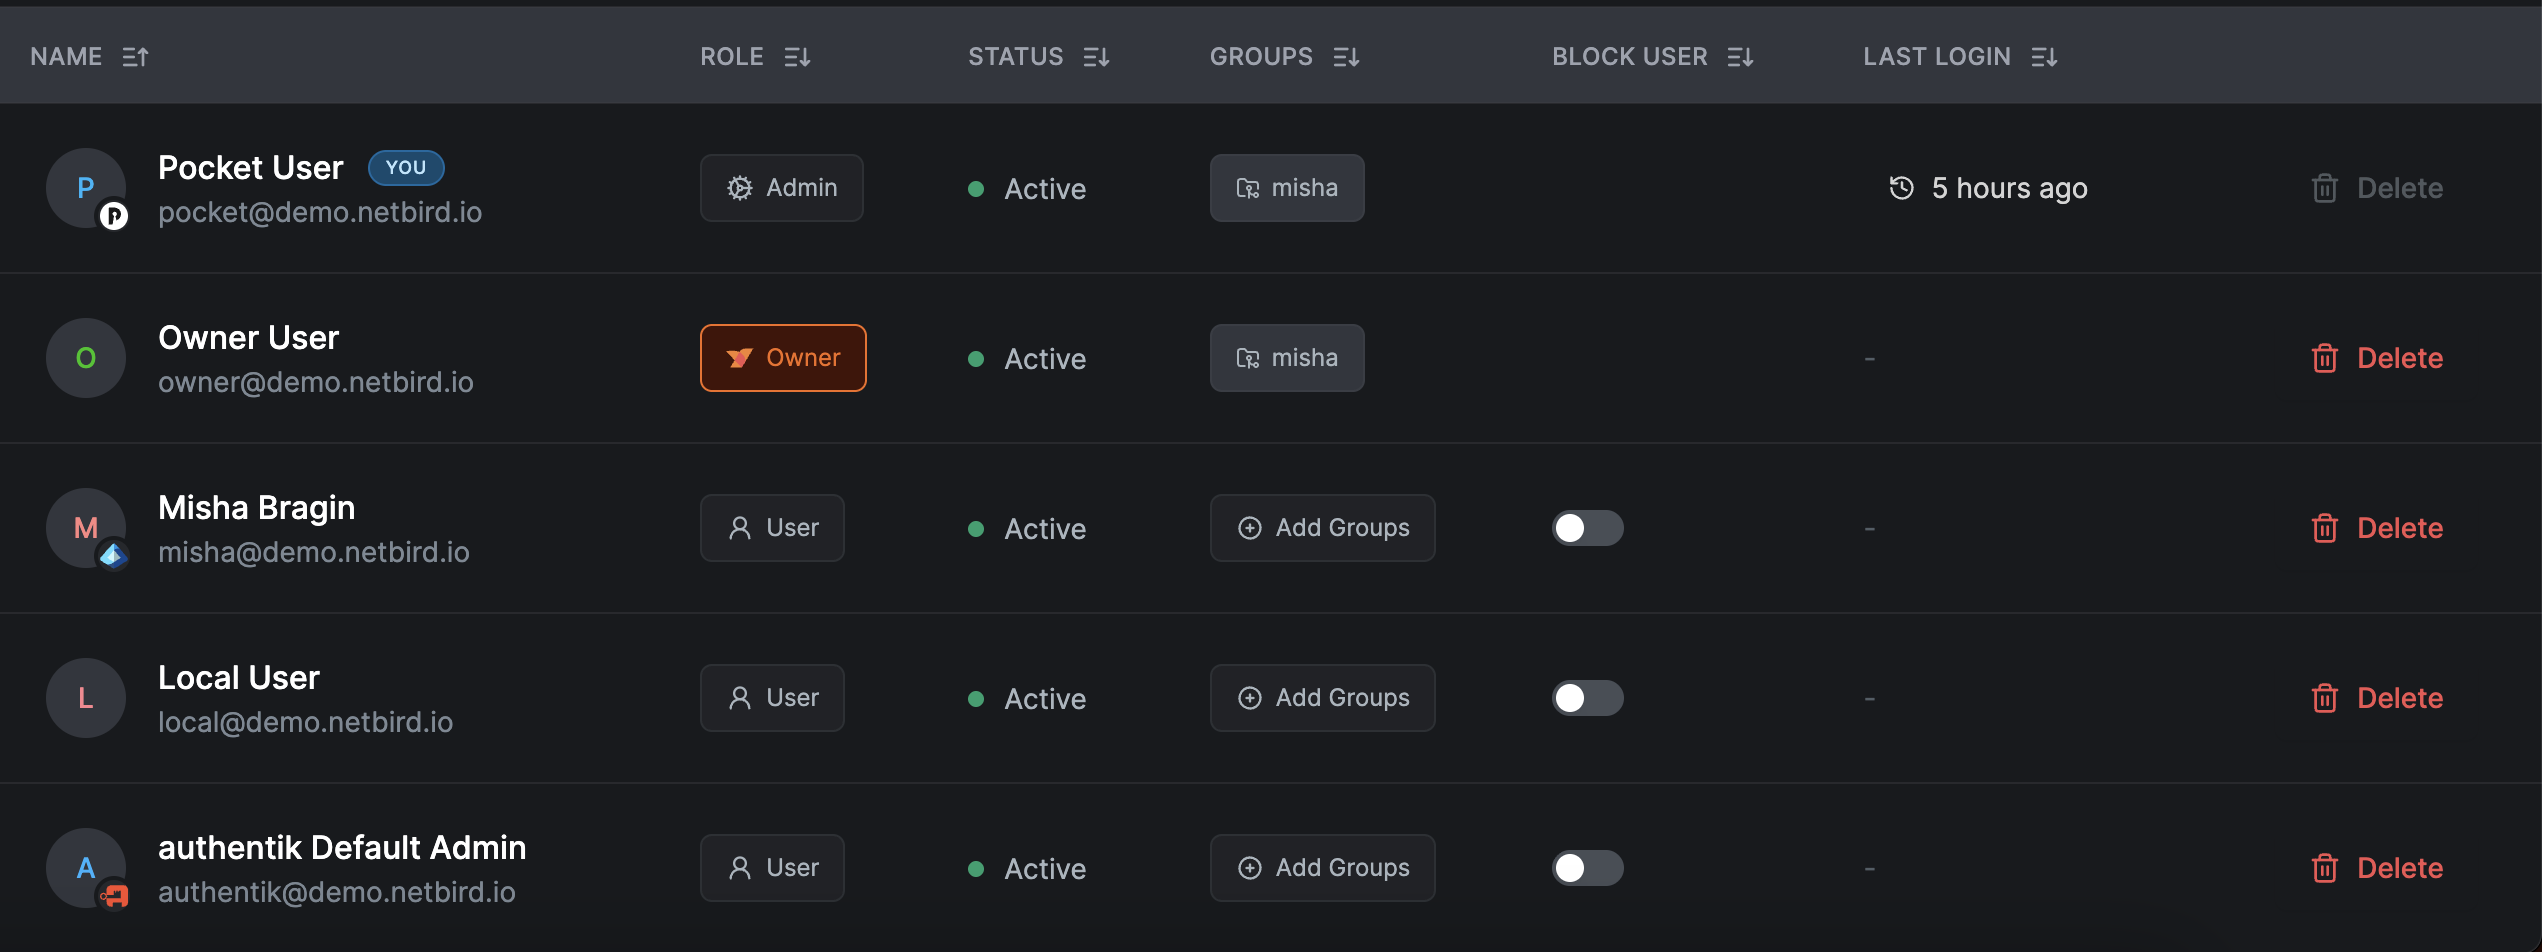
Users created through local authentication can be assigned roles:
- Owner - Full administrative access, cannot be demoted
- Admin - Manage users, peers, policies, and settings
- User - Connect devices, view assigned resources
Optional: External Identity Providers
Local users work great on their own, but sometimes you want SSO. Maybe you already have an instance of Pocket ID, or your company requires Microsoft Entra ID authentication. Version 0.62 supports connecting external identity providers alongside local users. Our integration now makes it easy to manage all of this directly in NetBird.
Multiple Providers Supported
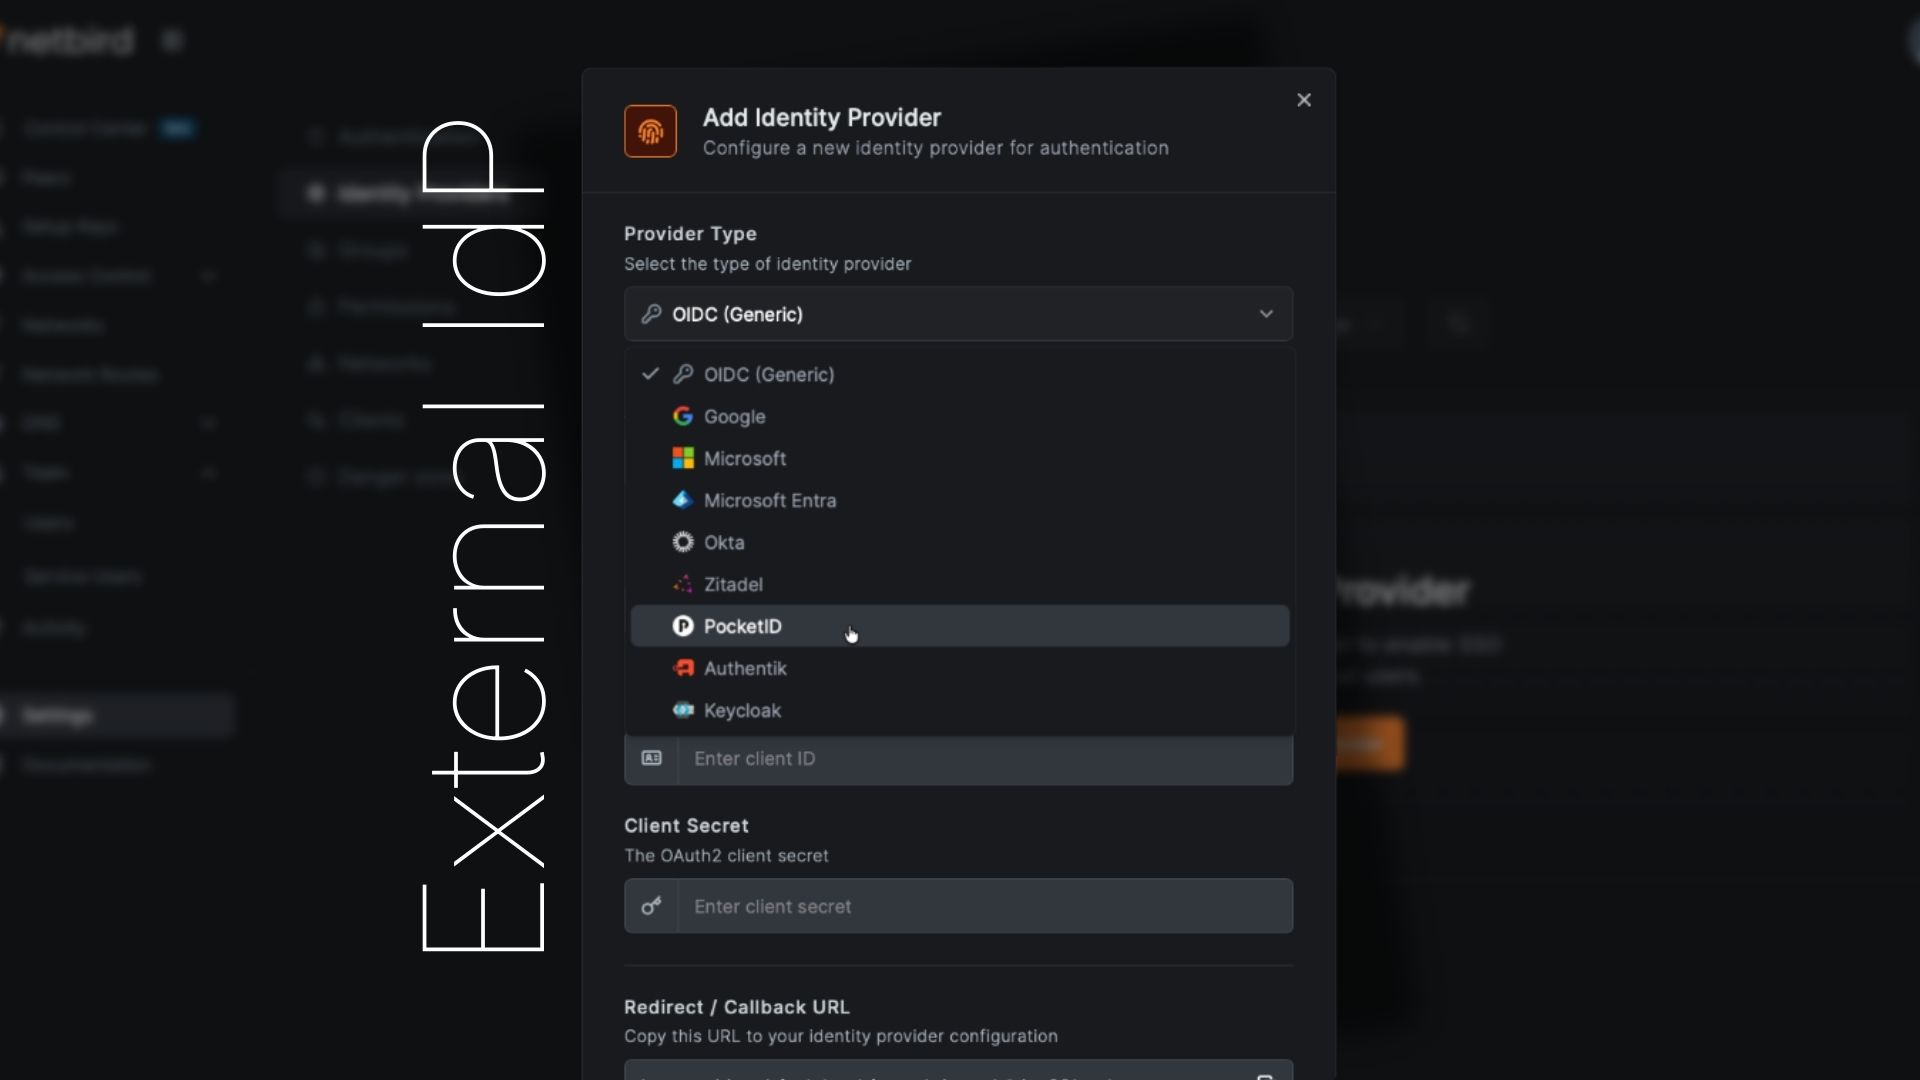
You can configure multiple OIDC-compatible identity providers simultaneously:
- Generic OIDC - Any OIDC-compliant provider
- Google - Google Workspace and personal Google accounts
- Microsoft - Personal Microsoft accounts
- Microsoft Entra ID - Azure AD / work and school accounts
- Okta - Enterprise SSO
- Auth0 - Managed identity platform
- JumpCloud - Directory-as-a-Service platform
- Zitadel - Open-source IAM with multi-tenancy and passwordless auth
- Keycloak - Popular open source IAM with extensive enterprise features
- Authentik - Flexible open source IdP with SSO, MFA, and policy engine
- Pocket ID - Lightweight OIDC provider with passkey authentication
Users see all configured providers as login options, with local email/password authentication always available as a fallback.
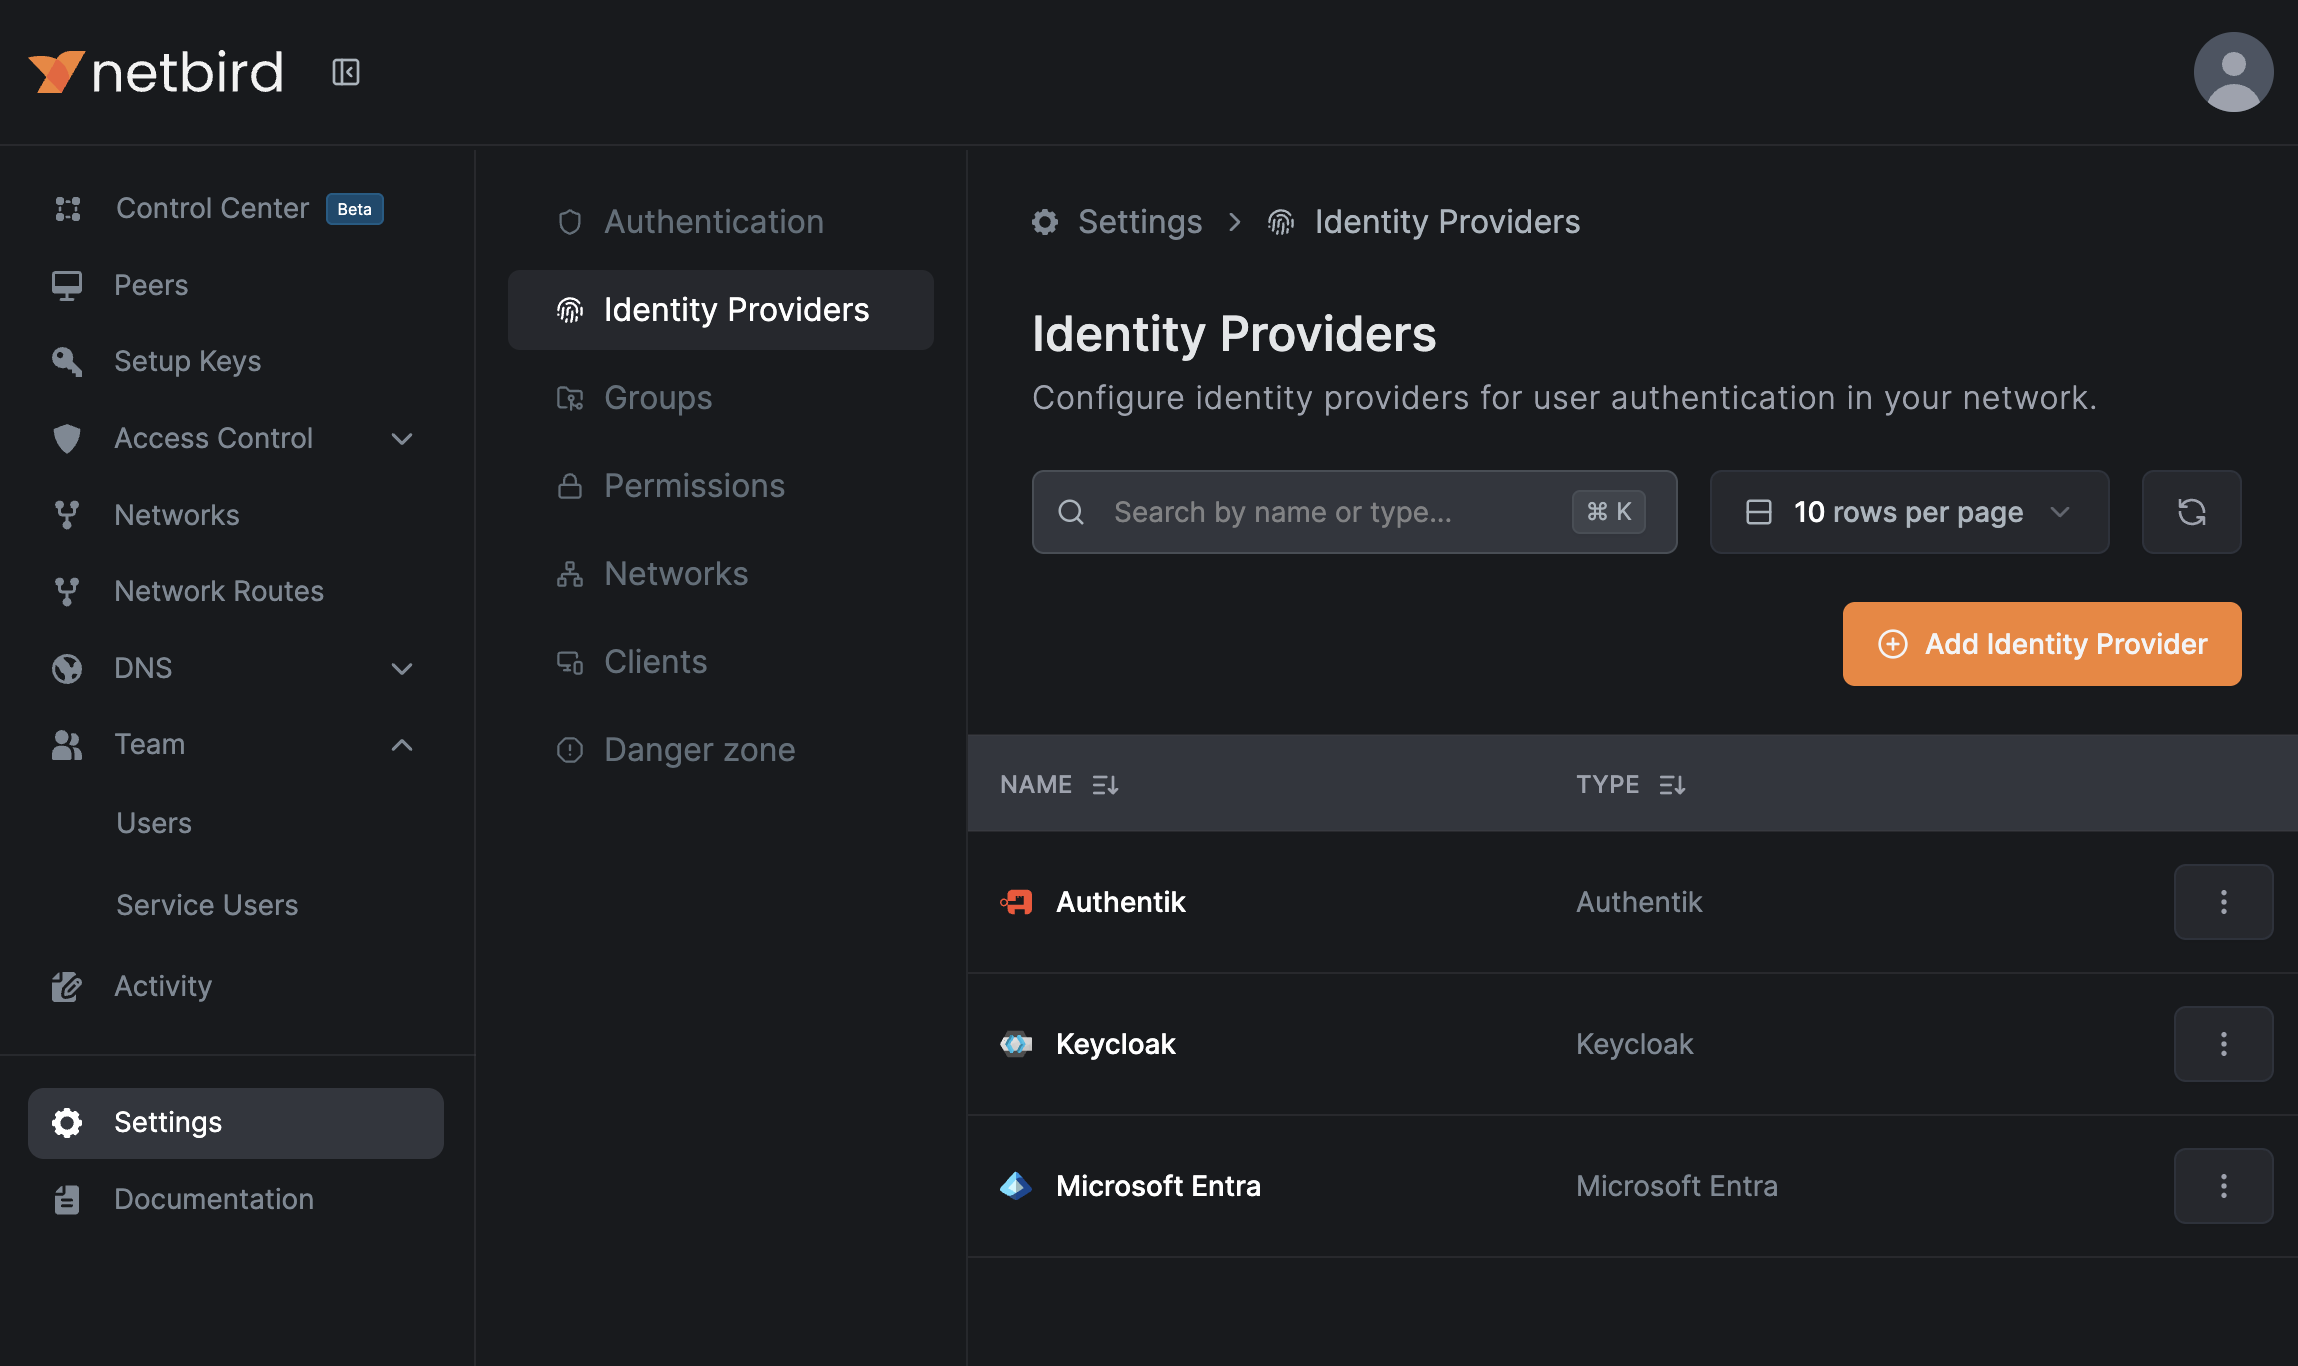
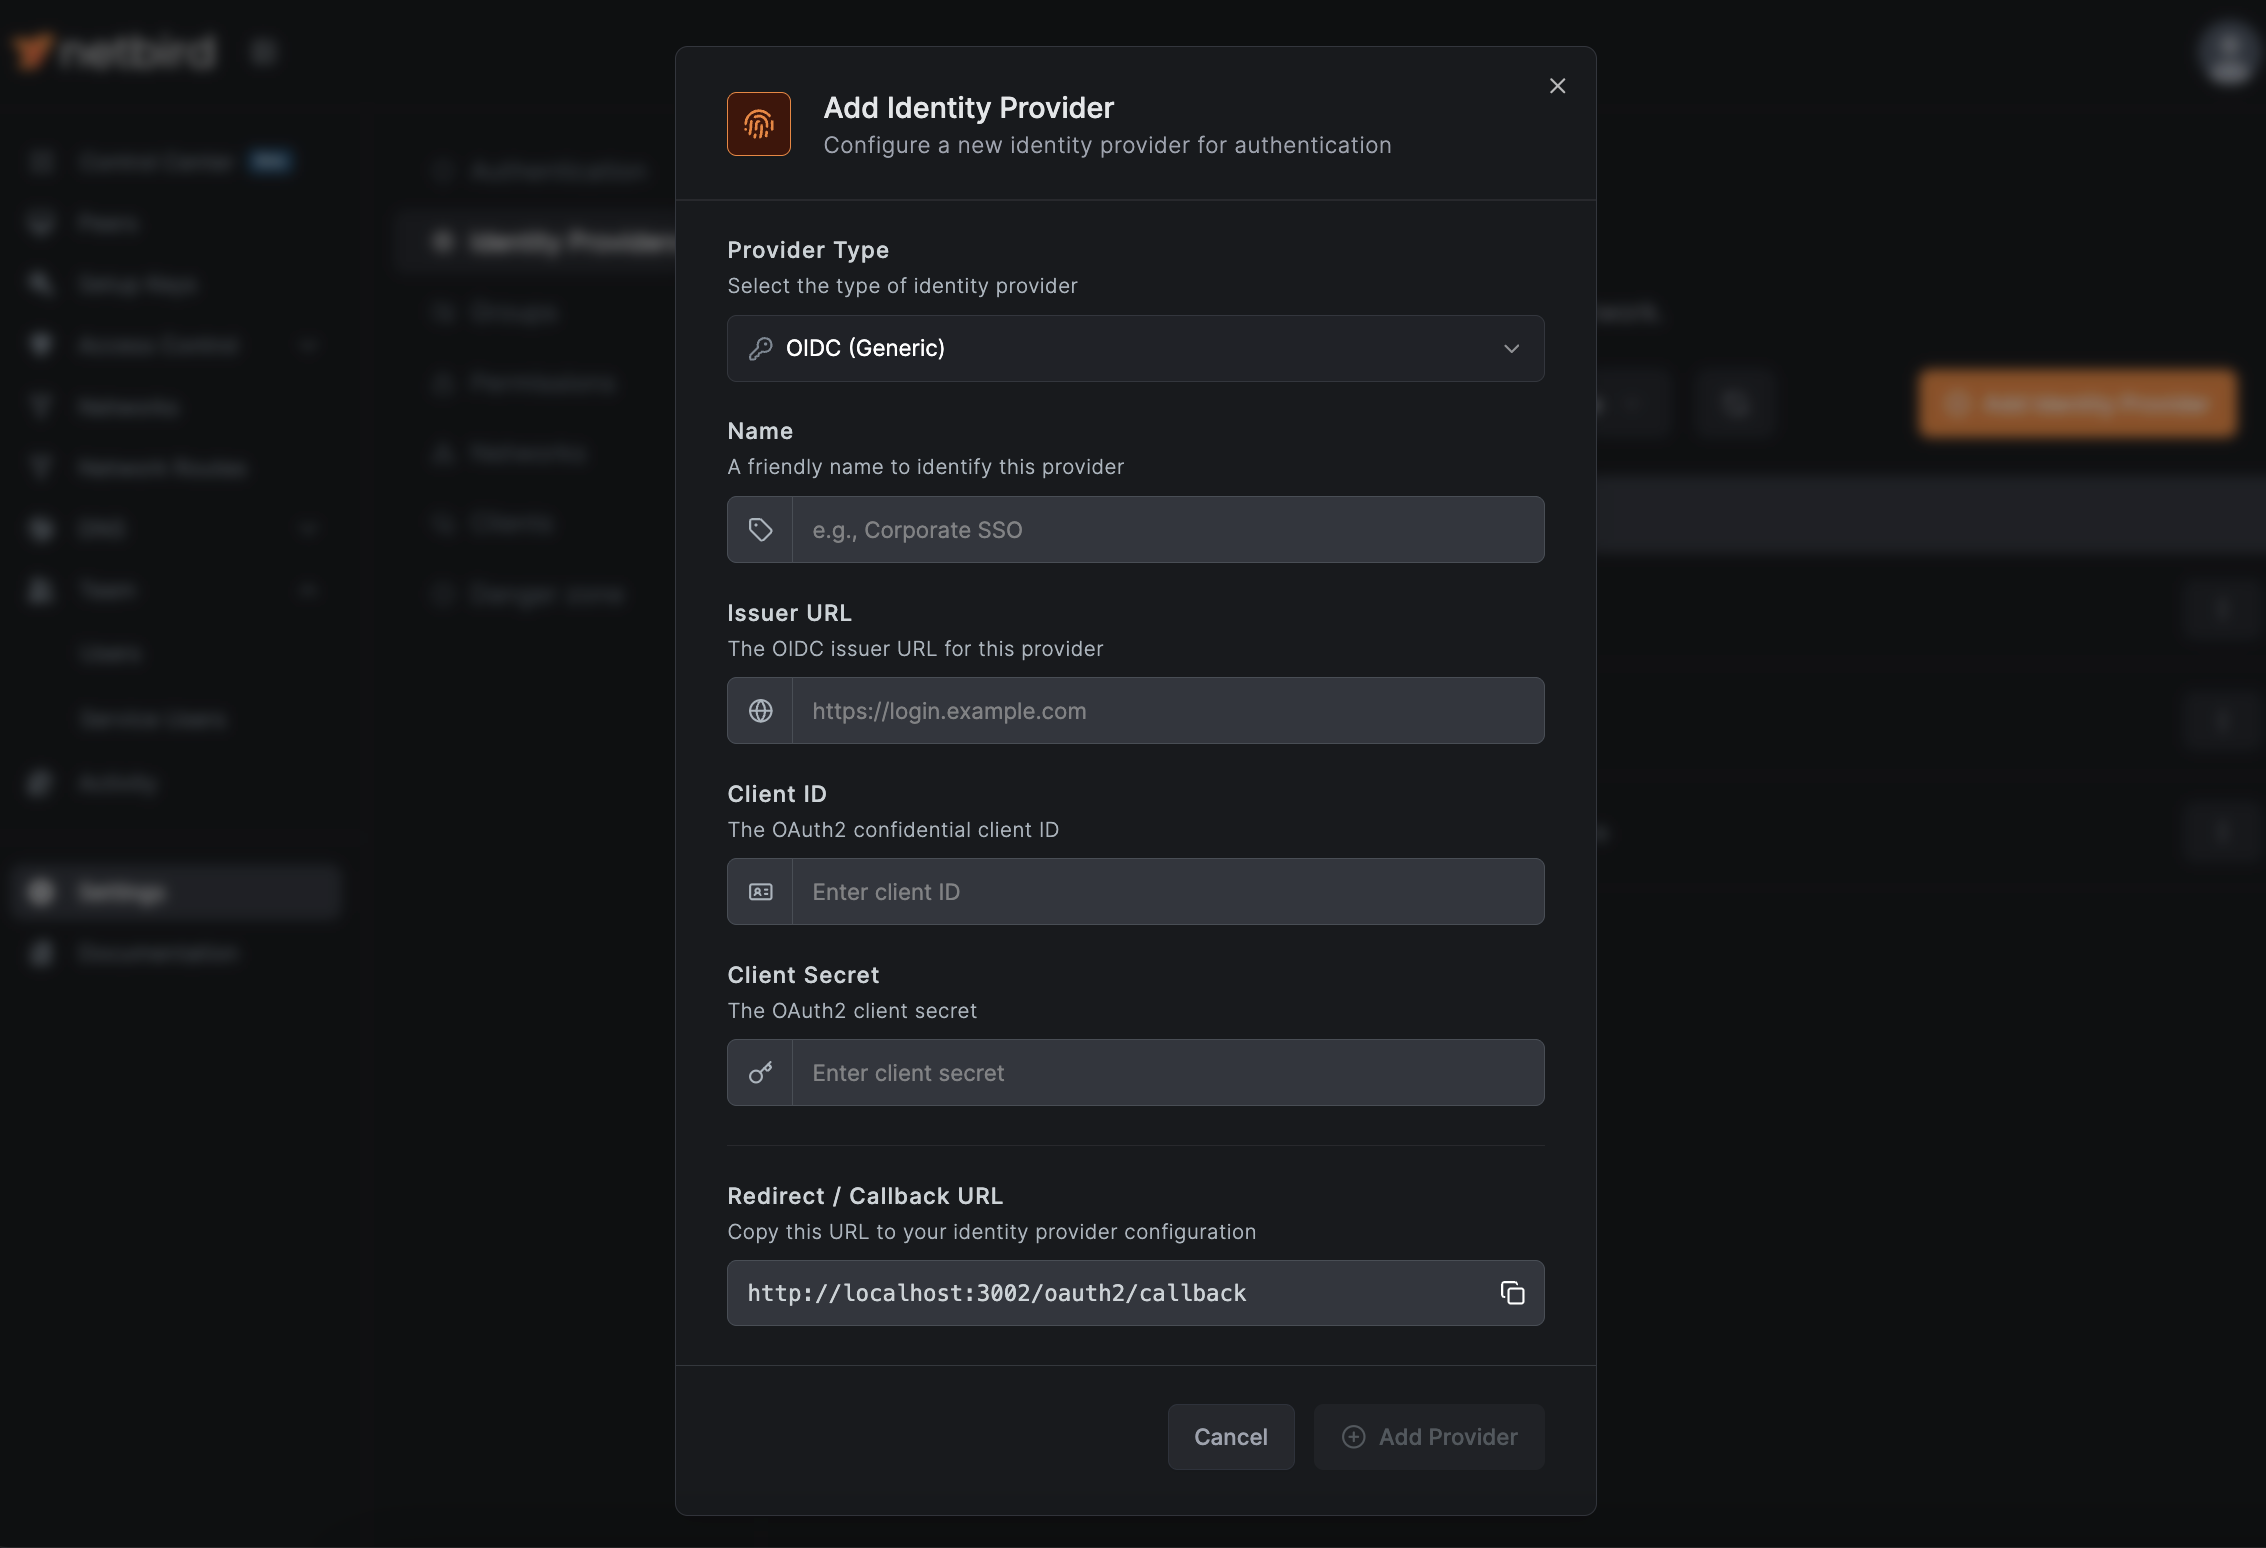
Adding an External Provider
- Navigate to Settings → Identity Providers
- Click Add Identity Provider
- Select your provider type from the dropdown
- Configure the required fields:
- Name - Display name for the login button
- Client ID - From your identity provider
- Client Secret - From your identity provider
- Issuer - From your identity provider (for generic OIDC)
- Copy the Redirect URL that NetBird displays
- Configure the Redirect URL in your identity provider's OAuth settings
- Click Save
That's the entire flow, no config files to edit, no service restarts required. The secret is stored securely in your NetBird installation and never exposed to the public.
How External Authentication Works
When a user authenticates via an external identity provider:
- User clicks the provider button on the login page
- User is redirected to the identity provider to authenticate
- After successful authentication, the identity provider issues a JSON Web Token (JWT) containing the user's identity and claims
- User is redirected back to NetBird with the token
- NetBird validates the token and creates/updates the user account automatically
- User is logged in and can access the Dashboard
Users who authenticate via an external identity provider appear in your Users list with a badge showing their identity provider (Google, Microsoft, etc.), making it easy to see which authentication method each user uses.

JWT Group Sync
For IdPs that support it, NetBird can automatically sync user groups from JWT claims. When enabled, groups from your identity provider are automatically created in NetBird and assigned to users upon authentication.
To enable JWT group sync:
- Navigate to Settings → Groups
- Toggle Enable JWT group sync
- Configure the JWT claim name (typically ) that contains the user's group list
- Optionally specify JWT allow groups - users must belong to at least one of these groups to access NetBird
Once configured, groups from your IdP's JWT tokens will automatically be created in NetBird and assigned to users when they authenticate. This eliminates the need to manually manage group memberships for users authenticating via external providers.
Different identity providers may require specific configuration to pass groups in JWT claims. For detailed, provider-specific setup instructions, see the Identity Providers documentation .
Technical Implementation
Under the hood, local user management is powered by an embedded Dex server running within the Management service. Dex is a lightweight, battle-tested OIDC provider that handles:
- Local username/password authentication
- External provider federation (the "connectors")
- JWT token issuance
- Device authorization flow for CLI authentication
No additional containers, no separate databases, and no external network dependencies for authentication.
Passwords are securely hashed using bcrypt before storage.
Migration from Zitadel Quickstart
If you deployed NetBird using the previous script, you have options:
Option A: Keep Using Zitadel
Your existing setup continues to work. No action required. The standalone IdP documentation remains available for reference.
Option B: Add Zitadel as an External Provider
Deploy the new version, then add your existing Zitadel instance as an external identity provider:
- In your Zitadel console, note your application's Client ID and Client Secret
- In NetBird Dashboard, go to Settings → Identity Providers
- Add Zitadel as a provider with your existing credentials
- Users can continue logging in with Zitadel
This gives you the simpler deployment while preserving your existing authentication.
Option C: Migrate to Local Users
- Export your user list from Zitadel
- Deploy the new NetBird version
- Create users locally via Dashboard or API
- Decommission Zitadel containers
For detailed migration steps, see our Migration Guide .
Note: We're working on an in-depth migration guide to help with switching from standalone IdPs to external providers. Contact us at support@netbird.io if you need immediate assistance.
Get Started
-
New deployment: Use the Quickstart Guide
-
Existing deployment: See the Migration Guide
-
Add SSO providers: Check the Identity Providers documentation
-
Try NetBird: Get started at netbird.io/pricing
-
Join the community: Star us on GitHub · Follow us on X