
You've likely encountered considerable buzz surrounding Zero Trust Networking recently, with prominent cybersecurity vendors leveraging the term extensively in marketing campaigns. They target large enterprises with multi-million dollar cybersecurity budgets. Often, the value proposition behind such substantial investments remains ambiguous.
But what about smaller companies without big budgets for expensive network security solutions?
The trend in software, from monitoring tools to databases, is towards simplicity, speed, and cost efficiency, which also applies to network security. Increasingly, companies are turning to open source projects that effortlessly meet these criteria, with added transparency as a notable benefit.
We at NetBird believe that secure private networking is a fundamental right of every modern company. Our mission is to build an advanced network security platform that is easy to use and affordable for companies of all sizes and budgets.
With the recent NetBird release, we are bringing Zero Trust to the world of open source network security, extending NetBird's access control system with Device Posture and other Context-based checks —an essential part of Zero Trust Security.
In this article, you'll learn the importance of combining multiple context-based checks to secure private networks. We'll also guide you step-by-step through setting up these checks with NetBird. By the end of this article, you'll be able to restrict access to your infrastructure based on identity, operating system, geolocation, and other factors.
Limitations of identity-based verification
Historically, the basis of network access control was primarily focused on verifying identity—ensuring that the user attempting to gain access was who they claimed to be. In most private networking solutions, identity verification is achieved with Identity Provider (IdP) integrations like Okta, Google Workspace, or Microsoft Entra. These IdPs not only enable identity verification but enhance security by adding a Multi-Factor Authentication (MFA) layer. This additional layer significantly reduces the identity theft risk, ensuring that malicious entities are less likely to exploit stolen credentials.
Implementing MFA neutralizes many potential threats, even when credentials fall into the wrong hands. However, the complexity of securing network access escalates when other variables enter the equation, such as malware and unsafe network environments.
Consider a scenario where an employee, perhaps unknowingly, downloads malware from the internet. This malware could compromise the network the moment the employee connects, regardless of the successful identity verification via MFA. Or picture someone trying to access confidential company data at an airport using public Wi-Fi. They might pass the MFA check, which could still let harmful software sneak into the network. Both situations show that while MFA is good at checking who you are, it doesn't stop security risks from the devices or networks you use to access the system.
A medium-sized business case
Let's look at a common situation for a medium-sized business to break down the challenge. The company needs to provide network access from a variety of devices, including:
- Devices managed by the company's IT department.
- Employees' personal devices, such as laptops and smartphones.
- Devices used by external entities, including contractors, freelancers, and auditors.
These devices may operate on various operating systems and versions, some of which might be outdated and lack the latest security updates.
Furthermore, these access requests can originate from multiple locations at any time:
- Inside the corporate network, such as offices, branches, or data centers.
- From remote locations, like an employee's home network.
- Through public networks, such as those in cafes or airports.
This diversity in device types and access locations complicates securing remote access to the company's network and resources. Companies should consider using something more dynamic to verify access instead of just a static identity check.
Contextual access control and device posture checks
Contextual access control is a dynamic way to extend static identity checks when managing network access. It evaluates not only the user's identity but also the device's security posture and additional context, such as geographical location, network environment, time of access, and the specific system being accessed.
Device security posture assessment, or device posture checks, refers to evaluating a device's security and compliance status. This includes verifying the operating system version, the presence and status of antivirus software, the integrity of firewalls, and overall system health.
A comprehensive access control system should allow network administrators to create access policies defining who can access what, where, when, and how. In other words, policies that perform a context check before allowing access.
Let's get practical and see how to enable device posture and other checks with NetBird, an open source network security platform.
Cloud and self-hosted NetBird
As an open source company, we offer two ways to use NetBird: a cloud version and a self-hosted version.
The cloud version is a fully managed service that requires no management layer installation or maintenance. It's a great way to get started and manage your network, as you will need less than a minute to install the NetBird client application and create a network. A free plan allows you to add up to 100 machines and five users to your network.
The self-hosted version is open sourced and free to use. It allows you to install the management layer on your infrastructure. However, it requires more effort to set up and maintain your network. It also misses features like user and group sync from the identity provider (IdP), activity event streaming to 3rd party services, enterprise integration with CrowdStrike, and other EDR/XDR solutions. These features are available only in the cloud version.
We have prepared an installation script for the self-hosted version to help you quickly install the NetBird management layer on your server. You can follow the self-hosting quickstart guide on GitHub: netbirdio/netbird.
Don't hesitate to leave a GitHub star if you like our work!
NetBird security features overview
This guide uses the cloud version of NetBird to demonstrate how to enable contextual access control and device posture checks. But you can also continue with your self-hosted installation.
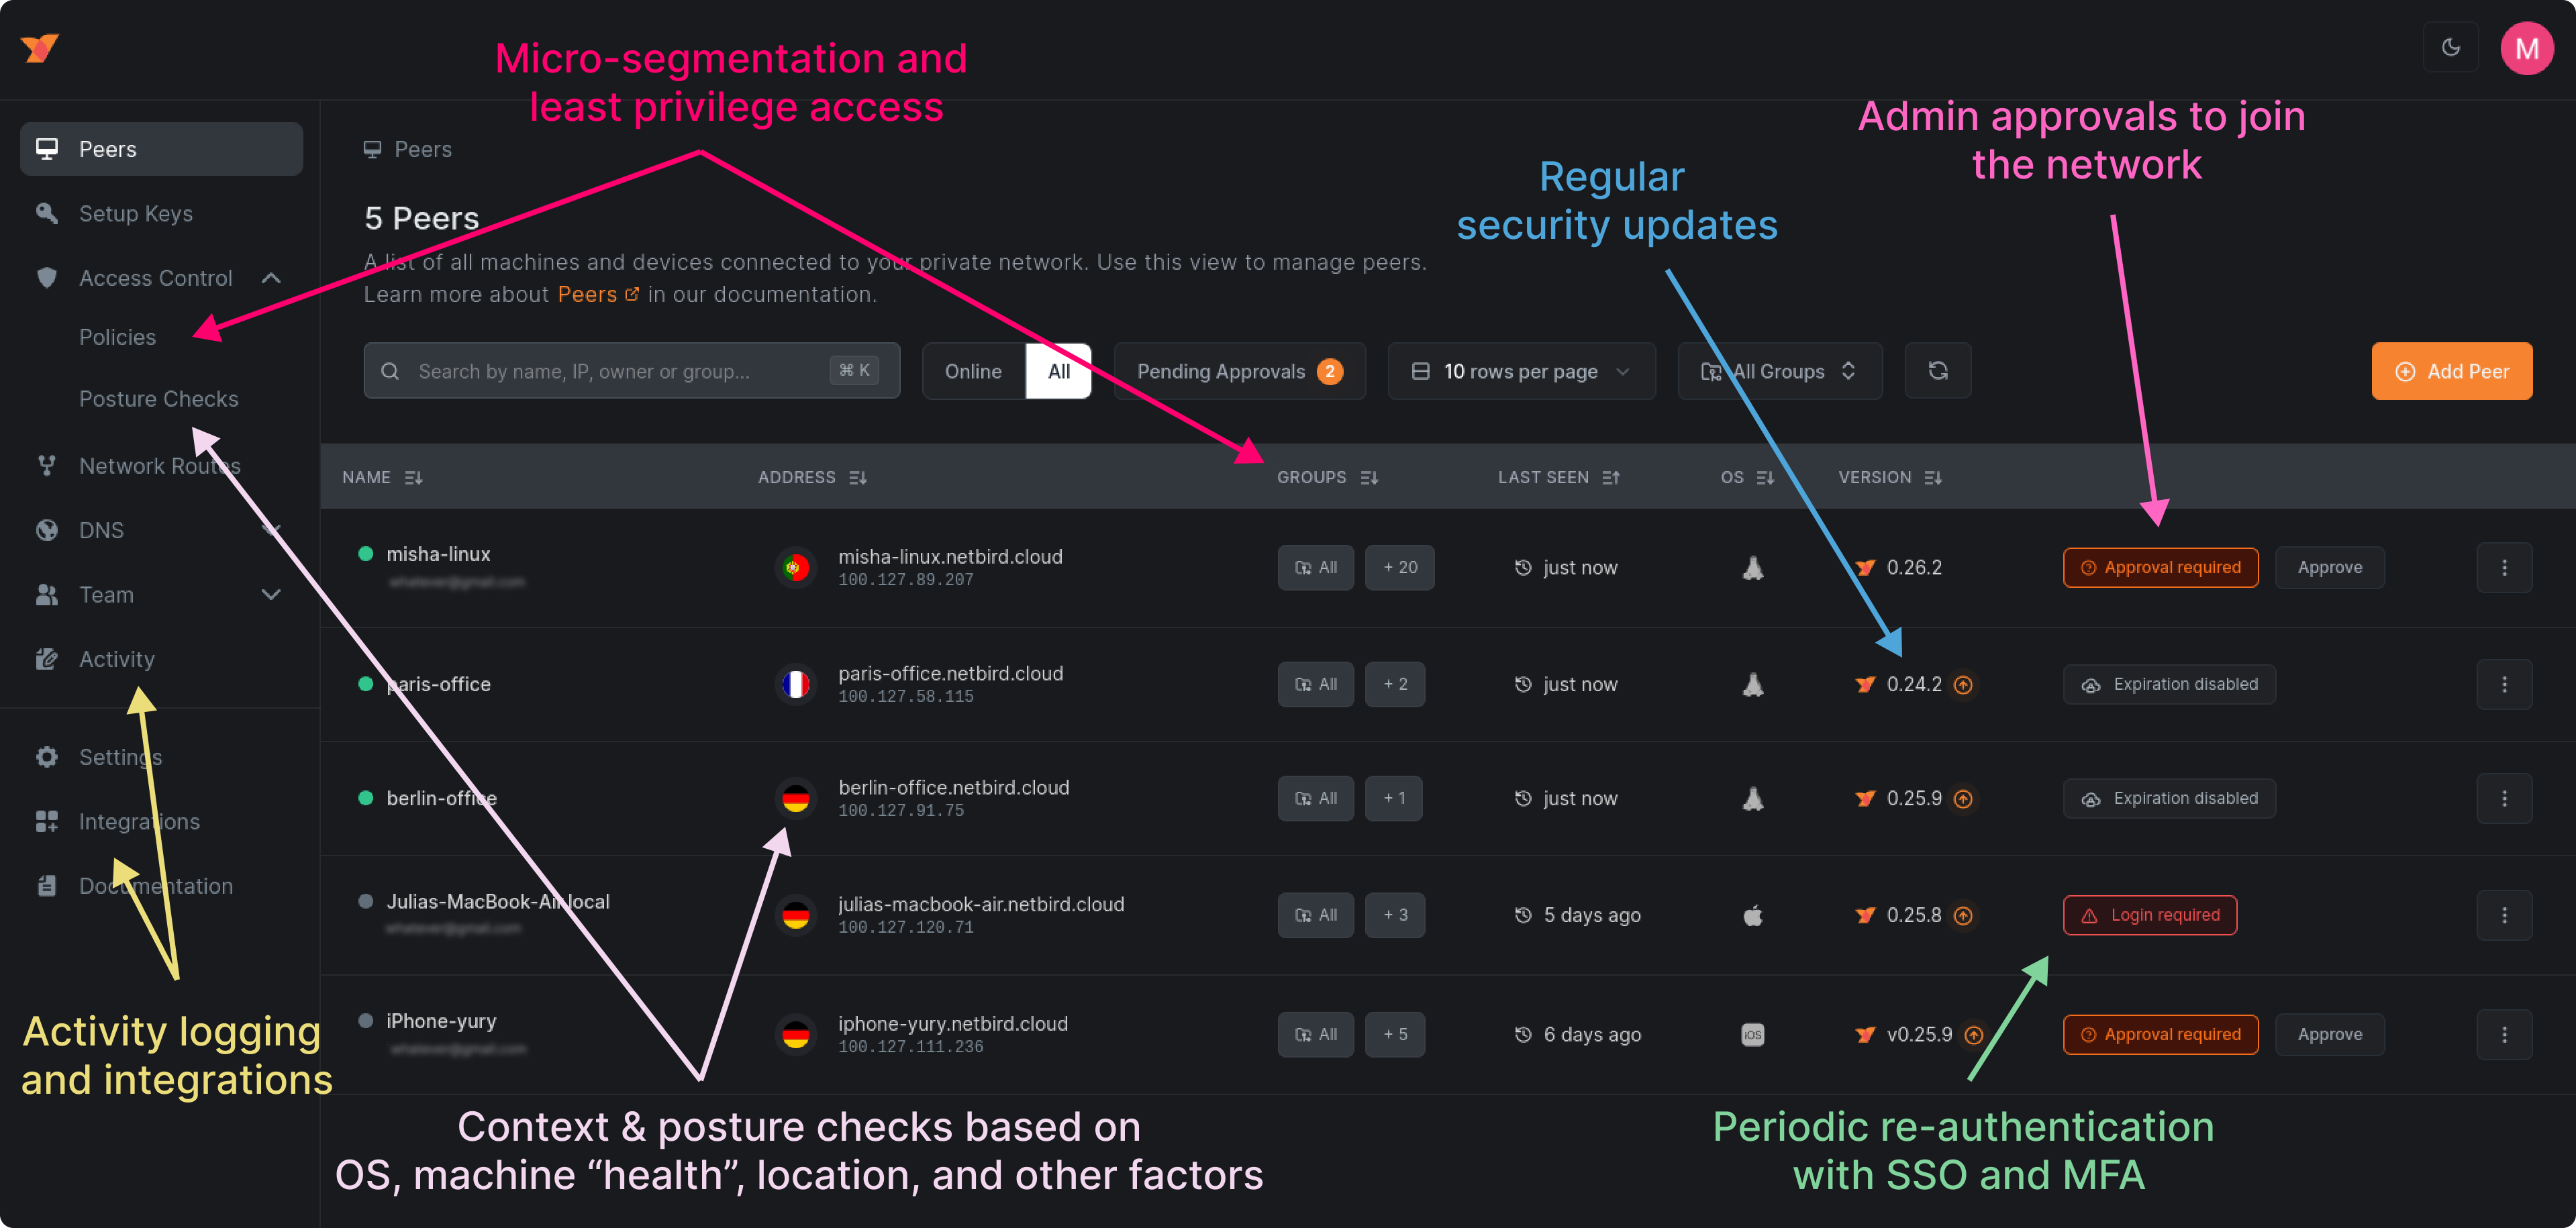
NetBird also offers other security features like centralized network management, machine approvals, micro-segmentation, end-to-end encryption, activity logging, and more. Through this guide, you will learn how to use them to secure your network.
Install NetBird on your machines
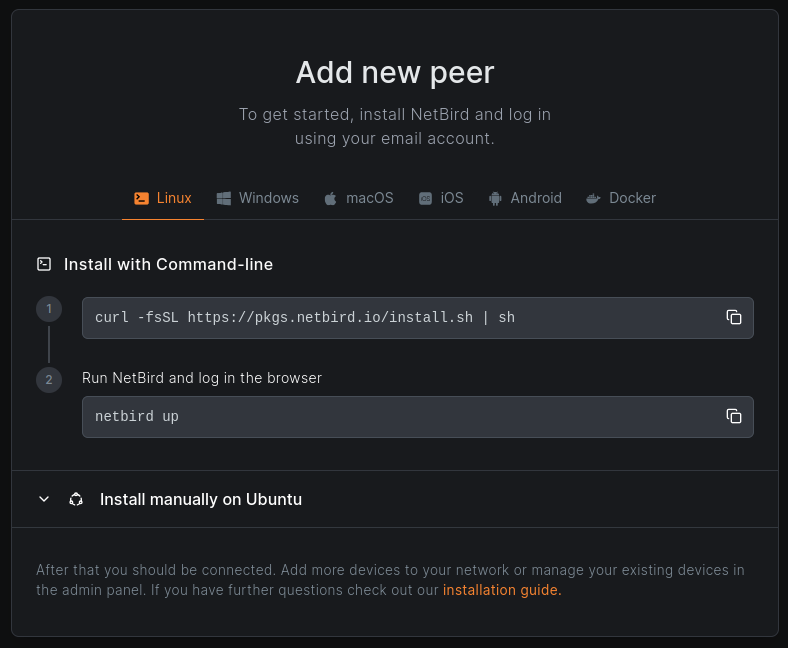
First, to protect your private resources, you need to install NetBird on them. In this guide, you'll install NetBird on a Linux laptop, a Docker container, and a virtual machine running in the cloud. If you are a Mac or Windows user, you can choose your preferred operating system during installation.
For each of the supported operating systems, you can find the installation instructions here:
Use SSO and MFA to authenticate your machines
After a successful installation on your laptop, open your terminal and run . It may be more convenient for Mac and Windows users to use the NetBird UI application that appears in the system tray after installation. In this case, click the Connect button. This will trigger an interactive SSO login process, and a browser window will pop up asking you to sign in with your Google or Microsoft account. If you don't have a NetBird account yet, it will create one for you.
You can also use your organization's email address and identity provider (e.g., Google, Microsoft, or Okta). In this case, NetBird will create a new account for your organization, making you the owner. All your colleagues who belong to the same organization (domain) can join the account with a role and no permissions to manage the network.
If your identity provider has MFA enabled, you will be asked to complete an MFA challenge:
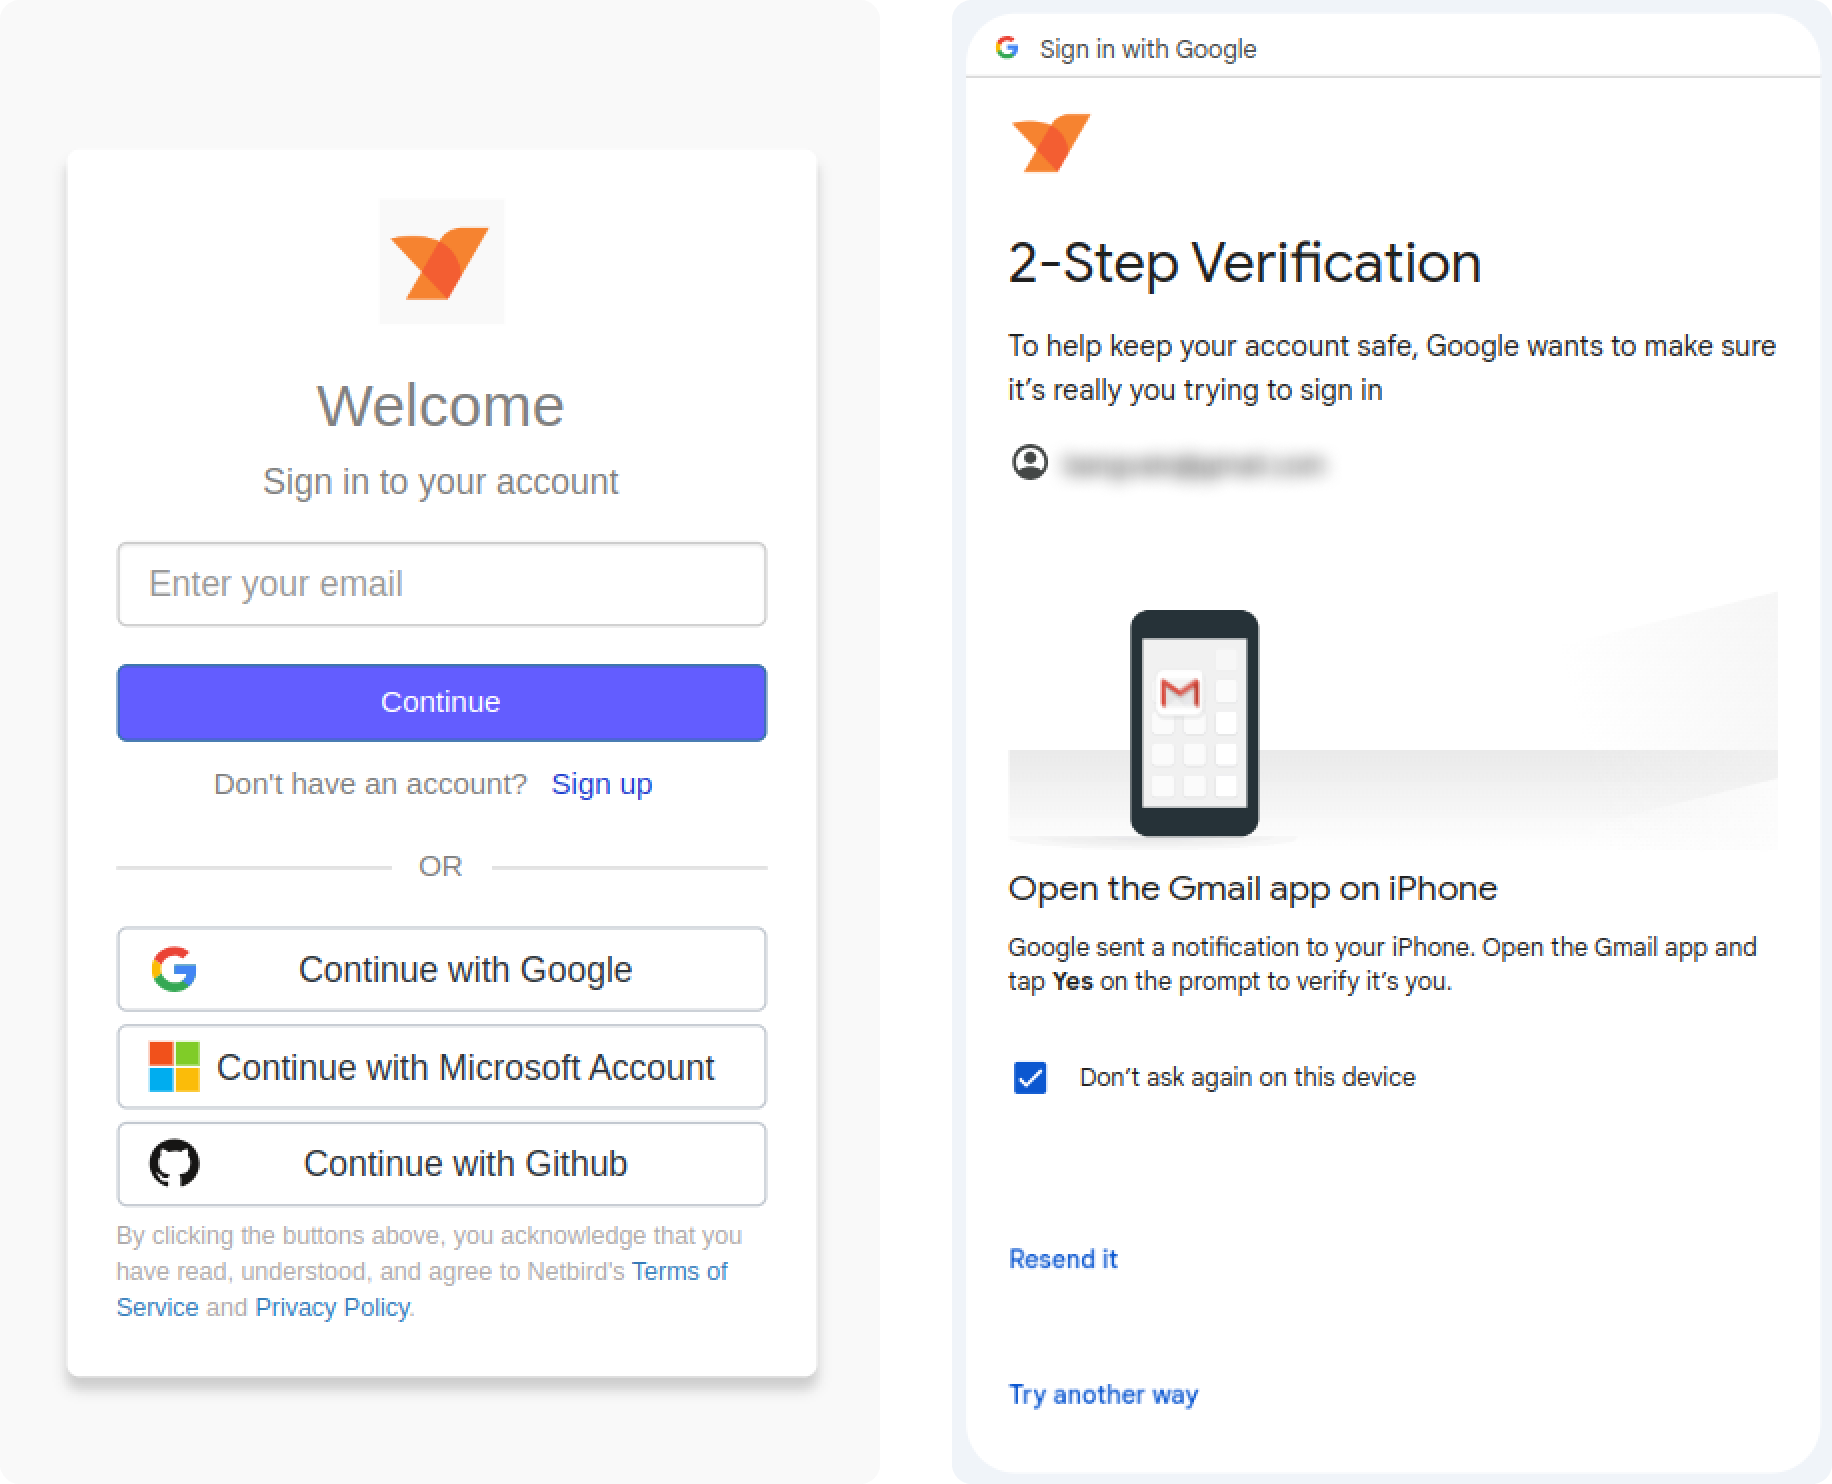
Congratulations! You have created your NetBird network, added your first machine, and passed the first contextual check which is an identity verification with SSO and MFA.
Access the admin panel to manage your network
As an account owner and administrator, you can access the NetBird web-based admin panel at app.netbird.io and manage your network.
The first thing you will see when accessing the admin panel is a peer list. It's a list of all the machines in the network. There is only one, for now: your laptop.

Use setup keys to authenticate containers and servers
The container authentication process differs slightly from the one used with your laptop. As usually there is no real user behind a server or a container, you can use setup keys for authentication instead of the interactive SSO login.
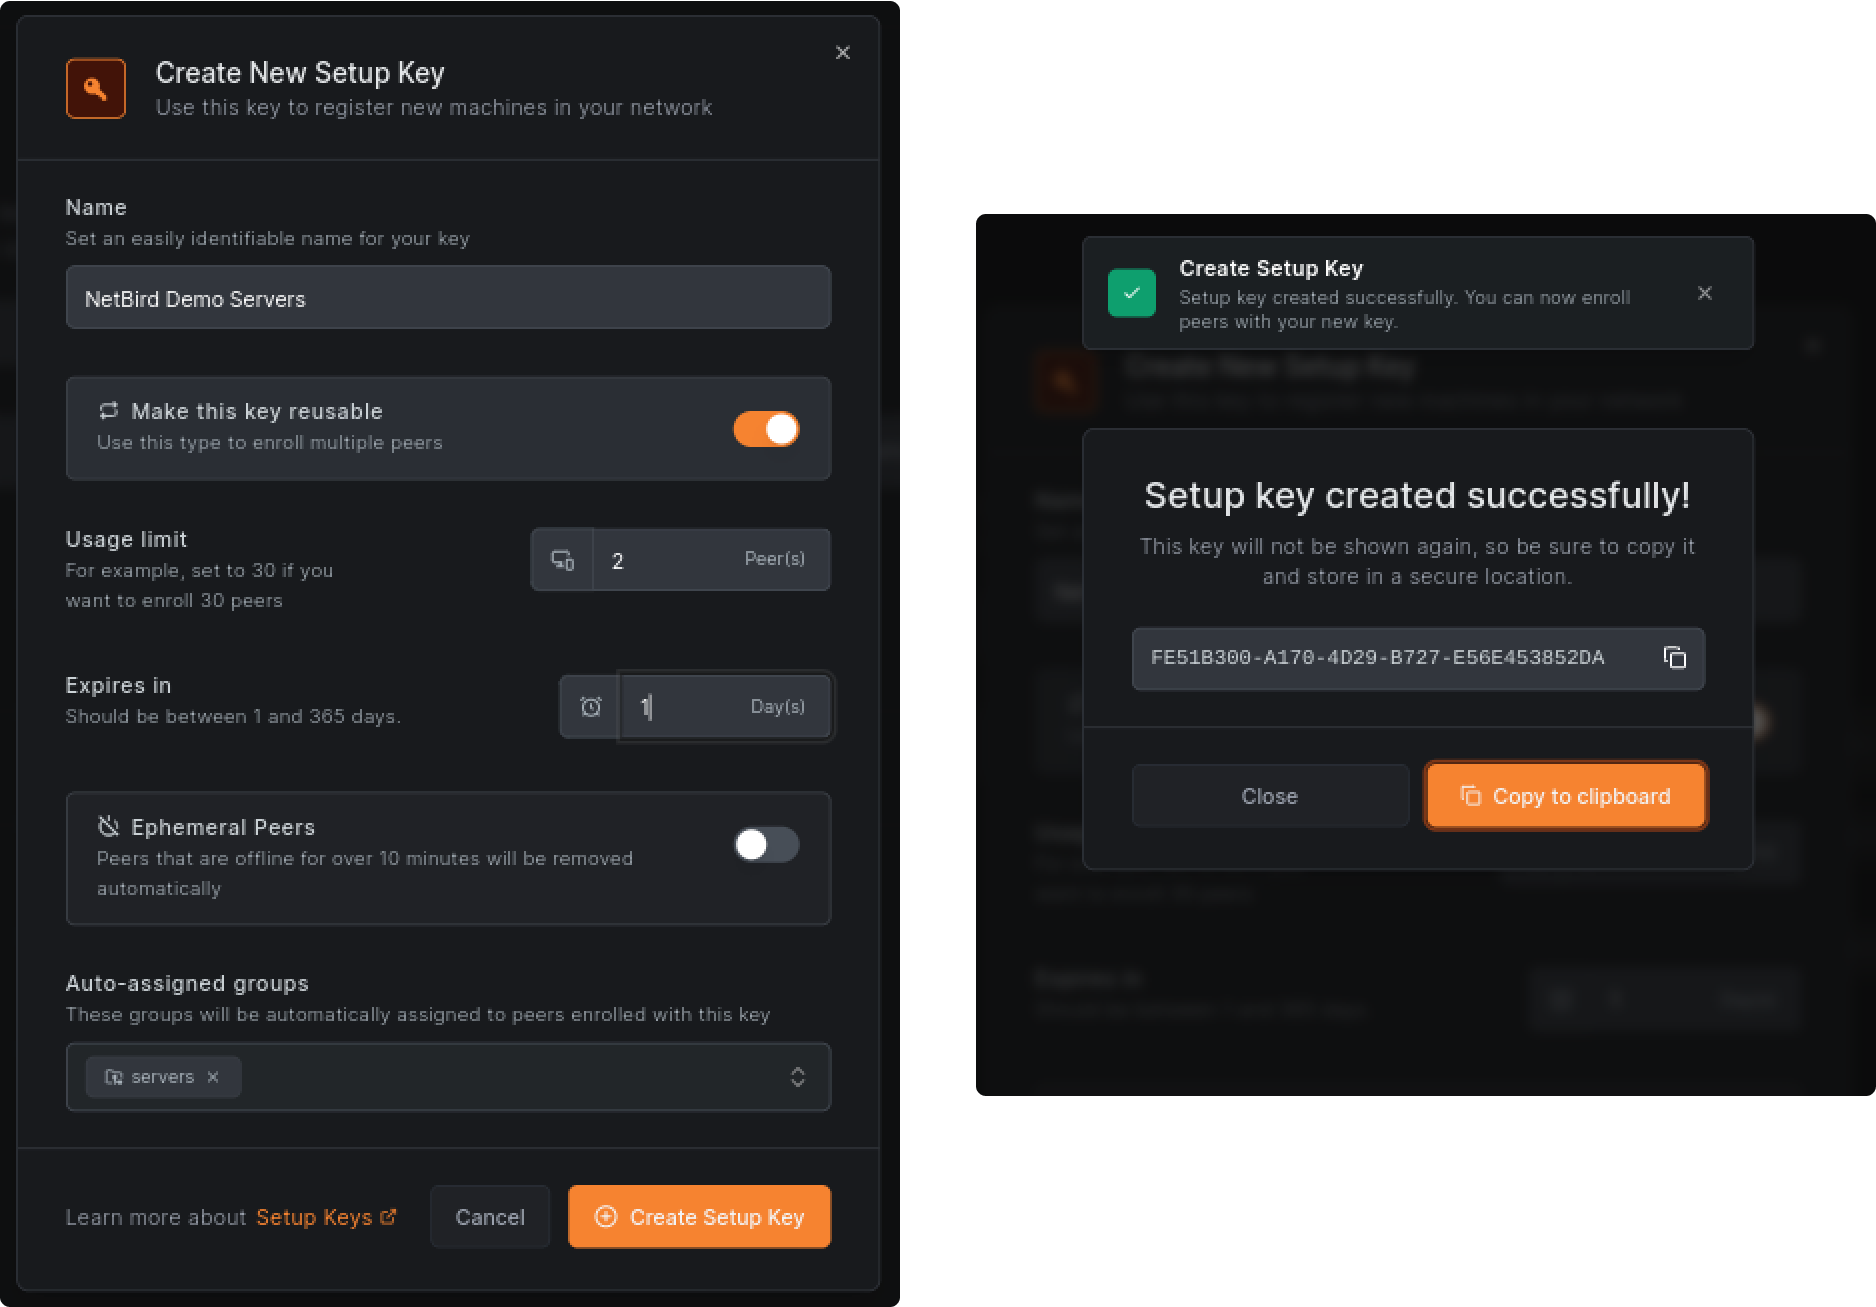
To get the setup keys, go to the admin panel and click the Setup Keys menu and then the Create Setup Key button.
There are a few important security options that you can configure for the setup key. You can limit the key's lifetime by setting an expiration date, after which the key will expire and become unusable. Furthermore, you can limit the key's usage by setting a maximum number of times the key can be used for machines to join the network. This is useful when you know precisely how many machines you plan to add to the network. For this tutorial, a value of two is enough as you will add a Docker container and a virtual machine to the network.
Using this setup key, you can also define groups that will be auto-assigned to all your machines that join the network. Later in this guide, you will learn about groups and how they can help you with network micro-segmentation.
Here is an example of a command that you can use to add a Docker container to the network using the newly generated setup key:
You can now proceed with adding your cloud VM to the network. But before you do that, there are two other security features that you should know about.
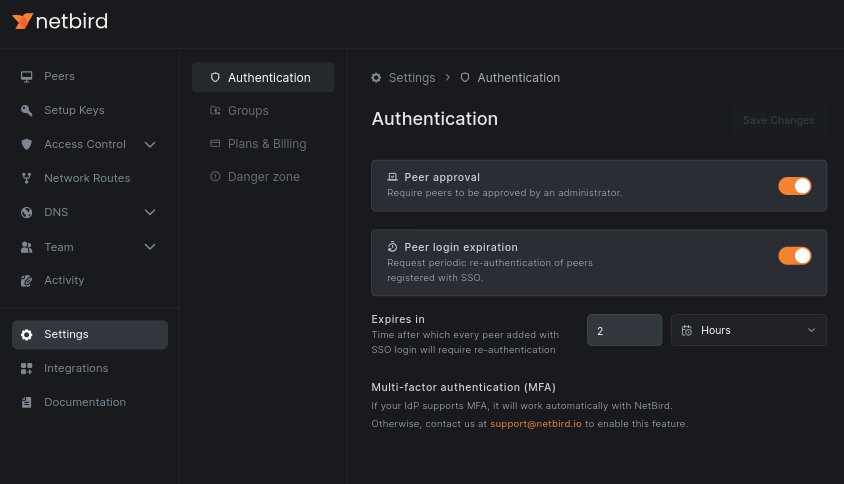
Enforce peer approvals and periodic re-authentication
The peer approval feature requires manual approval from the network administrator before any machine can join the network. It helps keep the network closed to only trusted devices that the company controls. Adding a new machine to the network will appear in the peers list with an Approval required flag.
You can also enable a periodic re-authentication that requires users to authenticate their devices with SSO periodically. Peers that require re-authentication will appear in the list with a Login required flag. The re-authentication interval can be between one hour and 180 days.
To enable these features, go to the Settings menu and then Authentication. Click the Save Changes button to apply the changes.
Approve your cloud VM to join the network
With the setup key in hand and the peer approval feature enabled, you can now add your cloud VM to the network: This script will install NetBird on your Linux server:
After the installation, run the following command to add it to the network:
The server will appear in the peers list with an Approval required flag. You can approve it by clicking the Approve button. You can also use the Pending approvals filter to quickly find all machines pending approval.
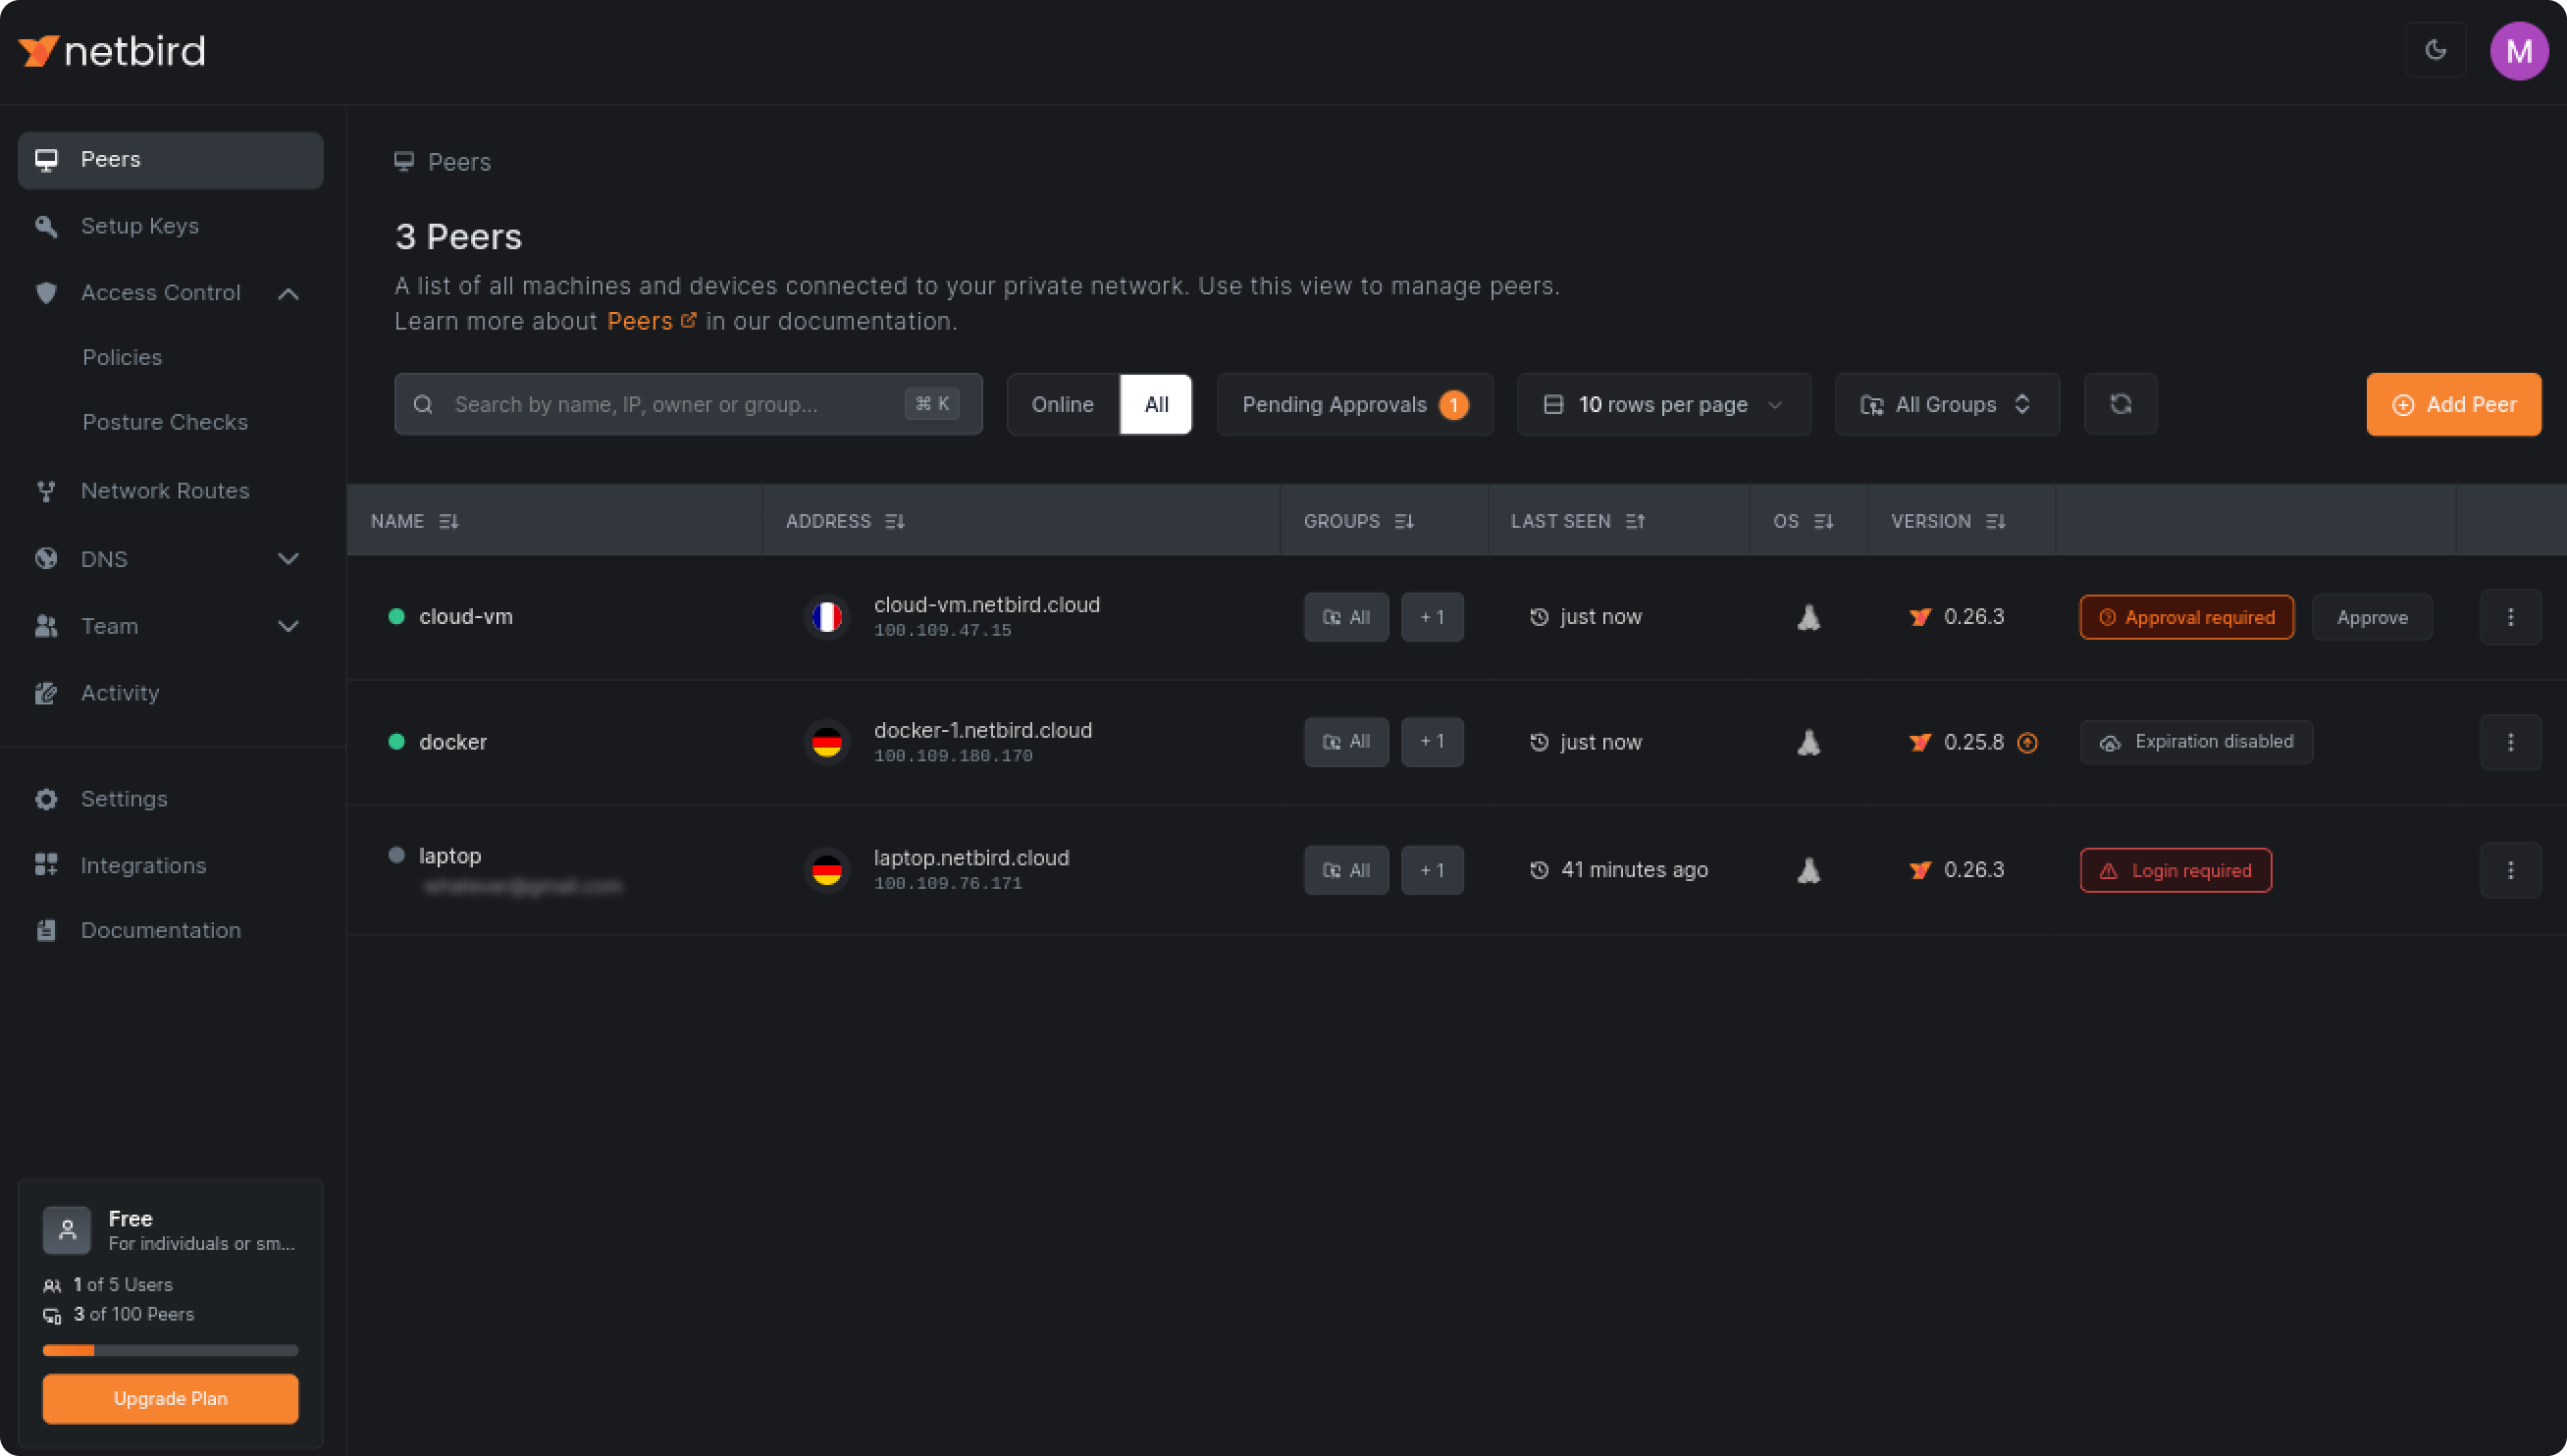
Looking closer at the peers list, you will notice country flags. This is an automatically detected geolocation of the machines. In this example, the cloud VM runs in France, while the Docker container and the laptop are in Germany. Keep this information in mind, as you will use it later in the guide when creating access policies.
Restrict access with groups and policies
To validate that you can access your machines, run a command on your laptop. It will show you a number of machines connected to your laptop. There are two: the Docker container and the cloud VM:
Default policy and group
To restrict and manage network access, NetBird offers two tools: policies and groups. Policies define who can access what, where, when, and how. With groups, you can organize your machines and users into logical groups and then use these groups in policies to define access rules. For instance, to grant remote desktop (RDP) access to a Windows server or SSH access to Linux servers for developers, you can organize your developers and servers into groups, then apply an access policy that specifies the desired protocols and ports.
By default, NetBird creates a group and assigns it to all your machines. A policy allows all machines in the group to access each other. This is a very permissive rule that you should replace with something more restrictive. Go to the Policies sub-menu under the Access Control section and deactivate the policy. After that, when running the command, you will see that the cloud VM and the Docker container are no longer connected:
Create a new access policy
You can now create a new policy allowing access to the cloud VM and your container from your laptop. In the Policies menu, click the Create Policy button and fill in the form with the following values:
- Protocol: TCP
- Source: users
- Destination: servers
- Ports: 80, 443
Choose the direction of the traffic by deselecting the bottom arrow between the source and destination fields.
The and fields are groups. There are no and groups yet; just type these names and NetBird will create them automatically.
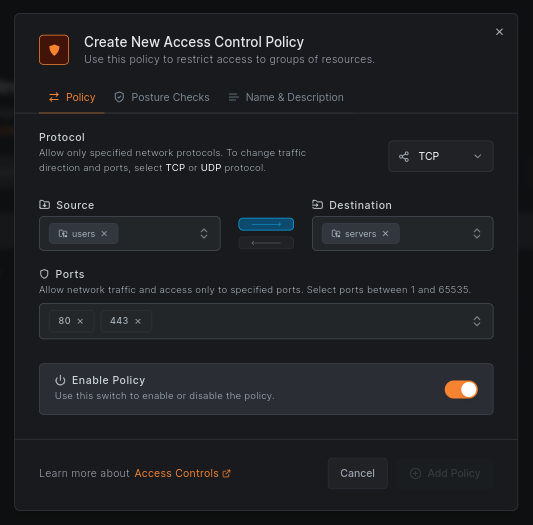
Click on Name & Description and give your policy a name, e.g., Users to Servers HTTP. Click Add Policy to save the policy. You will see it in the list:
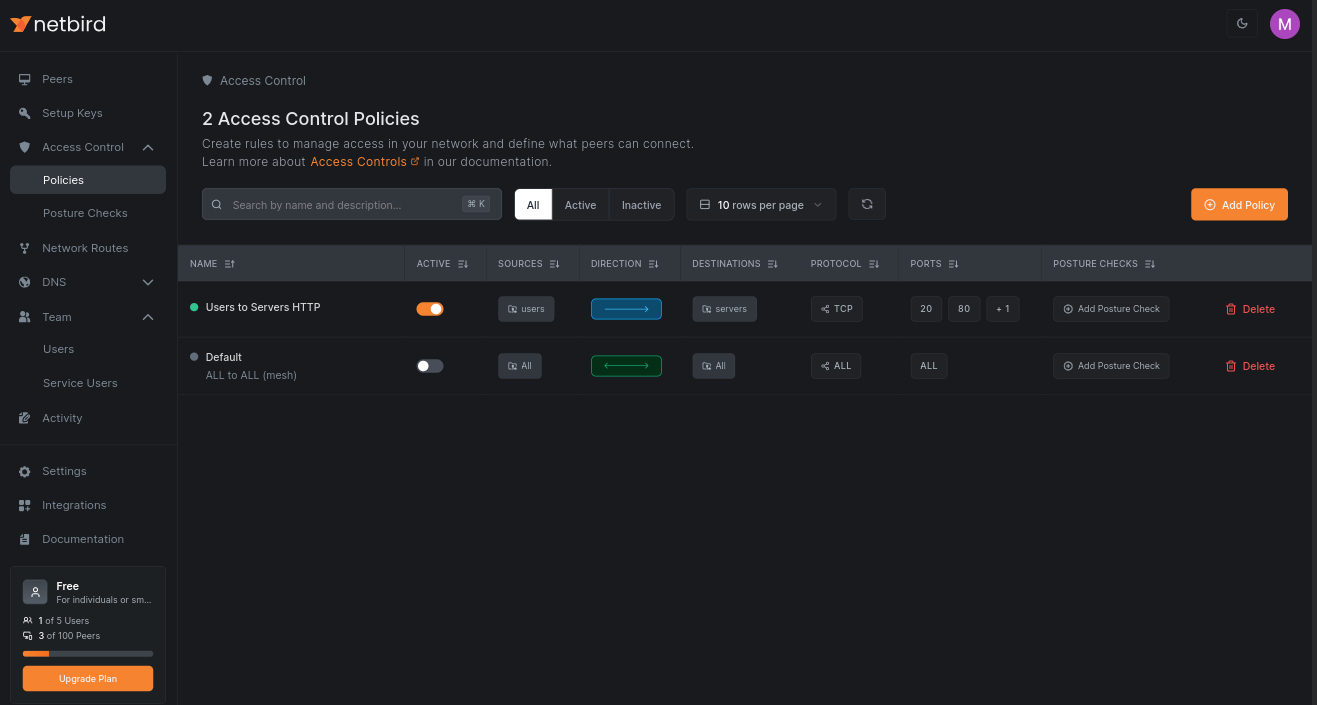
Creating groups and policies in NetBird allows you to achieve network micro-segmentation. You can create as many groups and policies as you need, even just for a single machine or a user, to enable granular access control.
But traffic is still not going through. What is missing?
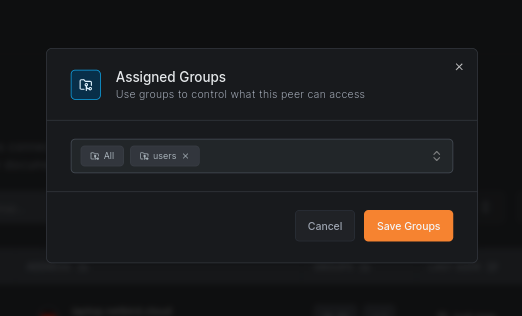
Assign groups to your machines
You need to assign groups to your machines to apply the new policy to them. Go to the Peers menu and click on the groups column in the table for each machine. You will see a popup with a list of all your created groups. Select the group for your laptop and the group for the cloud VM and the Docker container.
It may sound like a time-consuming task to assign groups to machines manually, especially if you have a lot of machines. But you can automate this process with the help of setup keys. When you create a setup key, you can define groups that will be automatically assigned to all machines that join the network using this setup key. To do that, use the Auto-assigned groups field when creating a setup key.
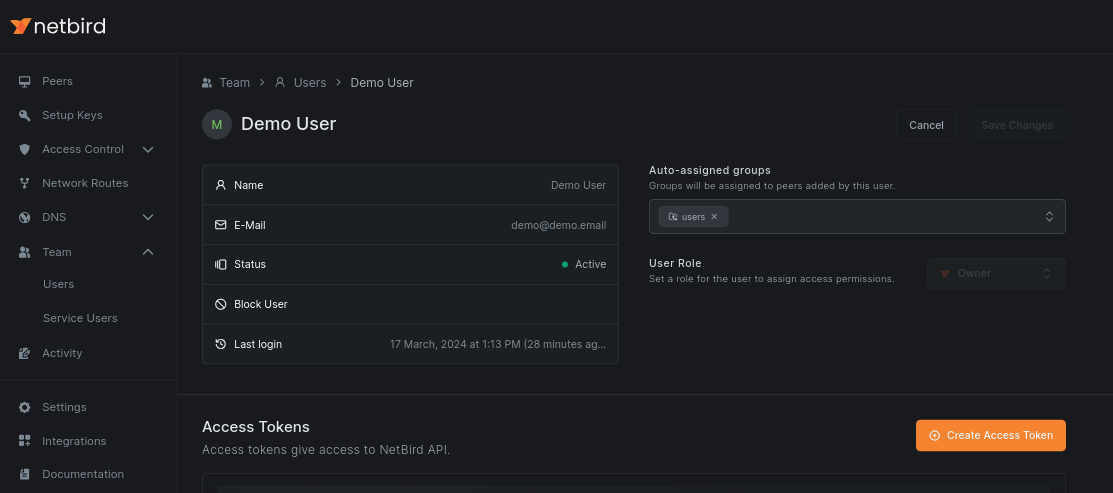
Similarly, you can apply auto-assigned groups to users. You can update users by accessing the Team and then the Users sub-menu:
After assigning groups to your machines, you can run the detailed `netbird status -d' command and see that the connections work now:
On-board and off-board users with IdP sync
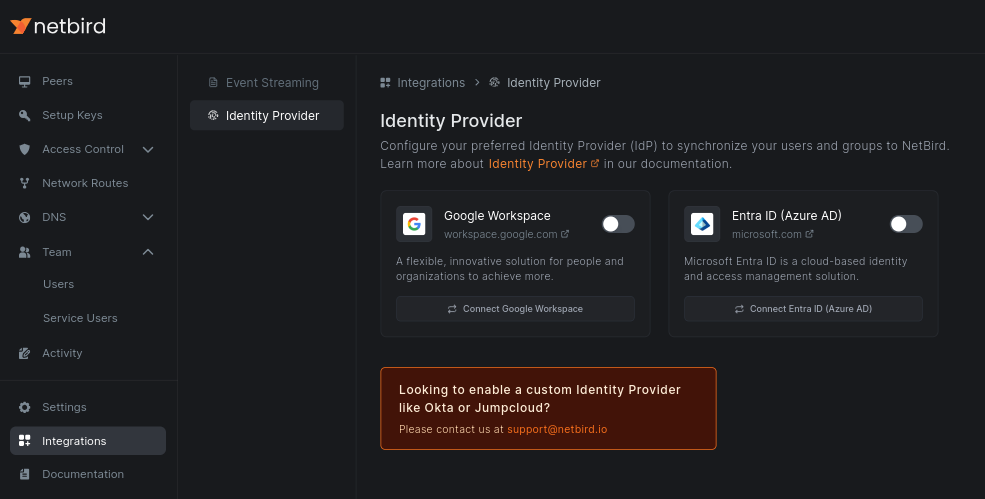
There is another convenient feature that you can use to save time and automate managing your team and accessing your network. NetBird can sync users and groups from your identity provider (IdP) like Okta, Google Workspace, or Microsoft Entra. You can then use these synced groups in policies to define access rules. Additionally, all groups a user belongs to in the IdP will apply to their machines.
There is also a great security benefit of using IdP sync. When you off-board a user from the IdP, NetBird will automatically revoke their access. This is a great way to ensure ex-employees cannot access your network and resources after leaving the company.
You can skip the configuration step for now and continue with it later when you are familiar with the rest of the features. To enable the feature, go to the Integrations menu, then Identity Provider and choose your IdP:
The IdP sync feature is not available in the self-hosted version of NetBird.
Enable device posture and geolocation checks
You have reached the most exciting part of this guide. You will now enable device posture and geolocation checks to restrict access based on the operating system and the location of the machines.
Context posture checks are essential for Zero Trust Networking. They allow you to ensure that only devices that meet your security requirements can access your network and resources, blocking access for those that don't.
Update existing policy with posture checks
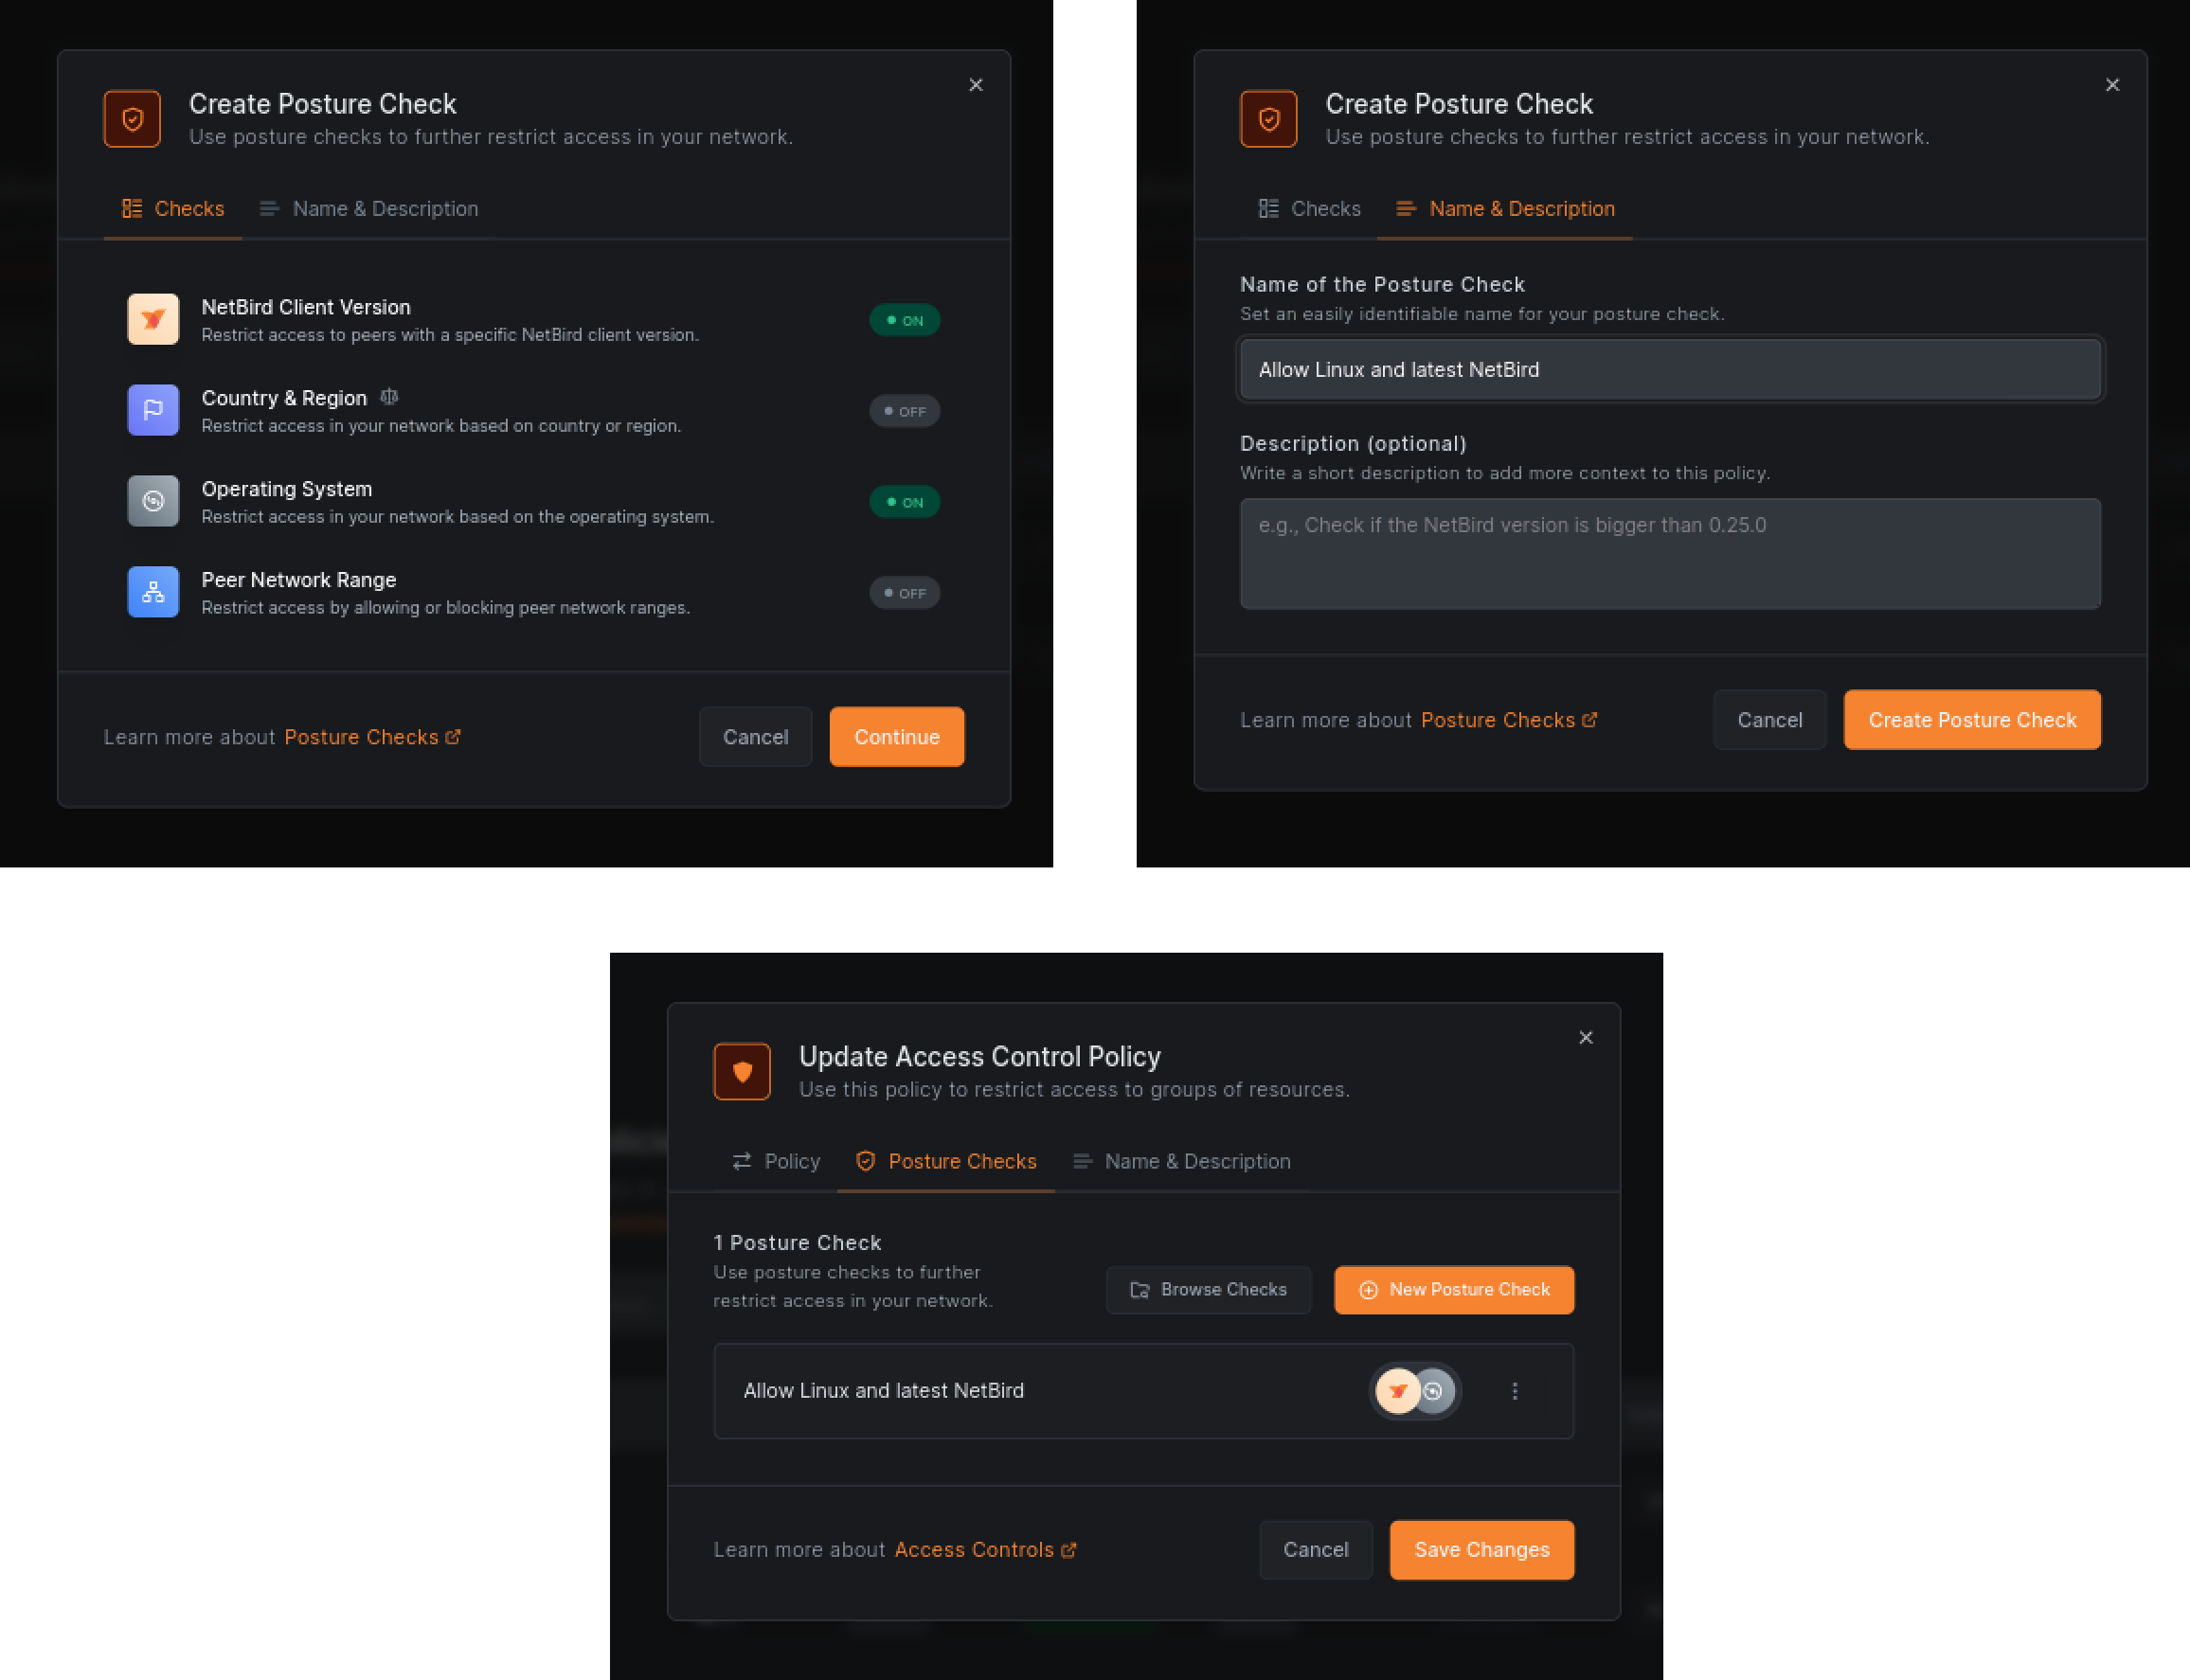
Navigate to the Access Control menu, then Policies, and click on the Users to Servers HTTP policy you created earlier. Click the Posture Checks tab and then the New Posture Check button. You will see a list of available posture checks.
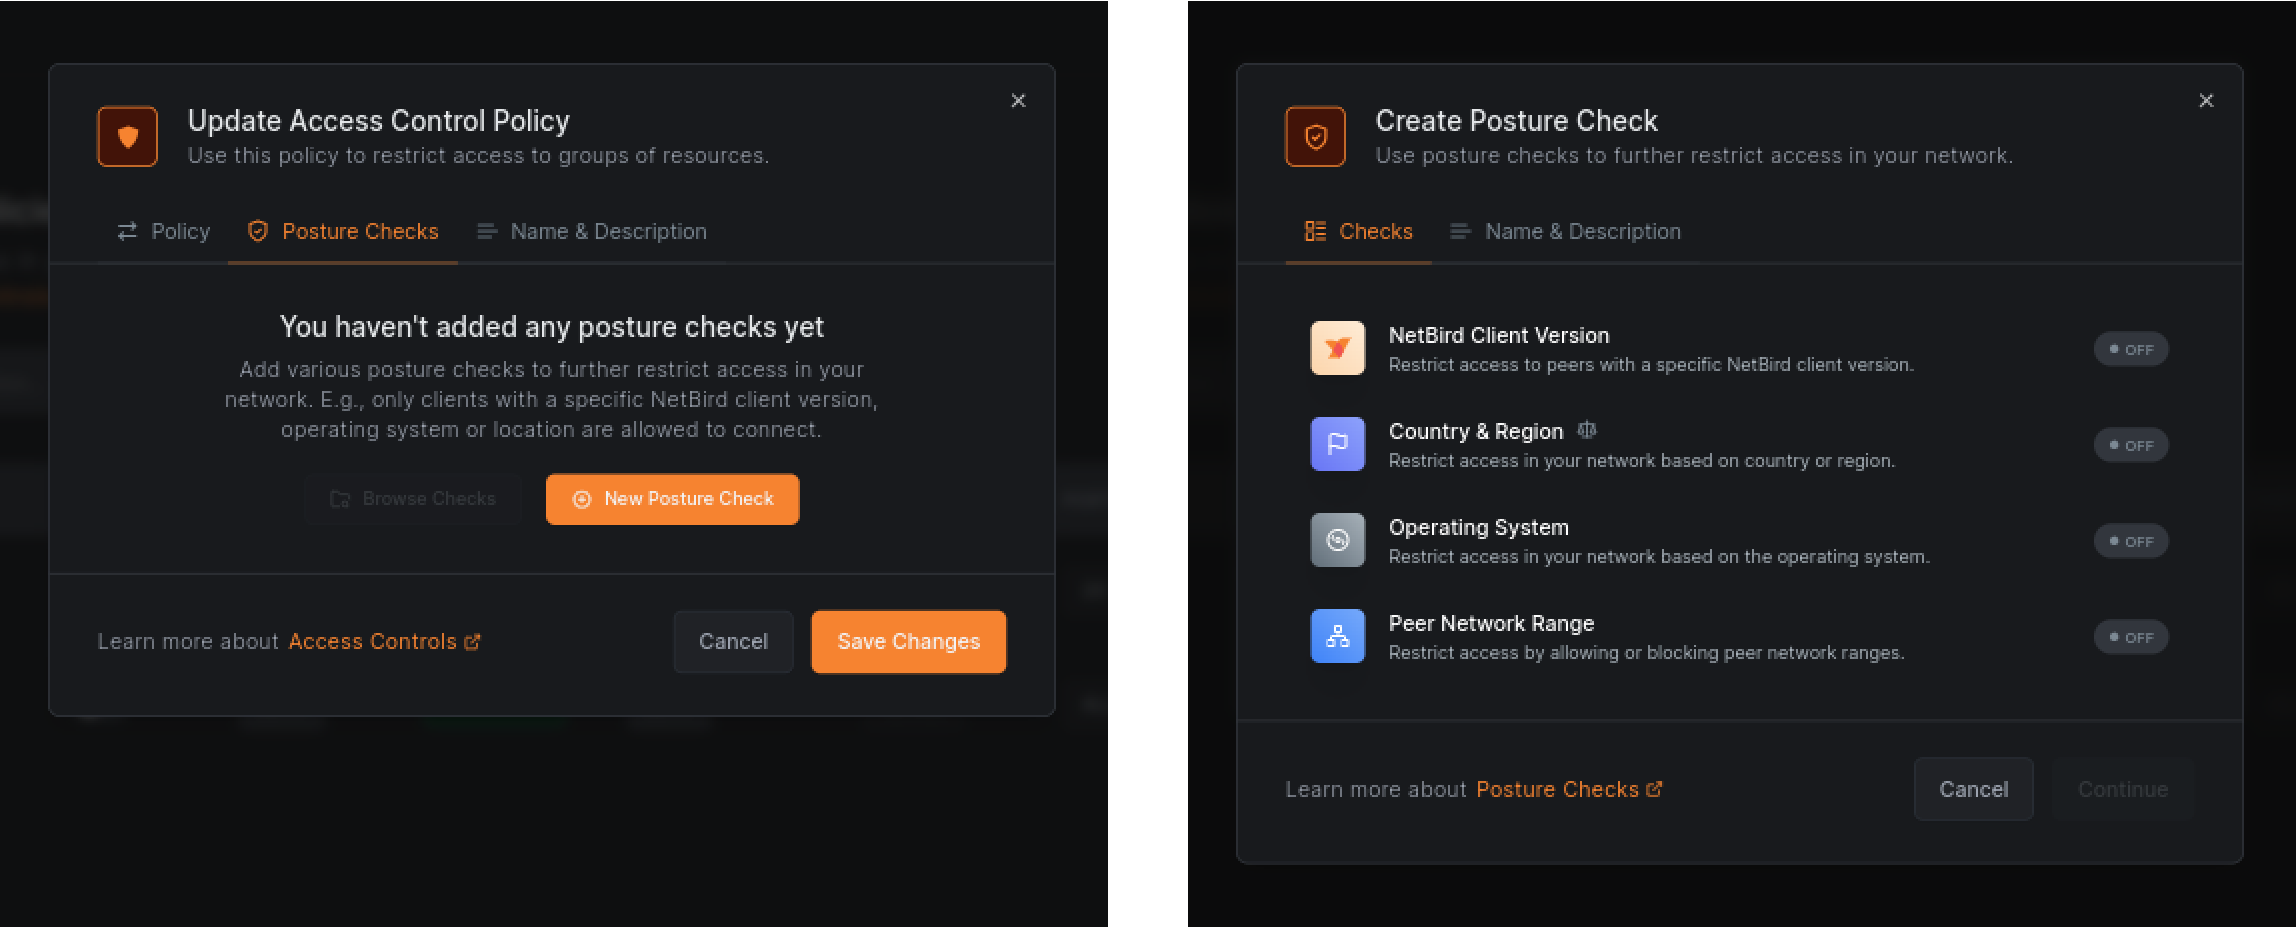
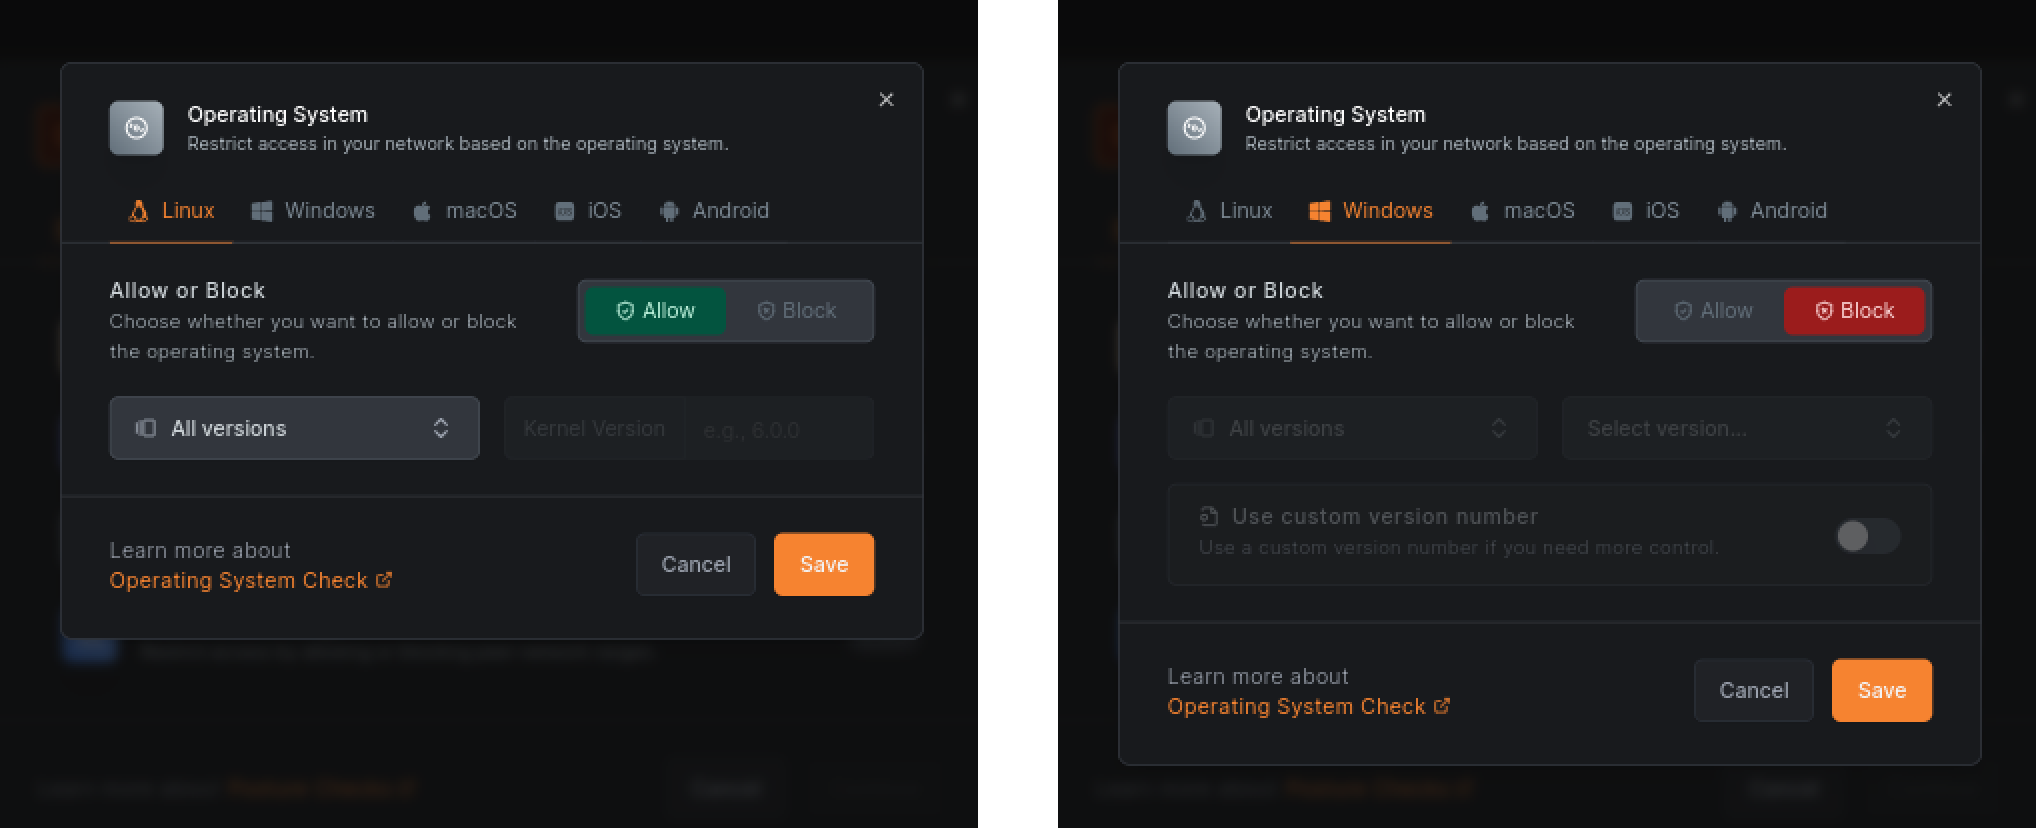
Now, choose the Operating System and set Linux as the allowed one, while blocking others. If your laptop runs macOS, you can set macOS as the allowed one and block others. Click Save:
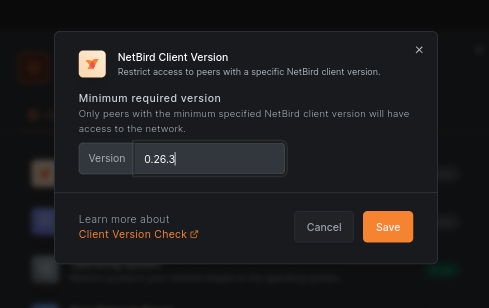
To further restrict access, you can add a posture check for NetBird Client Version. This will ensure that only devices with the recent NetBird agent and all the latest security updates can access your network. Set the Version value to the latest release ( as of this writing). Click Save:
Click Continue and name your check, e.g., Allow Linux and latest NetBird. Click Create Posture Check and then Save Changes to save the policy:
You can now experiment with posture checks by changing the operating system and seeing how the connections behave. Try adding your iPhone or Android devices to the network and see if they can connect. You can update your posture checks in the Posture Checks sub-menu under the Access Control section.
Enable geolocation checks
You can also enable geolocation checks to restrict access to your network based on the location of the machines. This is useful to ensure that machines can access your resources only from specific locations, such as countries or cities.
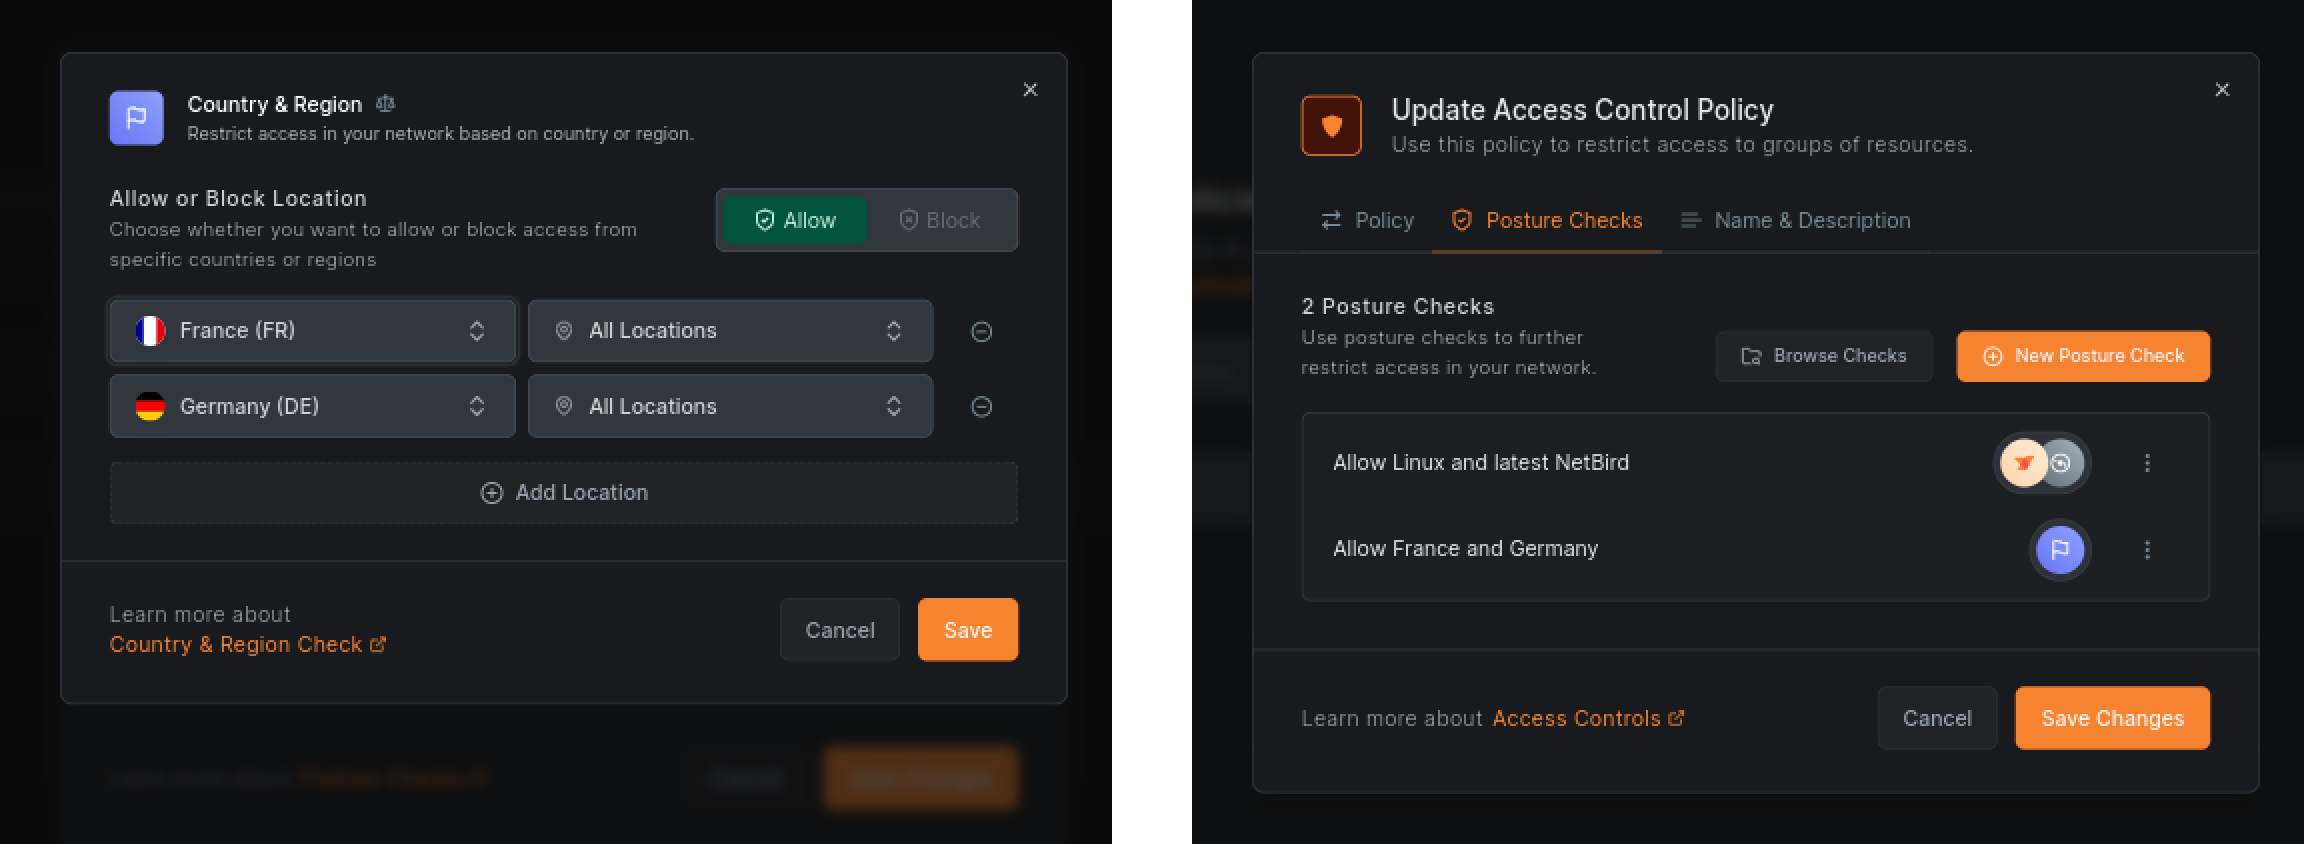
To enable geolocation checks, update your existing policy and add a new check for Country & Region. You can do this similar to the previous steps. Open your policy, then Posture Checks and new Posture Check. Set the allowed country to France and Germany. Save the check and then click Save Changes to save the policy.
You can now experiment with the geolocation checks by changing the location values or running machines in different regions.
The open source self-hosted version of NetBird supports posture and geolocation checks as well. It will automatically download a free geolocation database from MaxMind and use it to detect the location of your machines.
Enable network location check
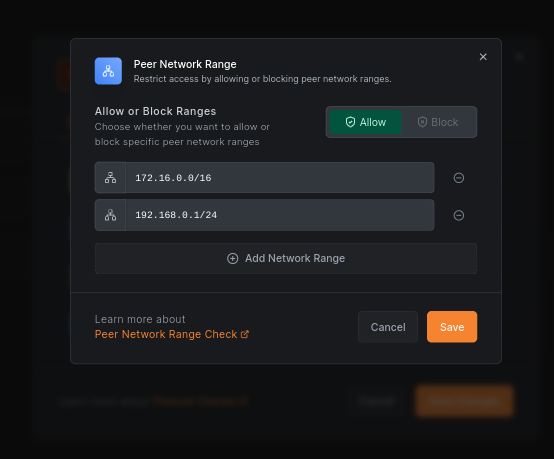
The network location check is another useful contextual check that can help you restrict access. For example, you can allow access to production databases only from the trusted network, such as your office or data center, and block access from others.
To enable the network location check, you can use the Peer Network Range check when updating your policy:
Activity event logging and streaming
Many organizations require Security information and event management (SIEM) solutions to comply with regulations. Network activity event logging and streaming to SIEM is a great way to increase the visibility of your network monitor and react to security events.
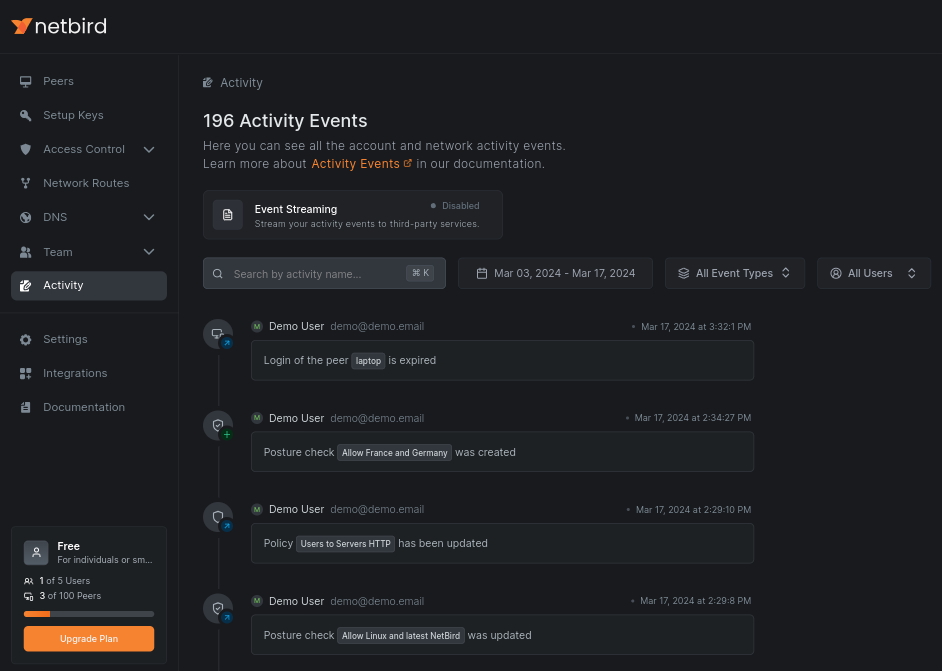
NetBird offers activity event logging and streaming to 3rd party services like Datadog. NetBird records every network configuration event by default.
Click the Activity section of the menu to see the list of all events that have occurred in your network:
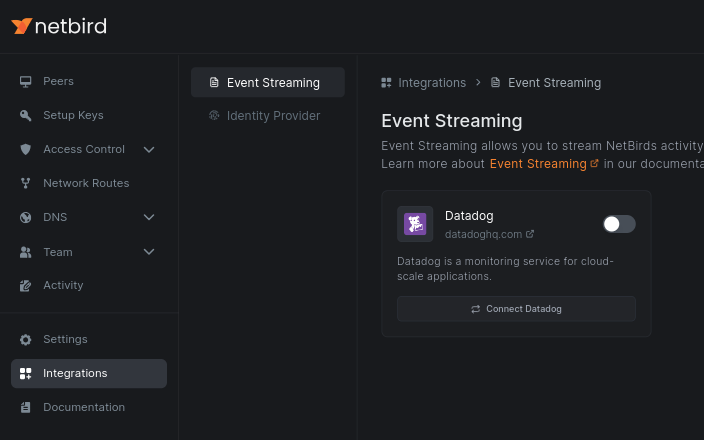
To enable activity event streaming, go to the Integrations menu and then Event Streaming. Choose your preferred provider:
Conclusion
In this article, you've learned the importance of combining multiple contextual checks like identity verification and posture checks to secure corporate private networks. You've also learned how to enable these checks with NetBird, an open-source network security platform.
Finally, you've seen how to use open source technologies to start adopting Zero Trust principles in your private network.